Those of you who follow my blog – all 3 of you! – will know that I start each new year with a build list selected at random by some of my modelling friends.
This year, it looked like this
And I have to say, unlike other years, this time I almost got through the entire pile. The exceptions being the Academy Hornet and the Tamiya Tomcat. The Hercules has been started, but at this stage remains parked with just the fuselage done..
The year started out with the ICM Gladiator MkII, a very enjoyable build , which was also published in Model Airplane International issue 332.
In fact, it was so enjoyable the other Gladiator in my stash got built as well, this time as a MkI, because, who doesn’t love a Gladiator in 1930s markings?
Next, the model I was dreading, the Walrus. This really did end up becoming a slog and I was glad to get it off the bench
After this, respite was sought in the form of the Arma Models 1/48 Hurricane MkIIC Simply the best Hurricane available in 48 scale. I was also pleasantly surprised when it won a Sjlver at ScaleACT
Here’s hoping they bring out a MkI
This was followed by my best build of the year, the WNW Rumpler, Again, a very enjoyable build, so its no surprise my 2025 build list includes a WNW kit
Now, here’s where I went off piste, as instead of grabbing another model off the pile, a tamiya Mosquito was instead pulled from the stag so as to use a rather fetching scheme that had caught my eye in my decal collection. Although now ageing, tamiyas Mossie is still the No 1 in 48 scale, beating the Rervell kit which is let down by a few inaccuracies..
November was a time for catching up with a few modelling mates I hadn’t seen in quite some time at ScaleACT. One of Australia’s premier modelling shows held in Canberra. Upon my return home, the urge to complete a quick build was strong, so out came the Eduard 1/48 Mustang. This really was a fun build , and there definetely will be a couple more Eduard Mustang builds in my future
The final build for the year was the RedRoo Models 1/48 Dragonfly. Not the easiest kit, but I quite like the finished model, although I don’t think its anywhere near my best work
What didn’t get finished
The Hercules, simply because Id had my share of drawn out builds for the year. The fuselage is together, AND I will complete it. Working out how to scratch build some chin mounted flare fairings is also holding me up
The Tomcat and Hornet also were not started , thanks to the distraction of completing a couple of kits that weren’t on the pile. Do I feel guilty about this? Not in the slightest. The Tomcat will get added to next year’s pile , and Ive decided to move the Hornet on as along with a few of my other larger 1/32 scale jets.
Final Thoughts
Eight kits is not bad, especially given 4 of them were 32 scale kits, but I really was hoping to crack double digits. getting an article published was one of my aims this year, and I was chuffed to have ticked that one off. Thanks Brett Green
Whilst I feel I have made some improvement, my biggest downfall remains getting really nice sharp base coats down, without the need to go back and rectify seams and file marks I missed even after inspecting the model following the primer coat. More attention needed here, and my weathering looks shit! My oils just look stippled on rather than properly blended. And Im still really not happy with my photography. (shut up Calum!) despite changing my lighting setup this year. I still feel like Im not turning out consistently high quality models, but inn some ways this is a compromise Im happy to make if it means I get more models finished, rather than just spending a lot of time on each model and getting 3 done for the year.
Thank You All who take the time to read my ramblings on this blog. It really is appreciated.
May you and your families all have a Happy and Safe Festive Season
Next years build list will be announced early in the New Year. One that definitely will be on it is the Airfix 1/48 EE Lightning. This is the subject of next years build off between myself and The Hamfisted Modeller
Seeing as I won this year’s Hurricane Build Off, I get to pick next years!
The Arma Models 1/48 Hurricane was the perfect antidote to the preceding Walrus It is a lovely fitting, well detailed model that builds up very quickly. the surface detail is some of the best out there, Arma using both raised and recessed detail to achieve the multitude of rivets on the wings. The fabric surfaces are not overdone, also being rendered subtly. Heres hoping Arma follow it up with the Mk1.
Construction
Really there’s nothing that I can add here that the many YouTube builds of the kit don’t already cover. The cockpit whilst being a little fiddly to clean up fits perfectly. It even clips into place without the need for any glue, although obviously you do need to use glue. For one thing, your seat will fall out! Talking about the seat, the kit one is a little thick, my boxing came with a lovely resin item, making the kit seat redundant. Same for the exhausts.
Some further thoughts;
Be precise cleaning up all sprue stubs , ensuring all mating surfaces are flat as this determines how much filling you will need to do.
If you are fitting the drop tanks, you can dispense with filling the shell ejection ports as suggested by Arma as the drop tank pylons cover the holes that need filling
Added details,; Obviously this is entirely up to the individual modeller how far he goes with adding all this, but Id suggest, at a minimum, the radiator bracing, upper nav. light, brake lines and rudder control lines although only the prominent brake lines were added to my model. I did open up the slot in the rear armour plate to allow the shoulder harness tail to fit through.
When choosing a particular airframe to model, check such details as round or rectangular rear view mirror, cockpit ventilation slots present or not, glare shields fitted or not and IFF aerials as these details varied greatly from airframe to airframe. As an example the aircraft I modelled had the cockpit ventilation slots fitted and no glare shield whereas other planes in the same Sqn did not have the slots or had the glare shields. Photos are your friend, and for RAF Aircraft, Flickr and the IWM website are the first places I visit. If I have any questions, Britmodeller will usually have the answer.
Finishing
A mate of mine, being Kiwi likes to finish a lot of his WW2 aircraft as aircraft that were flown by NZ pilots. Obviously he can’t do this with modern day subjects as NZ don’t have an Air Force of note anymore ( Sorry all my Kiwi followers, Im assuming you all have the same sense of humour as my mate that requires you to keep on kicking that dead horse until its completely lifeless!!)
So when I found an 87 Sqn, machine that was flown by an Aussie, Sgt B Bawden from Sydney, I decided to take a leaf from Calum’s (rather thin) book. My model was always going to be finished as an 87 Sqn machine so an Aussie pilot was the icing on the cake. Of course there were no available decals for Sgt Bawden’s machine in 1/48 scale meaning the scroll and NIGHT DUTY title would need to be hand painted. The below photo shows the actual machine, and Yes, I keep referring to aircraft as machines because thats how Biggles referred to them !
Researching the 87 Sqn machines revealed they were a Night Intruder Squadron, with overall black aircraft, however as the aircraft were required for daylight missions over the Dieppe beaches to support the landing their top surfaces were hastily painted with brushes in the temperate land scheme which at that stage would have comprised of mixed grey, (not Medium sea grey as Ive used) and dark green.
To achieve this rough look the model was first painted overall black, then a very patchy coat of MR Paint MSG applied by airbrush. Panzer putty was then used to mask off the grey areas and the green applied, this time using Gunze . The demarcations o these aircraft were not standard and differed from machine to machine.
There are some excellent articles on Britmodeller regarding these schemes, well worth a read if you love getting into the minutia of these things. It appears on this particular aircraft, the green covered the black quite well, but the grey, not so much. The plan was to brush tamiya MSG around the codes to emphasise the brush painted nature, but of course, I didn’t have any.
The rest of the national insignia were from the kit decal sheet. Codes came from a generic Xtradecals RAF code sheet. Colours for the wing roundels were Tamiya Flat Red mixed with a bit of Hull Red until a matt with the decals was achieved. The blue was Royal Blue with a few drops of Flat Black.
With regard to the HAD masks, I thought a real shortcoming with the set was no masks for the underside demarcation. Aircraft from this squadron had quite distinctive wavy demarcation on the empennage, and HAD should really have included these on their otherwise very complete mask set as its a unique feature of these schemes
That just left the scroll. The Eagle Strike Night Hurricanes Part 1 sheet contains a red scroll of the right size, but it reads – actually I can’t remember what it reads, but it certainly wasn’t NIGHT DUTY!. Underneath this red decal, the modeller applies a slightly larger white decal which allows the white border and lettering to appear.. Current sources suggest the scroll on Bawden’s aircraft was red with yellow border and lettering.
This was achieved – after a night of thinking about it in my sleep – by cutting out the underlying scroll shape from yellow decal using the Eagle Strike decal as a template. this only took 4 goes!
The lettering on the red scroll was painted out and I found some tiny tiny yellow decal letters to spell out Night Duty, as you can imagine, these were incredibly difficult to apply and I resorted to (untidily) brush painting the I and Y
No one seems sure how long these aircraft stayed in this scheme so I went light with the weathering. Just some black chips around access hatches and wing roots and exhaust stains as evident in the photos. The chipping on the canopy was achieved with the hairspray technique.
The exhausts were painted an orangey colour as the real things were coated with a paint that reduced glare, hence why this particular machine is not fitted with the glare guards./ Feedback from a couple of modelling friends led to me darkening them up as my mates felt they were too orange. They were shaded with a black brown mix, which I feel does make them look better. They are 3D printed by ARMA and have incredible detail. Far and above better than the kit offerings.
Conclusion
The Arma Hurricane is highly recommended. Although Arma market the IIc and IIc Trop as separate boxings, all the IIc boxings come with the parts to make a tropical or Night Fighter, so it doesn’t really matter which boxing you buy unless you are after one of the particular kit schemes. The only thing I wish I had done differently was use a mixed grey rather than the Medium Sea Grey for the camouflage.
This was a thoroughly enjoyable kit and I have already ordered a Sea Hurricane and a IIb . As Molly Meldrum would say ” Do yourself a favour”
Hawker Hurricane IIc 87 Sqn. RAF Charmy Down UK June 1942
When this kit was first announced by HpH, I was immediately on board as the Walrus is a favourite of mine. The only kits in my preferred scale of 48 were the awful SMER and slightly less awful Classic Airframes kits, the superb Airfix kit still being 3 years away. A 32 scale Walrus sounded very epic. It was also very expensive!
I was somewhat dismayed upon arrival of the kit to see the small resin parts had been cast attached to a sheet of resin. Separating the parts was going to require quite a bit of sanding!
Aside from that, the main airframe parts looked to have been cast very cleanly and with excellent detail, the fuselage being fully riveted and the flying surfaces being cast in solid pieces with rib detail that mimicked the sturdy construction of the real thing. The bow section had been marred by the rough removal of the casting block at the factory leaving a ragged gap when both fuselage halves were dry fitted together. Instructions were on a CD which I printed out, so as to make them more accessible on the bench. It is handy though to keep the CD handy as you can zoom in on the parts to help identification. Whilst the parts are numbered in the instructions, the actual parts aren’t. Numbers on casting blocks would have helped greatly in assembly. This would have to be one of the most complete kits on the market, with decals , photo etch, masks and even HGW fabric seatbelts all included in the box.
Construction
The first order of business was to straighten the two fuselage halves. Although I had taped them together many years ago to preserve their shape, they had still developed a few warps. These were straightened by the simple expedient of dunking the fuselage halves into boiling water until they naturally returned to their original state.
Construction was able to be commenced straight away, thanks to me having removed most of the resin parts from their backing a few years ago during downtime at work
Much sanding was involved, the parts either being hand held or taped to a small piece of aluminium angle whilst sanded against a sheet of wet and dry taped to a flat surface. My recollection at the time was a few parts got damaged but looking at my work now, far less than I remembered. Yay for me!
The interior is VERY complete, with a full cockpit, radio operators and navigators station included. The only thing missing was the run of control lines along the fuselage, which of course could be added by the modeller. The bell cranks leading off the control column and rudder bar are provided though, ready for you to connect the lines to.
Id suggest adding the side windows first whilst you still have good access . If the resin flash from the window openings is carefully removed, the resin windows should be a push fit once the window opening corners are squared off
To keep the build momentum going an early decision was made to only build the visible items. So into the spares box went the radios, the operators seat, and a few other bits and bobs that would never be seen. The roof trellis was replaced by a piece of plastic card that formed a tab to help align both fuselage halves.
There are side windows which you can see flashes of the navigator’s table through, but that’s about it. Given this, adding the radio sets, and all the other mid fuselage fittings seemed pointless as they would be invisible on the finished model.
So, only the parts around the gunners openings were added, such as spare drum magazines, ribs and floor sections.
Constant dry fits of the fuselage halves ensure they would mate without any of the ribs fouling. There was a bit of filing required, and snipping of various ribs needed throughout this process. All in all, though, everything went fairly well, with the various components locating nicely, apart from the floor which required new slots cut for the ribs to fit into. Tedious but easily achieved by holding the floor up to the ribs, the new positions for slots marked and then cut in.
To help matters, ensure you add the side windows early before any of the other parts and that you glue all the bulkheads to the same side. I didn’t do either of these things and it complicated assembly a little bit. Ensure you get the snuggest fit you can with the main bulkhead against the interior wall. Mine also needed sanding a fair bit to reduce its width.
Once this was in place, 2mm holes were drilled through the depressions HpH had thoughtfully added. K&S stainless steel rod was used. Lines were marked out on the wings to ensure the holes were drilled perpendicular to the fuselage. With as much of the interior as I wanted installed and painted , the fuselage halves were now joined. It was not the best join, with several steps in the keel and one behind the canopy. These were fixed by cracking the join and reglueing the area, one area at a time. This worked quite well with all of the steps being eradicated.
The entire seam required filling with super glue and repeated rounds of sanding and priming to remove all trace of the seam. The main area being the top of the fuselage between the rear gunners area and the cockpit. The area immediately behind the cockpit required its raised detail reinstating with plastic strip as my judicious sanding had eliminated it. The aforementioned tab of thick plastic card under the roof join ensuring that seam didn’t crack open with all the required sanding.
A spot primer coat of Mr Surfacer was then applied and the rivets reinstated with a Rosie Riveter riveting tool.
Although the holes for the wing spar were drilled where HPH indicated. Looking at the model in plan view revealed the wire was not exactly at 90 degrees to the fuselage centre line. Redrilling it would have caused a loss of the structural integrity I was hoping for, so it was left as is, my thinking being the matching hole in the wing could be drilled at an angle to compensate.
Next on the list was the fitting of the engine nacelle. HpH providing a helpful jig to aid in its alignment
HpH provide dimples for where the strut location holes need to be drilled, however no advice as to what angles the holes should be drilled at. It is left up to the modeller to determine by studying the walkaround photos included in the instructions.
To me, this is one of the areas where HpH could really improve the modellers experience in building their kits. Yes, I know HpH market to the advanced modeller, but this does not absolve HpH from providing detailed instructions to assist in making their kits an enjoyable build. This is a key part of the build. The nacelle provides the base to which the top wing centre section is attached. Getting the struts at the correct angle here is imperative to getting the geometry of the aeroplane correct. Given you are joining a centre section which needs to be square to an offset nacelle, strut placement and angle is critical. No assistance in the form of diagrams, pre drilled holes is offered by HpH though, the photos in the instructions being less than helpful.
Its these kinds of things that don’t make building the kit as enjoyable experience as say for example, a Fisher Models kit. Anyway, the nacelle was fitted. 4 of the 8 struts needed fairing in to the nacelle with Milliput as they were a little short. I was concerned my nacelle was not forward enough, a point that was reinforced later when fitting the propeller as it fouled the wing trailing edge. Oh well!
The next step was to fit the rather large tail unit. The tail fin is a separate part and when test fitted, had quite a large step on one side requiring building up the side of the fin with milliput. Rivets and panel lines were then reinstated . On top of the vertical fin sits the tailplane. In the kit they come as right and left halves, one of mine had a casting flaw that left a mark which would have been incredibly hard to sand away without destroying the rib detail. All the tailplane parts need to be pinned to each other to ensure maximum strength. There was no real difficulty in this stage, just ensure everything is square. Mine looked square, that is until I got the wings on!
There are two bracing struts each side. Dimples for drilling are there on the fuselage, but not the stabilisers. Consequentially, my struts were fitted to the tailplane one rib too close Of course they had been soundly glued and faired in before this was realised. I didn’t pick this up until comparing the model yo photographs of the actual aircraft.So they were painstakingly unglued, holes redrilled and the struts relocated one rib further out. I was starting to not enjoy the Walrus.
Wings were added next, again not as neat a fit as the dry fits suggested. This was purely down to my imprecise drilling, rather than the kit, as dry fits had shown a step and gap free join several times. The upper wing is quite a heavy sizeable assembly when the outer wings are glued to the centre section. 2 part epoxy was chosen for its added strength. Adding the upper wings to the struts took several goes to ensure everything was straight. My top wing has got a slight twist in it due to the top nacelle struts being out of line, thus causing the wing centre section to not be square to the longitudinal axis.
Rather than continue with a blow by blow account detailing all my errors, below is my suggested assembly sequence for anyone else attempting this model.
Ensure all contents of kit match the photo of kit parts
Drill holes for spars in wings and fuselage. Test fit often. Ensure all holes line up and are perpendicular to fuselage centre line. Do not add upper wings to centre section yet.
Add the main bulkhead which will have the wire spar pass through it and drill this.
Assemble fuselage adding as much of the interior as you desire, bearing in mind much of it will be invisible. Ensure canopy will fit.
Pass wire spars through before closing fuselage. It’s a lot easier than afterwards!
Build and add tail unit ensuring everything is square.
Build up engine nacelle as complete unit with lower struts, ensuring by repeated dry fit it will be able to be added later. Use supplied jig to ensure it will be sitting in correct place with struts angled accordingly. Drill holes for the nacelle rigging.
Ensure lower wings are a good fit. Do not attach them yet.
Use the lower wings as a jig to assemble the outer floats but do not attach them at this time. Drill all holes for rigging.
Add the upper nacelle struts to the upper wing centre section, ensuring all your struts are at the correct angle to ensure the centre section remains square to the fuselage centre line. This is vital in ensuring your model will have correct geometry. It will also take lots of trial and error , remember that nacelle is offset, but the centre section needs to remain square. The instructions don’t really illustrate the position of the struts at all well, You want the angled bits of wire plugging into the upper wing. Glue the struts to the nacelle, but not the centre section at this stage
Disassemble the model into subassemblies of fuselage, nacelle and centre section
Add canopy. You will be annoyed to find the supplied masks are all undersized!
You can now paint the fuselage and nacelle and wings and I would go as far as even decaling.
Glue nacelle to fuselage and add rigging.
Add floats to wings, rig the floats then add wings to fuselage.
Add outer wings to centre section, glue struts in place and into wings.
The tailwheel/sea rudder should be added last to save breakage, mine must have snapped about 3 times despite having a steel wire core.
Ah, the benefits of hindsight. I’m sure my build would have gone a lot easier if it had been tackled this way.
By the stage of adding the upper wings I was completely over the model, in fact a couple of times I simply just did not want to sit at the bench.
The decision was made to finish the kit to the bare minimum standard. My initial vision was a battered weatherbeaten aircraft, but at this stage, simply did not have the strength to invest any more time than was needed to get a basic paintjob on the model. For the above reason my model’s weathering is limited to some chipping along the hull using the hairspray technique. It was left at that. The weathering may get revisited at some stage, but probably not.
Paints used were MRP for the top surfaces and white Ensign enamel for the underside Sky Blue. Enamels are not my paint of choice these days, but this sprayed beautifully, but boy did it pong!
Anyone that says lacquers smell worse than enamels are kidding themselves. HpH threw in one last annoyance with their provided canopy masks all being undersized, necessitating new masks being cut from Tamiya tape. I was by now thoroughly over this model and just wanted it off the bench.
Masks for the markings were cut after scanning the decal sheet for the Airfix 1/48 scale kit.
Rigging was fishing line. Holes were drilled right through the upper wing so that the line could be pulled taut, the holes then being filled. It would have been better to drill right through the bottom wing, but this is the kind of model you simply just don’t turn upside down if you can avoid it. It weighs a ton, turning it upside down would be just inviting disaster.
With the rigging done, all that awaited was the wheels being added. This was accomplished without incident, and with that, the Walrus was done.
Conclusion
I have very mixed feelings about the finished model. It is nowhere near my best work. In the haste to get it off the bench, several compromises were made, especially in regard to the finish. Parts such as bomb racks and the machine guns were left off, although photos do show this machine with no gun armament. Despite this, the finished model is a beast, it captures the nature of the Walrus like no other scale can, and looks very impressive in the cabinet. I love it. HpH have made an excellent kit, although some details like landing light and wingtip lights are missing. The model certainly is not fun to build.
Strangely it has not lessened my desire to build the 2 other HpH kits in my stash, these being the Hornet and the Helldiver. What it was responsible for though, was me deciding to sell just about all of my bigger 32 scale kits. hese big, complex builds in my stash, so onto the For Sale pile they went, and I feel a lot better for it. Most of them have already been replaced with the same subjects in 48 scale. My cabinet thanks me.
Now for a lie-down and a Tamiya kit!
Supermarine Walrus MkI 5 Communications Flight. Royal Australian Air Force. New Guinea 1943
I enjoyed my other Gladiator so much, I decided to build the second one in the stash rather than selling it as was the original intention.
Even without considering the “foreign” air forces, such as Sweden or Finland one is spoilt for choice with Gladiator schemes, do you do a silver interwar one, or a camouflaged war RAF example? Then there are the Sea Gladiators as well. My previous model was finished in early war RAF camouflage, so this one would be a silver interwar RAF example.
Construction
To take a different path from the usual “starting with the cockpit”, the rudder, stabiliser and elevator halves were first glued together so that they would have time to properly set up and allow any glue shrinkage to show itself.
With this done, construction returned to following the steps outlined in ICMs instructions, starting with the cockpit. ICM provides parts that when built up result in a reasonably busy looking cockpit.
Of course, the builder can improve on this. In my case I included some simple additions and refinements starting off with wrapping thin copper wire around the spade grip of the very plain looking control column. A brake lever, cam and the brake line were added from scrap plastic and solder.
Map cases were built up out of plastic card, and the slots on the throttle quadrant deepened with a Trumpeter scriber before new throttle levers were added from slivers of plastic card topped with blobs of paint.
Quinta 3D Decals were used to replace the instrument panels and seatbelts. The kit compass pedestal was replaced with a better detailed Quickboost item.
There is an ejector pin in the seatback that needs to be filled and the gunsight requires the clear reticule adding. A punched disc of clear plastic did the job here.
Once the cockpit shelf is added, you really can’t see too much into the depths of the cockpit, even with the cockpit access doors opened. Speaking of shelves, to better replicate the real item, the rear shelf behind the pilot (part C22) was cut down to leave just the central beam. To my eye, this really adds to the open framework look of these 30’s era aircraft.
If you wanted to add detail to the now visible interior behind the pilots seat, frames and a radio could be built up from card and strip. I didn’t bother as my canopy will be open and sitting over the top of the fixed canopy section, so hopefully, that empty space will not be too visible. Finally, the machine gun barrels were cut off, as these would be replaced by brass Master Detail barrels once all painting had been completed.
With the cockpit painted and detailed to my satisfaction, the fuselage halves could now be closed. This was achieved with Tamiya Extra Thin Glue which was liberally applied allowing the excess to ooze out to fill any gaps.
The two halves fit tightly. The lower insert…..not so much. That said the gaps here were minor and were eradicated with CA glue mixed with Mig Ammo Steel metallic pigment. To me the pigment seems to make the CA slightly easier to sand and also has the benefit of colouring the glue so you can see what you are sanding!
The fuselage was then mated to the lower wing assembly with some filler required to blend in the rear join. A result of the soft ICM plastic the wings are alarmingly flexible but adding the struts and top wing will hopefully add some rigidity.
ICM would have you rely on a small diameter plastic peg, inserted into a hole in the fuselage to hold the horizontal stabilisers in place. Given the soft plastic, this would likely end in tears so the pegs were cut off and a suitable diameter brass rod used to provide far more strength. Even more fortuitous is that the real Gladiator has a small gap here between the fuselage and stabiliser. While you have the brass rod out, the tailwheel strut can also be cut and replaced as this is another weak area of the model.
With this done, a complete airframe and top wing sat on my bench awaiting primer. Prior to priming, a No. 77 drill was used to open up all the rigging points as I intended to use EZ line for the rigging. Once all holes were drilled, the struts were cleaned up and attached in their respective positions.
Next up was the engine. Again, ICM have done an excellent job of portraying the Mercury engine. When completed it looks quite busy with its cowling support braces and cooler intake tubes. Quickboost do make one piece air cooler intake tubes that are slightly better detailed however I didn’t use them on my model as the kit ones looked fine to my eyes. The instructions here were slightly confusing, but eventually I worked out you have the option of building the cowling closed or open. If building the closed version, do not add the cylinder heads, parts D14 or exhaust pipe “plates parts D21 and D22.
In a perfect illustration of the pre planning that goes into all my models, it was now that I decided the model would look better rigged with the AIMS PE Bracing wire set rather than the EZ line. The reasoning being that the PE would better represent the flat RAF wires that were used on the real aeroplane. The set was promptly ordered from AIMS in Hungary. Post from Hungary to Australia takes about three weeks.
Painting and Finishing
While waiting for the PE bracing to arrive the model was painted. A primer coat of Mr Surfacer 1500 revealed a few seams, mainly around the lower fuselage insert. These were eventually dealt with, some which required multiple attempts!
The fixed tail surfaces and wheel hubs were then given several light coats of SMS red. This was then masked off and the remaining airframe, tail control surfaces and cowling got the Tamiya LP11 treatment with the model being rubbed down with fine 8000 grit sanding pads between coats.
Once the AIMS rigging arrived a careful perusal of the instructions revealed that AIMS wants you to remove the moulded inspection hatches from the wings so that they can be replaced with PE items. The idea being that the hatches are placed over half the hole drilled for the rigging to make a slot for the PE bracing wires.
Whilst the AIMS instructions provide clear photos of an actual Gladiator to assist you with placing the PE bracing wires, it would have been more useful to have been given precise measurements as to where to drill the holes to accept the wires. Of course, this meant that some of my previously drilled holes were in the wrong spot so these were carefully filled and redrilled all the time dodging previously installed struts.
In the end it all looked a bit messy, so the decision was made to strip the model using Mr Thinner and repaint. This took me back to where I was 3 weeks prior. I would complete far more models each year if I didn’t have to do so much twice or three times to each model!
On the other Gladiator build I had used a 1 Man Army mask set for the stencils and these had really impressed me sot they were put to work again. If you have not seen these sets, they are laser cut masks for not only the national markings, but also all the maintenance stencils. As the surrounding area needs to be taped off to prevent overspray, all these markings were sprayed prior to applying the decals as I did not want to be applying Tamiya tape over decals. SMS Super matt Black was used to spray all the stencils, and then the masks removed.
The decals are by Aerocraft Models. These performed very well, laying down with the aid of Microset and Microsol. However, (there’s always a however!) Aerocraft do not give you handed fuselage Sqn flashes.
Both flashes provided are for the port side fuselage. To apply the flash correctly to the starboard side and have the serial read correctly, the modeller will need to cut the serial from the flash and apply it separately so it is correctly orientated. If applied straight off the sheet without modification your serial on one side will be upside down and back to front.
The front of the stripe is also angled to follow the panel line there, and if not corrected, this will slope the wrong way also. Aerocraft helpfully supply some spare striping in both red and blue, and this was used to reverse the angle of the flash on that side.
A sealing coat of SMS flat varnish was then applied over the whole model. Once dry, panel lines were given a wash using Tamiya dark grey panel line accent with the excess being wiped off using white spirits. Removable panels were outlined with black wash.
I wanted something different from my usual weathered finishes so on this model I went with a cleaner finish.
The exhaust collector ring and exhaust pipes were painted in a mix of MRP Exhaust Colour and SMS Dark Bronze. If using the kit exhaust pipes, they will need their ends drilled out.
The Master Details machine gun barrels were first sprayed with Mr Metal Primer, followed by a coat of Tamiya Semi-Gloss Black with a final coat of Humbrol Gunmetal. This was then gently buffed for about 20 minutes which imparted a lovely metallic sheen.
Rigging
The rigging could now be attended to using the AIMS set. All started well with the crossed cabane wires and inboard wires working as advertised. Turning to the tail, despite drilling the holes as called out in the instructions, I just could not get the AIMS wires to fit. AIMS only provide measurements for the holes in the tailplanes. I really wish they had supplied all measurements.
Of course, a better modeller than me would probably have measured the wires against their respective positions before drilling. As a consequence, the interplane wires were far too short to span between the holes I had drilled so EZ line was used for the rigging. EZ Line was also used for the tailplanes. In all, only the cabane rigging was used from the AIMS set. Other people have used this set without drama, so the inability to get a good result using it was purely my doing.
Final Steps
On the final stretch the wheels were added. Then the model was given another coat of SMS Flat varnish, which dulled the silver nicely, making it look more like doped silver.
The clear parts were then unmasked and the gun barrels added.
The aerial wire on these early machines extended from the tail fin post to a point just behind the canopy where it then split into two wires reaching out to each wing. To portray this, first a length of EZ line was added stretching span wise across the wing. Next, another length was glued to the fin post with its other end intersecting the wing line. Tension was then taken up so that the wing line stretched into a V, meeting the fuselage wire at a point over the spine. A couple of turns around the wing wire were added and then a drop of Superglue was added to the fuselage wire to keep it all in place.
Finally, a length of monofilament thread was run from behind the cockpit up to meet the junction of all these wires. Small dabs of Vallejo matt varnish were brushed over the superglue to remove any shininess and the model was done.
Conclusion
I found the ICM Gladiator an enjoyable build, to the point this is the second one I have completed.
Only a minimum of aftermarket enhancements were added to enhance certain details. In my opinion there is enough detail out of the box to satisfy most modellers, what is there providing an excellent base for further detailing and refining if that’s your thing.
For me, the machine gun barrels, seat belts and instrument panel were “must have” refinements. To this I would add the Quickboost cockpit doors, exhaust pipes, and if doing a MKII, the carburettor intake as “seriously think about getting”.
The AIMS bracing wires did not work FOR ME, but I do think they would enhance the finished model nicely being the proper flat section wire.
Weak points (literally) of the model were the stabiliser and tailwheel mounting points due to the ICM soft plastic.
Gloster Gladiator Mk.I No.72 Sqn Royal Air Force Church Fenton. UK 1937
Rather than just cataloguing my builds I thought the modelling year as a whole should be recorded. This means the events I attended as well as any thoughts I had.
This should provides some good laughs when I re read it some years in the future.
The year started with me asking my friends to pick models at random, that I would then build that year. This is the same system I have used for the last 5 years. That doesn’t stop me from using it every year though. One day I will build ALL the selected kits!
It never really works, I think the most I have built was 4 out of the 6 selected kits
Anyway, here was the pile of kits elected for 2023
Quite the undertaking. Of course posting it on my FB page met with much laughter and banter from my friends.
So, how many of these did I actually build? Well the walker bulldog came the closest before being binned. What is they say about battle plans only lasting until the first contact!
It became apparent I was not ready for modelling just yet. As well as recently retiring from the Ambulance Service, my wife and I had also moved to a different State and new house. Obviously there was a lot more to concentrate on than modelling, so my attention turned to building a new model room.
With this done, the modelling mojo soon returned and in quick succession three Airfix Spitfires made it into the display cabinet. Two of these were left overs from 2022,
I was back in the saddle. There were seven completions for the year, which I’m quite happy with, given my shaky start.
In addition two shows were attended, The NSW Scale Model Show and ScaleACT in Canberra, where I caught up with many modelling friends.
My other hobby is Aviation Photography, and three airshows were attended through the year as well
Hunter Valley Airshow
Classic Fighters Omaka New Zealand
ADF Newcastle Airshow Newcastle NSW
In addition there was a trip to West Australia and a road trip across to Canberra to view an Open day at the Australian War Memorial storage facility
WOW, So quite a busy year then!!
Modelling goals for the year were to start consolidating modelling consumables and tools. This will carry over into 2024, but Im quite happy with progress so far selling off quite a few tools and paints that just weren’t getting used. I bought far too may kits again but this was somewhat countered by selling just about all of my armour and ships kits at show swap and sells.
Hunter Valley Airshow NSWClassic Fighters Omaka NZClassic Fighters Omaka NZClassic Fighters Omaka NZOmaka Aviation Heritage Centre NZOmaka Aviation Heritage Centre NZOmaka Aviation Heritage Centre NZOmaka Aviation Heritage Centre NZOmaka Aviation Heritage Centre NZScone MemorialAirport NSWAWM Technology Centre Treloar ACTAWM Technology Centre Treloar ACTAWM Technology Centre Treloar ACTAWM Technology Centre Treloar ACTAWM Technology Centre Treloar ACTADF Newcastle Airshow 2023 Newcastle NSWADF Newcastle Airshow 2023 Newcastle NSWADF Newcastle Airshow 2023 Newcastle NSW
Goals for next year will be to continue scaling down tools and the various brands of paint and glue used, concentrating on just using tamiya and gunze as the other brands are used up.
My collection of books and magazines will also be markedly downsized after the realisation, once bought, these just end up on the shelf, many of them not being further picked up after that initial read. Id also like to publish an article in one of the magazines.
May you all have a safe and Happy New Year you are celebrating that at this time of year. My sincere Thanks to those of you who have subscribed to the blog.
Now! To get my friends to pick 8 random kits for 2024!!
Weapons; AIMS, Master details barrels and Vector MG131s
I’ve wanted a 1/48 Do217N in the collection since Koster Aero Enterprises bought out their vacform conversion for the Monogram kit way back in the early 2000s. Despite this, the kit and conversion set were sold in The Great Stash Slash of 2004. But, now that doesn’t matter as we have a much nicer kit of this variant that can be built straight from the box
The path that led me to the purchase and building of ICM’s lovely kit was again, one of impulse!
I had recently purchased some of AIMS 1/32 night fighter conversions for the Revell Ju88, which saw me flipping through a book on German night fighters.
A picture of an all black 217 rekindled the earlier enthusiasm with the resultant jump to remembering reading a build article by Andy King on the ICM 217 he did for The Modelling News.
Next minute, I’m on the BNA website and its in my basket! How does this stuff happen??? As a mate and I have repeatedly theorised, impulse buys need to be started straight away, whilst the enthusiasm is hot, or the danger is you will be selling that same kit at a swap and sell 5 years down the track.
So, box was duly opened, my work bench being opportunely clean of current builds.
The size of the aircraft took me by surprise upon opening the box and looking at the one piece wing, the only other ICM kit Ive built being the Do17. One could say the Do217 is to the Do17 as the Super Hornet is to the Classic Hornet
That wing has beautifully engraved crisp panel lines, but these do not carry over to the rest of the kit, the fuselage and some parts like radiators having shallower detail, and also quite textured surfaces that will require a rub down before paint. Two complete engines are included in the kit should you wish to display the model with cowlings off. I saw no need to make the aircraft uglier than it already is, so my nacelles will be closed. A bomb bay is also included as there are parts to allow both opened and closed doors. I dallied with the idea of an open bay to show off the interesting way the doors open, but again, the aircraft looked decidedly pregnant with open doors, plus there is only very rudimentary detail. A fuel cell is included, but no bombs. As my chosen schemes was the all black night fighter, I didn’t think a bomb load would be carried.
Construction Notes
The instructions are a bit vague in places in regard to where some of the cockpit components fit to each other. I found by studying all the parts, there are locations for the pilot seats and floor in the side walls, just that they are not called out very well in the instructions. I also found them a little confusing regarding displaying the engines until I realised you are required to cut the cowlings off if you want to display the engines. After this, it all made sense. This model was being made all closed up, so all steps dealing with the engines were crossed out to avoid mistakes and make things a little clearer.
I used part A15 as a jig to position the cockpit side walls. The cockpit was painted RLM 66 instead of ICMs suggested 02, as I think by 1943 this was the colour of Luftwaffe cockpits. Tamiya XF24 Dark Grey standing in for RLM66 on this occasion. Beware of the decal dials for the instrument panels as they are separate, not a one piece decal. Here was my first introduction to the keenness of ICM decals to fold over themselves, hmmmmm, those wingwalks were going to be fun! Make sure you paint the back of part E12 as it can be seen through the canopy. Ask me how I know!! It has a pin mark that needs to be filled or, do as I did and skin the rear of it with some plastic card. I went to the trouble of adding thin stretched sprue levers to part E31, I didn’t bother with the decal as it will never been seen. Seat belts were added to all seats from Eduard.
Although ICM say you can leave out the bomb bay floor if doing the 217 with closed doors, I decided to add it to provide a little bit of structural support to the fuselage. It a long assembly with minimal surface area for glue and I could see me cracking joins just through picking it up. In the event, I should also have added the sidewalls C18 and 22 for added support as the floor by itself does not really add any strength.
I managed to crack the wing leading edge joint several times, due to the broad chord of the wings coupled with , again minimal glueing area at the leading edge mating surfaces.
Take particular care ensuring you are using the correct parts for the nacelles. I managed to glue the port outer to the starboard inner side, then wondered why the nacelles weren’t a good fit! This was luckily, quickly corrected with a much better fit of the nacelles being achieved, in fact, the fit throughout was above average.
I found the best fit for the wing was to push it as far forward as possible to ensure a tidy fit on the ‘shoulders” This does leave you with a gap to be filled at the rear, but this was easily filled with a shim of plasticard. Before adding the wing, ensure all mating surfaces are free of burrs and flash, which helps in getting the best fit possible. Of course this advice should stem to all facets of assembly, in addition to plenty of dry fitting.
I replaced the peg on the tailwheel yoke part E42 with brass wire, similarly, I drilled and pinned the undercarriage legs for added strength rather than relying on the kits butt joins. ICMs wheels are fine OOB, but I had already purchased the Aires set. I would also suggest Quickboosts resin exhausts if you don’t want to deal with the joins on the kit items.
Painting and Decalling
SMS Camo black was settled upon as the base colour. This is quite a nice warm dirty black, very similar in fact to the colour of Mr Surfacer 1500 black. For highlights I used SMS German grey randomly mottled on the wing centre section through various Uschi van Der Rosten masks. All national insignia save for the swastikas was sprayed on using a montex mask set. The swastikas came from an old Aeromaster sheet.
Im not sure if these machines were painted black at the factory or at maintenance units, but figured either way – rightly or wrongly – the stencilling would not have been reapplied perhaps apart from the wingwalks.
I elected to use the wing walk decals which went on surprisingly well, despite me and long thin decals usually not getting on. Plenty of water was the secret. I was still congratulating myself on this miracle right up to the point where I managed to accidentally touch and remove a strip of the decal! Luckily a very generous modelling friend in the UK sent me some make for painting dotted wingwalks . Thanks Andy
ON reflection, I wished I had painted all the wingwalks as I was left with some silvering.
Some panels were then masked off and MRP black sprayed along panel lines which stood out nicely. Well until the Dullcote was applied. Then everything kind of blended together. Typical!
Exhausts were base coated in SMS dark earth before a layer of hairspray was added, then a mix of NATO brown and NOTO black . This was then chipped off. To be honest, Im not really happy with the results. I think I would have been better off stippling these colours on with some sponge
For the canopy, this is the second model I have used interior canopy masks on. This is a leaf out of Jamie haggo’s book, as he does it on all his models where the canopy interior is visible from the outside, his rationale being painted interior framing looks much better than the shiny plastic visible if you were to follow the normal convention of spraying the interior colour from the outside. And he’s right!
Final Assembly
This comprised of adding the undercarriage doors, all of which located securely. The aerial was added from invisible thread, and the machine gun and cannon barrels added. AIMS cannon barrels were used as, unlike the kit ones, they had open flash suppressors. I didn’t bother drilling out the mg barrels as the diameter was too small. Finally, the piece-de-resistance. the Gaspatch radar array was added. Cutting them away from the supports was heart in mouth stuff, let me tell you! I employed a new scalpel blade plus used a new set of nippers. They were painted in Tamiya dark Iron. If there is one must have Aftermarket accessory for this kit, its these, although looking at my slightly wobbly ones in my photos, this crew will have a hard time finding any Lancasters!
Conclusion
Im really happy to have a black Dornier 217 in the cabinet, and a much better replica than the old KAE and Monogram kit would have provided thanks to the access we now have to things like 3DP radar arrays and brass gun barrels.
The model itself was very enjoyable to build, with no real vices along the way, aside from the somewhat soft plastic, which does not suit structural components like landing gear. Despite this I look forward to building more ICM kits. The Do217N was unloved by its crews, its performance suffering greatly due to its increased armament, and all the added radar gear. But in my cabinet, its loved greatly by me!
Hong Kong Models 1/48 B-25 J comes in a box adorned with some nice art work that is also provided as a poster inside the box. Surface detailing is by way of petite engraved rivets that unfortunately fade away slightly at the fuselage centrelines . Amongst the 249 parts are options for different shaped bullet deflectors for the upper fuselage, a top turret or, if you’re building a Mitchell without a top turret, a blanking plate and separate cheek armour if you want to build an early J that was not fitted with the additional armour. Two different fits of fixed nose guns are also provided.
The kit can be built with flaps, boarding steps and landing gear up or down. Cowl flaps can only be shown in the open position, although Quickboost do make cowlings with closed flaps.
Interior detail is adequate for what will be seen with parts for the bomb aimer’s position, cockpit, top turret and tail gunners position. A bomb bay and bombs are supplied although there is no mid fuselage detailing around the waist gunners stations. If you want to add the ammo feed chutes, they will need to be sourced from an aftermarket set.
I found the fit of all parts excellent, with the tailplane, fins, and nacelles being a push fit. The engineering is spoilt though by the requirement to fit the landing gear early during construction. If I were to do this kit again, I would modify parts F24 and 25 by cutting the pointed ends so that the struts could be added later. Same with the nose gear part E32. I would just cut the end off the drag link, so that it could be fitted later.
Despite me protecting the front leg with a protective sleeve of foam, I still managed to break it off accidentally manhandling the model around the bench. Bras rod was used to replace the broken oleo, which also lent more strength to the part, so not a total loss, but annoying nonetheless
Although the gear locates solidly into deep sockets, the model still rocks slightly on its gear. Possibly due to the soft plastic, perhaps if they had of had the drag links also locate into sockets as well, the model would sit more solidly. The supplied nose weight fits quite cleverly underneath the cockpit to form the tunnel. No other weight is required.
Construction Notes
The Eduard seat belt set only included lap belts, I added the kit PE shoulder belts as I felt they would have been fitted at this late stage of aircraft development.
When building the bomb bay, fit part E45 during final assembly, as otherwise the arms will get broken. The kit bomb fins are rather thick, As you won’t see them, I left them as is, rather than bothering to thin them or replace with PE.
As mentioned above, I would modify the landing struts so that they can be added after painting.
This is one of those kits where you are required to follow the assembly sequences as set out in the instructions. I deviated by adding the cooling flap rings to the cowls which then made inserting the engines harder. The engines as provided were adequate, but can be dressed up if you want to add ignition wiring, etc Alternatively, if your name is Sam Dwyer, and you like to buy every piece of available aftermarket for a particular kit, Quickboost make resin items 😀
The landing light glare guards part EP4 were left off my model as per reference photos I looked at. There are two scoops provided in the kit that locate into shaped cutouts in the cheek armour plates. They are pictured in stage 35, but not called out in the instructions, from memory they were parts E58 and 59.
The kit wheel treads are a bit rubbish, so best replaced with AM ones. If you are replacing the kit gun barrels with brass ones (and why wouldn’t you!) the breech holes will need drilling out slightly, lets take a moment here to recognise HKM for providing separate barrels as this certainly aids painting. Ensure though that the waist guns have been securely glued to their mounts. One could also add PE ring sights as they would certainly be visible from outside.. All the transparencies fit very well, although I have a slight step on one side of my nose, which could have been minimised with more care on my part.
I was unhappy with the kit replication of the fabric ailerons. The elevators and rudders are fine, but the ailerons….not so much. I masked them off, then sprayed several coats of Mr Surfacer 500 primer to build the depressions up before sanding them flat. The rib tapes were simulated with tamiya tape. Although I think they look better than what was provided, Im not sure the effort was really worth it, having seen a few other built examples on the net. They don’t look too bad under paint.
Rivetting along the centre seams of the fuselage will need to be reinstated with a rivet wheel after the seams have been cleaned up. The wings can be left off to aid painting. Dry fits showed they slid easily into position, and more importantly, could also be easily removed. I also left the vertical fins off to aid painting. The fit is that good, so they were not added until very late in the build during final assembly. This makes the model a lot easier to handle. Still didn’t save that nose leg though!!
Painting, Decalling and Weathering
I wanted to try some hairspray chipping on this model, so first a base coat of Alclad Aluminium was laid down over the wings and engine cowlings where most of the chipping would be done. Two thin coats of generic hairspray were then sprayed over this before a coat of AK Real Colours OD was sprayed over the whole model.
AK RC faded OD was then sprayed over the model, leaving the dark OD under the wings and tailplane. Dark yellow was then added to the faded OD and this was further mottled over the upper surfaces of wings, tailplanes and fuselage. Fabric control surfaces were masked off and hit with the faded OD, this time mixed with a decent dollop of tamiya deck tan.
The undersides were then sprayed MRP matt black with the demarcations done freehand. No fading was added to the undersides, I would be relying on washes to give it a faded dusty look.
Once I had the basic colours blocked in, I took to the fronts of the cowlings and upper nacelles with a stiff damp brush slowly chipping away the OD to reveal the underlying silver. This was the first time I had tried hairspray chipping on an aircraft, and I’m not satisfied yet that it’s the best technique for aircraft chipping, certainly for small areas of chipping, Its a technique that definitely needs more practice on my part though.
I do think the silver pencil still offers more control.
WW2 Royal Australian Air Force national markings being fairly simple, lend themselves to being painted, so the roundels, fin flash, codes and serial numbers were scanned into my silhouette software and masks cut using the last of my Oromask.
The two machines on the ASL sheet have had their neutral grey undersides overpainted in black for night intruder operations, One of them, which was my original choice had the black painted hallway up the fuselage and nacelles rather than the normal demarcation line. sadly the one photo I could find of this aircraft , although of poor quality did not seem to show the high black sidesInitially my desire was to do the aircraft with the black undersides that reached midway up the fuselage, however then one photo I could find of this aircraft, although of poor quality seemed to contradict ASK’S drawings, with the fuselage painted with OD down to the usual demarcation. Certainly the tail fins did not look black. Shame, as I quite liked this scheme as drawn.
With the reasoning for my initial choice disproved, I turned to the other subject on the sheet. This in addition to the black undersides, also had nose art , although much later on I found , again. Artscales decals had probably got the background colour on this wrong too.
With the masks cut, a mate suggested that I first print them out on paper to check sizing. This was an excellent idea – thanks Calum – as it brought to light all of the decals were slightly too large according to photos of the actual machine. Subsequently, the masks were reduced size a bit. This is one of the advantages in using masks over decals.
,
Once the masks and decals had been applied another sealing coat of gloss was applied ready for the wash, which in this case was a brownish black shade of oil paint.
Once dry and the excess wiped off, a coat of semi gloss was applied ready for some oil paint weathering, semi gloss being used as the oils seem to blend a bit better over this. The problem was though, the only semi matt I had was a old bottle of low sheen Klear Kote by Alclad. This smelled like it was an enamel product and never really seemed to dry to a hard shell. Picking up the model, it remained , not tacky, but not dry over the course of a week until I dullcoted it. Even now, handling the model, my hands do not came away cleanly.
The Alclad went in the bin. This would be about the third Alclad product I have used that has not performed properly. They definitely seem to have a shelf life, well the clears and primers do!
The result of all this was, despite the matt coat, holding the model for any length of time seemed to pull away the matt coat, which led to a very truncated weathering session and my enthusiasm for the project being severely dented. Exhaust stains were sprayed on in thin coats, although looking at them, I wish I had used a darker shade. The pitot tube was replaced with Albion Alloy aluminium tube. On the underside the ADF football aerial was attached with some brass rod to secure it firmly in place. Brass rod was also used to replace the plastic pole aerials as I thought this would provide a stronger base for the EZI line strung between them. Aerial fairleads were also fashioned from brass rod for the tail fins and fuselage, Landing gear doors and actuator struts located securely to the nacelles and nose. Finally, the Karaya barrels were added to the gun positions, and the Eduard wheels glued on One gripe with these. The wheels are marketed as for use on the HKM kit, yet the axle holes required significant enlargement to take the HKM axles. If you are going to market an accessory as for a particular kit, then make it so that it is a drop fit for that kit and does not require modification. Eduard have form for this, especially their wheels. I would not be surprised if these are just their wheels for the Monogram kit, but with new packaging.
Finally, the transparencies were unmasked and to my horror, there was a lot of fluff on the inside. Most of the canopy fluff was removed by way of poking a bent micro brush through the top turret hole. I managed to pry off the nose cap as I had just used PVA.but in removing some overspray with a thinner dampened cotton bud, also managed to remove a swipe of paint off the nose . 50 ammo cans. Naturally I didn’t notice this until I had refilled the nose cap, this time with tamiya glue. Guess this model won’t be making the competition table after all.
Conclusion
I thoroughly enjoyed this build, All errors were of my own making. Lessons for me from this build were I still need to add as more parts like the wingtip lights that form part of the structure before painting, so that they can be properly faired in. My wingtip lights look like the late after thought they are. I also need to take more care with these bomber type aircraft to ensure fuselage openings are better sealed to avoid sanding swarf getting in.
Weak points of the kit though, are the exaggerated fabric effect on the ailerons and the ridiculous engineering that means the landing struts need to be added early in the build. Location points for the aerials and upper turret bullet deflectors also were non existent, which didn’t help with exact placement.
For my money though it leaves the Monogram kit in its dust, as it should. Yes, its twice the price, but in this instance is twice the kit. I will definitely be buying the solid nose strafers when HKM get around to releasing them. If using the ASK decals, do beware they are not the most accurate decals on the market in this case.
Enhancements: Gun barrels replaced with aluminium tube
Decals: Combination of kit decals and painted using Montex masks.
Construction Notes
Eduard’s new series of 190s have been written about in various online reviews as being viceless builds. Whilst they show a marked improvement in engineering, ease of assembly and surface detail over the older kits, I still found a few issues.
Everything in the cockpit is fairly straightforward, although I found the instrument panel has a tenuous and somewhat vague location between the two fuselage halves.
The same with part A32, I found it difficult getting it to seat properly. With the wheel wells, I was initially dubious of Eduards call out to paint them RLM76 rather than the usual RLM02. Perusing Eduard’s instructions for their other 190s showed me Eduard do call out 02 for the earlier marks. The A8/R2 kit is the only model where they suggest 76 wheel wells,
I decided they must know something I don’t! They have done quite significant research into the Rammjager as evidenced by back copies of the info magazine.
I cut the barrels off the inboard guns – to be reattached during final assembly – as they were bound to get knocked off during sanding operations.
Dry fitting the wing to the fuselage revealed a gap on one wing root. Consequently I delayed adding the gun deck and upper cowl parts to the fuselage so as to allow me to push the fuselage half out to meet the wing and reduce the gap. Great in theory, but I think doing that just created another problem for myself.
With the airframe together, one wing looked to have greater dihedral than the other. The wing root join was broken by way of using tamiya extra thin to rehydrate the join, then a shim added to reduce the dihedral. This seemed to fix the problem, or so I thought!
I should know better. Fiddling with wing roots like this just seems to muck with the geometry. Probably would have been better to add a sprue spreader under the cockpit. There are 2 more Eduard 190s in the stash, so it will be interesting to see if this problem appears on those, or was a construction fault on my part.
This aside, the model built up quickly. Filler was used on the centreline seam and the leading edges of the wings only. The tailplanes and gun covers fit perfectly.
Of course, its too much to ask of me for a build to go flawlessly, and so it was again in this case, although problems did not rear their head until well into decalling. Again, an unforced error, falling foul of Eduards decals. Well, thats probably a bit unkind on Eduard. It was me trying a new (to me) technique of removing the carrier film with white spirits. This had gone swimmingly on the wing crosses, then I got cocky. For those not aware of this technique. I refer you to Gary Wickham’s excellent tutorial contained within his superb Tempest build. My mistake was I left the white spirits on the swastika and chevron for longer than a minute, the result being the white spirits removed the carrier film, the decal AND the underlying paint. AAAGGGGHH
Had I mentioned I was really happy with my overall paint job and tight mottling? No, well I was! In all, this was a fairly simple mistake to correct, but it occurred during a stage in my modelling where frustration with this kind of thing was overriding my perseverance, so back in the box it went.
Completing the phantom renewed my enthusiasm to complete the 190, so back out of the box it came. The existing paintjob was stripped using Gunze thinners and now that I had a blank canvas again, was repainted using Mr Colour paints, although my mottling was probably a little tighter on my first attempt.
For the major markings a montex set designed for the tamiya kit was used. This was also not without some problems with recurrent peeling of paint and repeated masking and touch ups required. A couple of months earlier , this would have seen it relegated to the box or the bin, but this time I powered through, even cutting a new chevron and underwing code letter on my silhouette to replace the by now distorted montex masks. Its amazing how little achievements like this can lift your enjoyment for the hobby. Kit decals were used for the Udet emblem on the cowling, on this occasion, the carrier film not being peeled as they had laid down perfectly.
SMS flat was used as the final coat as this is not dead flat but leaves a nice sheen, which can be seen on period photos of Luftwaffe machines, the service life of which – by this stage of the war- could be counted in weeks, even days.
Oils were used on the underside to impart some staining. This technique still eludes me, analysing my attempt on this model has led me to think I need to apply smaller amounts in future. Oils certainly go a long way!
Casting an eye over the completed model, the geometry looks a bit askance to me despite Eduards engineering to ensure the added undercarriage sits at the right angles.. That added shim to the wing perhaps contributing to this, one wingtip still measuring higher.
Im reasonably happy with my efforts on this, more so, that – with this model – I had the perseverance to push through a couple of hurdles that presented themselves. I definitely feel Im back on the horse!
Up until completing this build 2023 had been a horror year for me modelling wise, with several kits started, but none completed.
The bin was the final repository for more than one of those builds that had not satisfied me.
Whether it was my recent retirement, the house move, the time taken setting up a new model room or a combination of all those factors playing with me, I found myself getting easily frustrated with builds that actually weren’t that bad, but to me had been ruined by some silly minor error on my part.
In an effort to reset, I decided to build the model that appeared first on m stash database, the venerable Hasegawa Phantom, even this was not without its setbacks, but this time I persevered through to completion. It may not be my finest work, but at least I have completed a model, which brings my total to 4 so far this year. Four! I built more when I was working full time.
This particular kit is the oldest kit in my stash, having been purchased in 1988 when it first appeared in Australian shops, its been packed, unpacked, placed on shelfs, shoved behind shelves, fallen down the back of shelves several times and the box bears the scars.
Opening the box revealed a fair bit of aftermarket had been purchased for it over the years. Even closer inspection showing I had at some stage made a start on the model, most likely soon after buying it, as that’s how I rolled then. Heady days indeed!
Wheel wells and undercarriage struts bore testament to my early airbrushing efforts where seemingly I blasted everything with thick underthinned paint at about 40 bar!
However what it did show me was my modelling has in fact improved greatly over the intervening years. If like me, you have long disposed of your early canon of work, it can be difficult to determine if you have indeed made great strides in modelling Looking at recent models in the cabinet sometimes only reveals incremental improvement. Looking at your amateurish attempts from 35 years ago certainly brings home the large improvements you have made in your modelling.
Construction Notes
The Aires cockpits are always incredibly detailed but have a reputation for being difficult to fit in just about all cases. That being the case with this one too, although I found it easier than some of their products. That was once I’d worked out what parts of the kit to remove. The instructions being virtually useless in this regard, save for the sage advice of “kit parts will need got be sanded”.
Eventually I worked out from studying the resin parts, the kit sills needed to go. The clue was the sill detail contained on the Aires part.
Still, the bottom of the resin cockpit floor and the top of the kit nose wheel well had to be sanded to within a mm of their life, before the cockpit would sit at the right height. Width wise though, not a lot of sanding needed to be done apart from removing the rudimentary side wall detail from the Hasegawa fuselage halves.
Stout plastic sheet locators were fabricated to hold it in place and the gaps between the sills and plastic fuselage sides filled with Milliput.
The rest of the kit went together remarkably well, minimal gaps at the intakes, a slightly wider gap at the front edge where the underside of the wing joins the nose was shimmed with plastic card which helped to minimise the filling. As the plan was to use FOD guards I could dispense with faffing around adding full intake trunking, although the abrupt end to the intakes trunking as hasegawa have moulded it is not a huge issue in my book, and can be minimised with some creative painting.
I say relatively well. There were complications but these were due to the kit missing a few parts due to the length of time it has been in my stash and the repeated packing and unpacking it has seen with various house moves. Here I have a friend, Ian Bevan who came to my rescue. If you are using the reskit exhausts, be forewarned you need to either shorten the rear of the flat area that forms the bottom of the fuselage halves or cut out openings to accept the extra length of the RESKIT exhaust tubes.
The spine just needed some panels and covers rescribed and she was pretty much ready for paint.
This model was always going to be in the classic cold war scheme – for me anyway- of grey/green/light grey camouflage they wore whilst employed in the strike role.
Gunze paints were used for the topside colours, AK Real Colours Light Aircraft Grey was employed on the underside due to it having a warmer tone, than Gunzes interpretation, which seemed to match my refs better
The Model Alliance decals were no problem. Stencils came from an Extradecals sheet for British Phantom stencils, and being printed by Microscale, also performed well, although Im not sure all the stencils on the sheet were applied to British Phantoms. The Xtradecal sheet was employed as the Hasegawa stencils had shown a propensity to break up when introduced to water.
Gunze gloss had been applied prior and post decal application followed by SMS Flat which gave the required sheen I was looking for. However the edges of all carrier film was still very visible, no silvering, but quite apparent edges. I have read where these lacquer clears can be too thin to hide decal carrier film edges. A coat of Testers Dullcote was applied, which hid all the carrier film, but also led to some frosting. Subsequent coats of SMS flat failed to bring back the sheen I wanted. Semi gloss should have been used in retrospect.
Later analysis showed this was the point where things started to go wrong!
My reference photos of this particular jet, (and here I need to mention Geoff Coughlin’s suburb e-book series) showed the jets from 17 SQN at this particular time to be fairly well looked after, with minimal weathering on top surfaces although the undersides were filthy. The jets at this stage being fairly new in squadron service.
To this end oils were used to impart heavy streaking and fluid loss. Speckling was also heavily employed to show the grime that would have been flicked up from wet runways.
For the loadout, I came across a photo in Double Ugly’s book on British Phantoms that showed a load of 3 MATRA Pods being carried on TERs. Hasegawa TERS from one of their weapon sets would be used, that is, until I screwed up drilling holes in them for brass pins, so Brassin TERS were used instead.
The whole drilling-tiny-holes-and-pinning-stores-to-pylons affair was incredibly frustrating. It didn’t help the hasegawa inboard pylons are an incredibly loose fit to the wing too.. The hypersonic tanks and pylons were trouble free and were a push fit.
With the Matra pods I also have to throw out a thanks to The Hamfisted Modeller for sending me the cut files for the frangible covers on the nose cones. The method is outlined in his build of the Kinetic Harrier
I did ask him to send me some skill too, but sadly , he had run out!
With the canopies, I found the Eduard PE canopy bow fascias just would not fit the canopy profiles. I should have just yanked them off, FGR2s of this era were only fitted with 2 mirrors so the centre one was cut off, Bizarre thing with the rear canopy, it had no hinges moulded on like the pilot canopy, a check of the FG! in the stash revealed that canopy also with no hinges.
Fault by Hasegawa maybe? Its marked as the standard F-4 Sprue, and all other Phantom sprues I have seen have been correctly moulded.
By this stage, as always happens with kits that aren’t going the way I envisaged, I began to take shortcuts and rush things as I really just wanted it off the bench. The next model will be wayyyyy better, right?
Therefore I didn’t bother with the full complement of RBF flags, so with the addition of the LP Ladders, I called it done.
Its not as good as I was hoping for, but Im pleased to have finally built the oldest model in my stash. There is the FG1 to build as well, but first a cheap Hasegawa Phantom will need to be sourced to replenish the parts I took from it to build this kit.
Hopefully Airfix see fit to release this iconic jet in 48 scale. The Hasegawa Phantom series have not aged as well as some of their other kits, the B/N, E, C/D and J all being rendered pretty much obsolete by newer kits from Meng and Zoukie Mura.
However, the Hasegawa kits remain the only Spey engined Phantoms in 48 scale to this day, and are still well sought after. They are still available on the second hand market as are the Revell reboxings for reasonable prices, well, here in Australia anyway.
Finally, Im not one for nostalgia kits or rebuilding kits from my youth, but this kit does have special meaning for me. Decades ago, it was purchased from a stalwart of the Perth modelling scene.,Tim Vickerage who owned a shop in Fremantle of which I forget the name, Modelcraft?
Tim was responsible for introducing me to Iwata airbrushes, Xtracolour paints and the model club scene. Tim sadly is no longer with us, so this build is dedicated to his memory.
Phantom FGR2 17 SQN. Royal Air Force RAF Bruggen Germany 1975
Well, combined with not yet having a bench up and running, and being coerced into visiting the in -laws for Xmas
(turns out five hours drive is STILL too close!) it’s beginning to look like…. my modelling year is done.
Net result? five models, which is actually not that bad for me, given my usual is 5-8 a year. There were a few false starts, although not nearly as many as in previous years. Toward the middle of the year, my wife and I made the decision that we were going to bring forward our retirement and move interstate to a retirement property we had previously purchased. This of course severely curtailed bench activities as we started to get our house ready for market. We are now in the new house but the modelling bench has not yet come back on line.
Anyway, on to the builds. In order of completion.
The year started out with The Eduard Spitfire I had bought The Few double boxing with full intention of building both. The second having opened cowls and gun bays, but that one became the first of the year to fall. Its back in the box and will be revived at some stage
What can I say about the Eduard Spits that has not already been said? Nothing really. Just. Build. One!
This was my second go around with this kit, having attempted it upon its initial release. From memory, that one never reached completion.
The kit was neither as much fun to build, nor as good as I remembered it, but Im happy with the completed model and its been a favourite on line. I must admit Im very chuffed with how the distressed stripes came out. Am I allowed a bit of self congratulations? Yeah, of course I am.:)
It was then the turn of Fly Models 1/32 Hurricane MkIId One of my favourite aircraft in one of my favourite schemes, what’s not to like? Well the whole kit really!
Beautiful surface detail, but not an enjoyable build. Looking at it on the shelf, Im also not totally convinced by SMS paint’s interpretation of Dark earth and Middle stone to be honest.
So, what’s next after two complicated builds? Well, Hell, lets just lurch into a complicated 1/48 jet!!!
Meng’s F-18E Super Hornet was started as a mate was building the Hobby Boss kit. Mercifully, this build stalled a little whilst I waited for some resin that seemed to be taking its sweet time proceeding through the U.S postal system to arrive.
In the meantime I started the Hasegawa 1/48 Ki-44 Tojo, as I needed a quick build. Or slammer build, if you want to stay hip and cool in the new modelling scene
Did I say quick? That fucking camouflage took me two goes!
That done, back to the Super Hornet, which actually was an enjoyable build, or as enjoyable as modern jets can be with all that pylon and stores palaver to go through.
This is pretty much where the packing up of the bench commenced, the F-18 being rushed behind for a point, as we say in the AFL states. Is there any other kind of footy? (No, there’s not, is the correct answer) which I feel is reflected in the completed model.
I almost got the Airfix Spitfire XIV over the line, but moving day arrived first
Somewhere along the way, a Wingsy kits 1/48 109E1 also died .
Far too many kits were added to the stash. On the other hand, a chunk of built models were sold, so there’s a bit of room in the cabinet.
The first job in the New Year will be to get the bench up and running. There is a decent sized room in our new place that will become mine. Planning has already started, the first step being to sort out modelling accessories and tools I no longer use or cant see me having a use for any more.
I was a little horrified at just how much modelling stuff I had to pack up, as a result my number one goal for next year will be sorting and, where necessary culling them . The decals have already been done, with the surplus decals going up on FB over the next couple of weeks.
Aside from that.
Make More Models.
Im on a transition to retirement, which means 11 months of Long Service Leave. Thanks Ambulance Victoria! Thats gotta get me through about……oh, an eighth of the stash! I’d also like to fiddle around with this site a bit more.
Thanks for looking at at my ramblings throughout the year, both here and the FB page
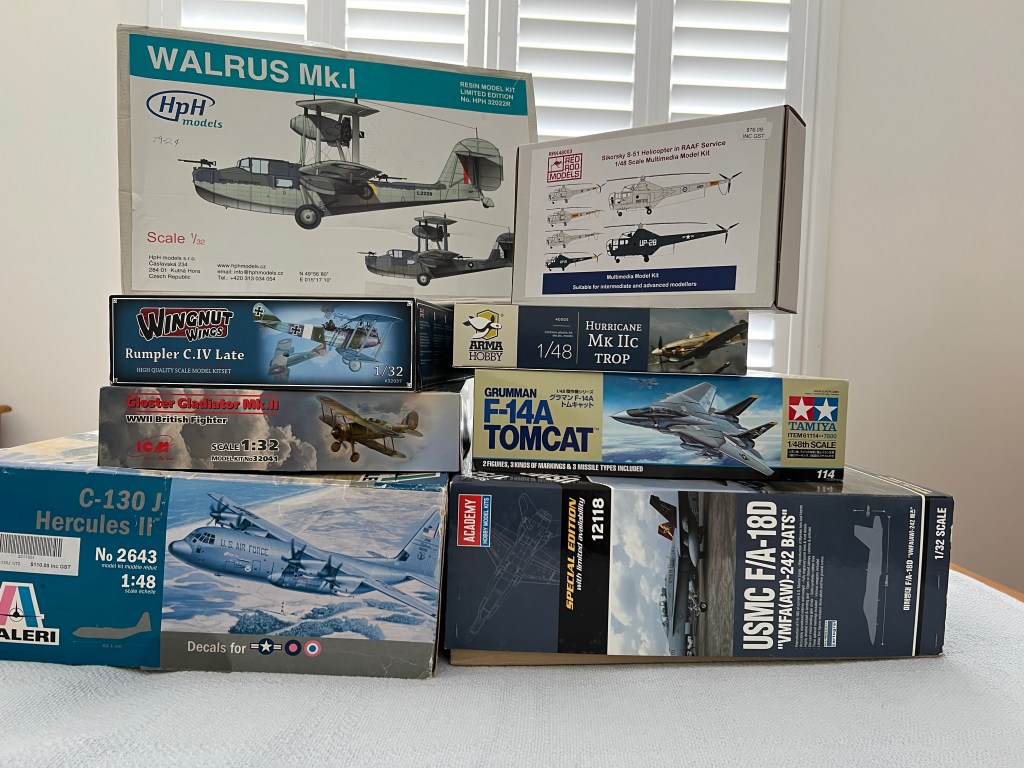

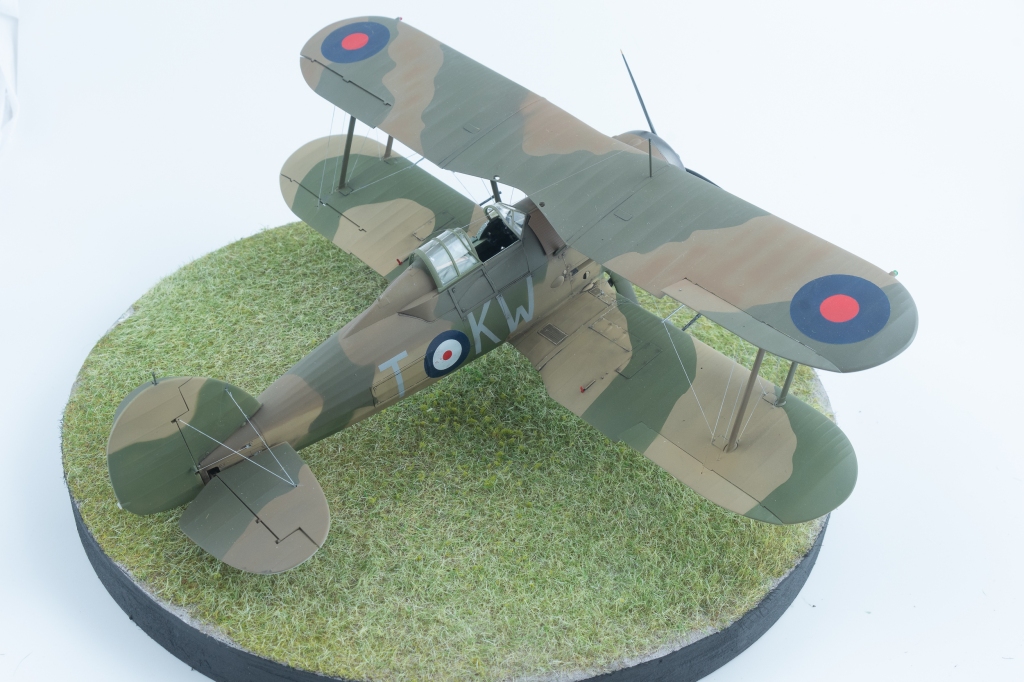

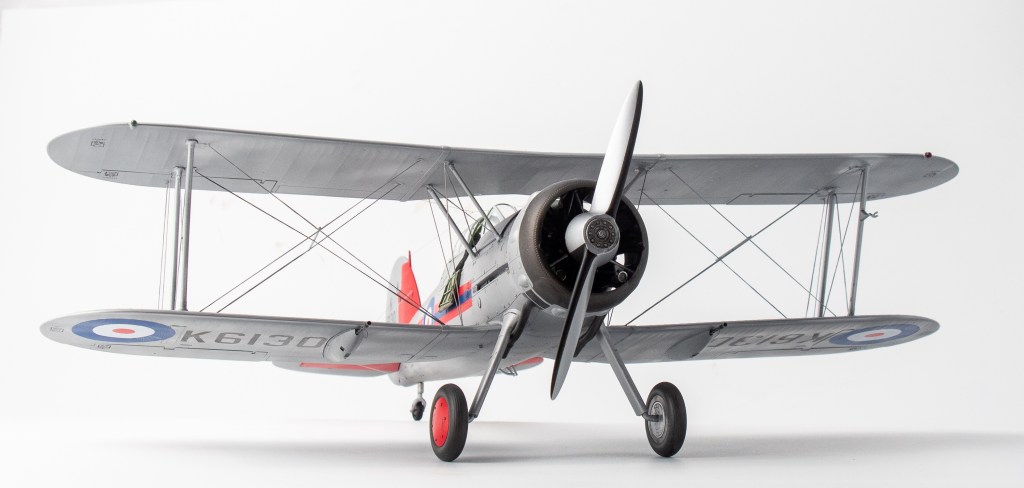


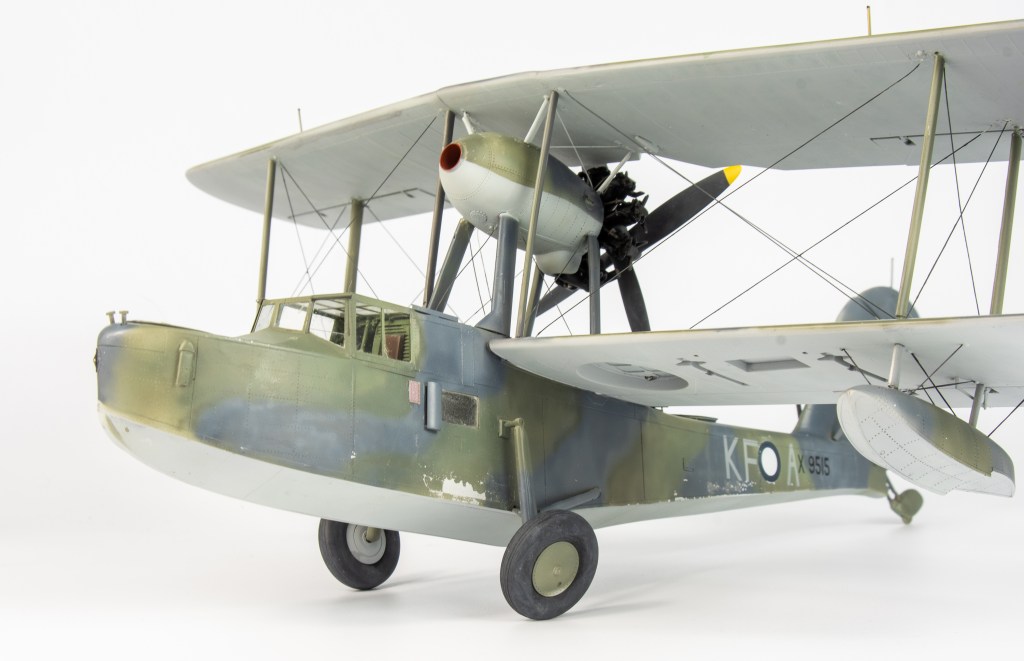
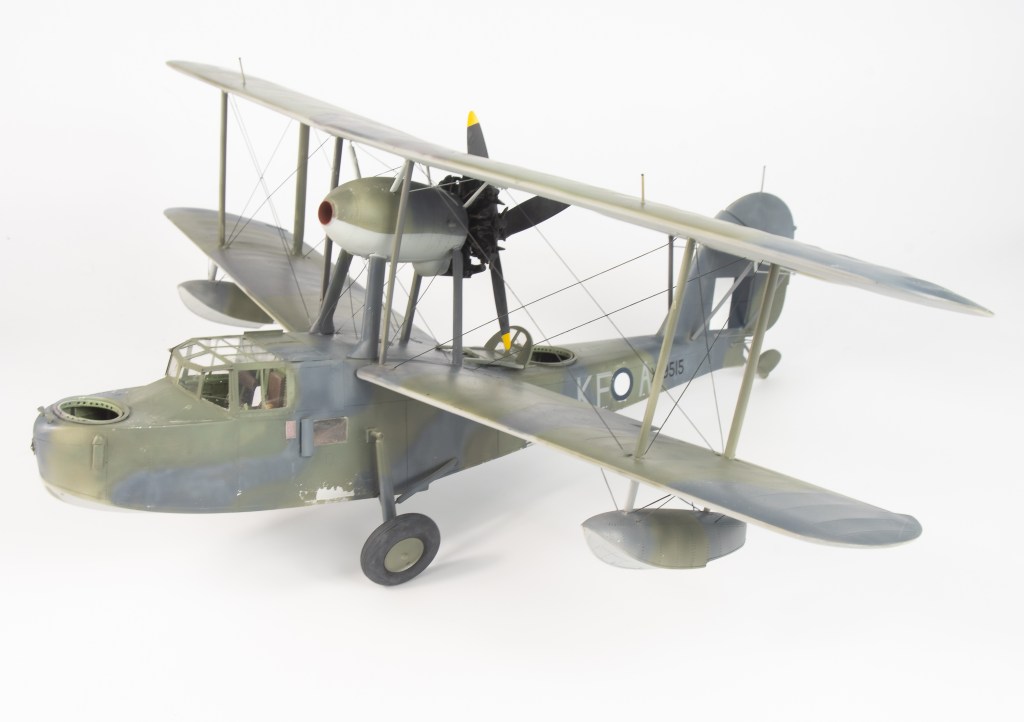


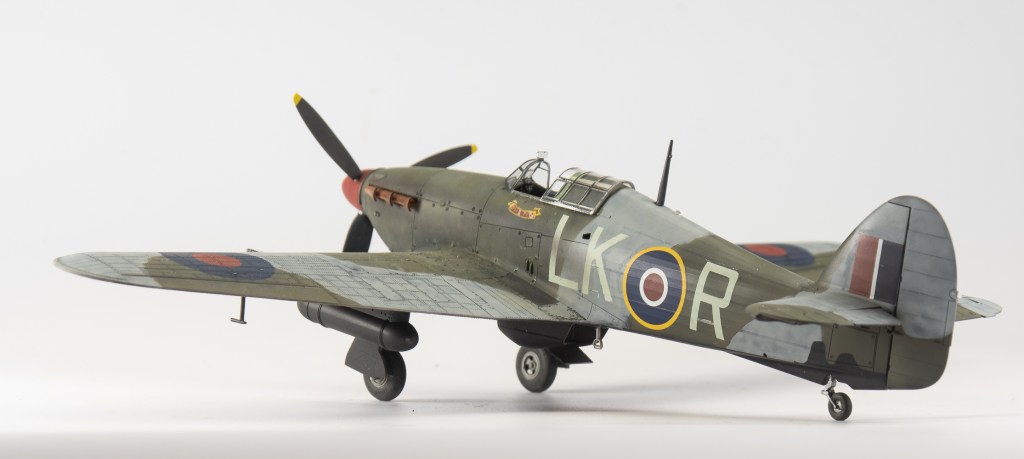
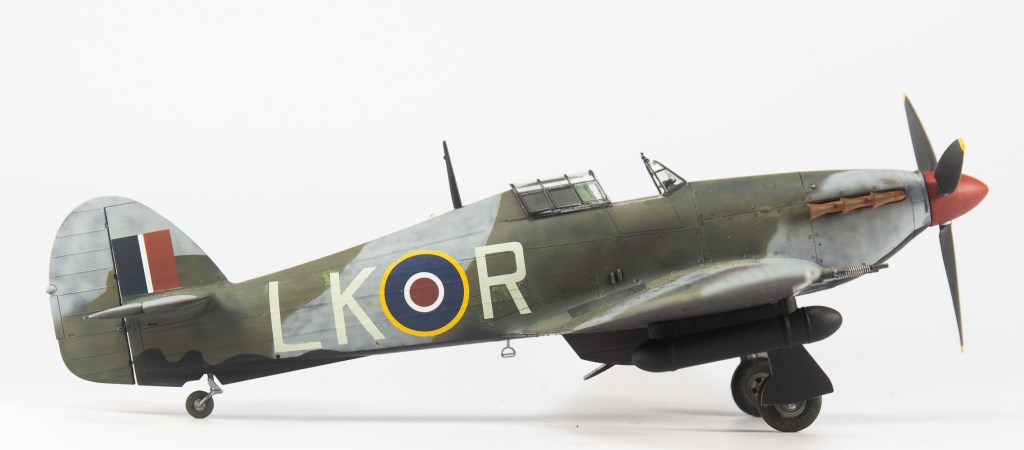
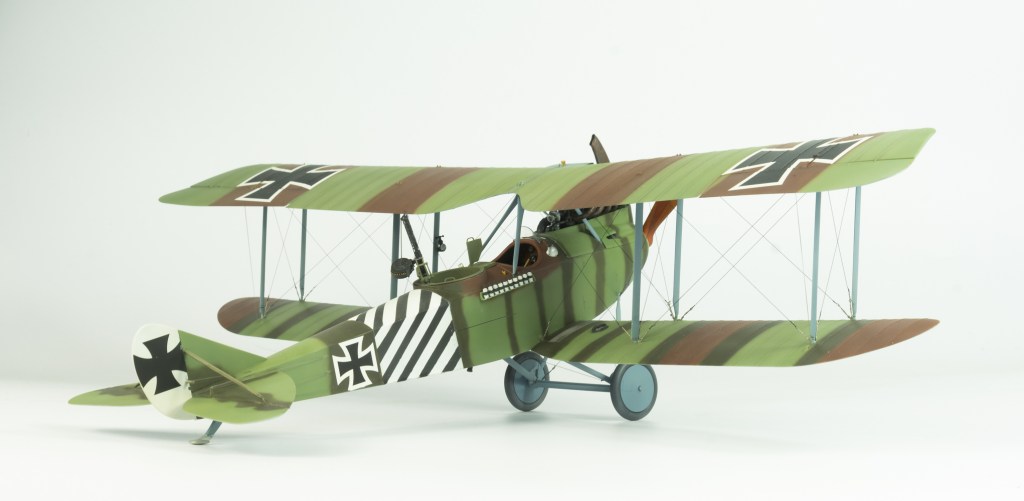
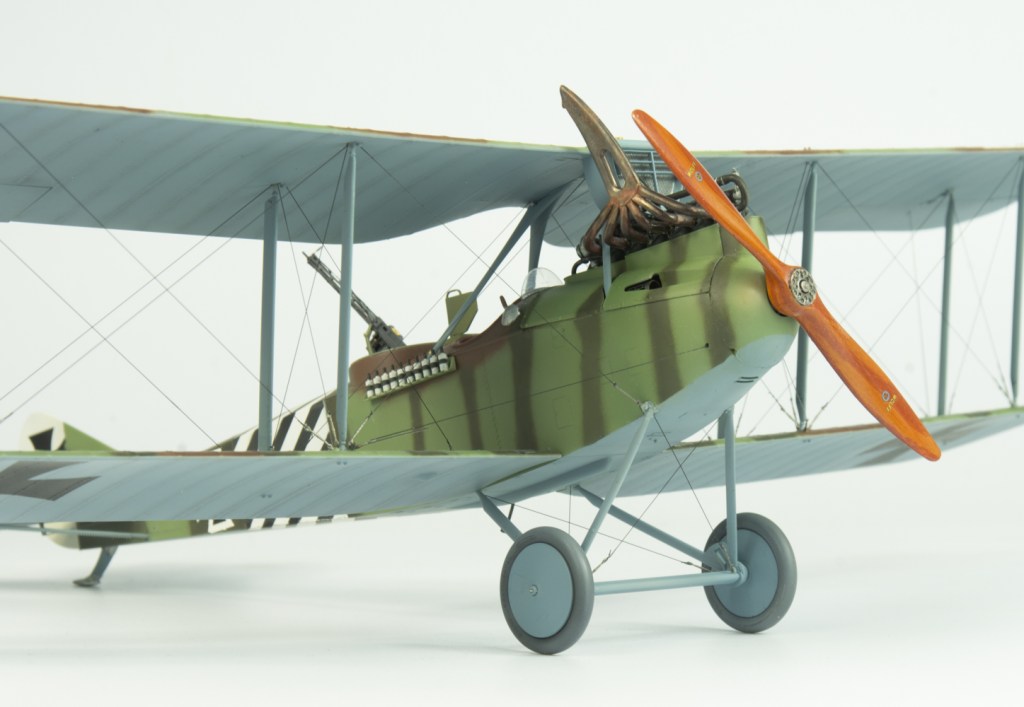
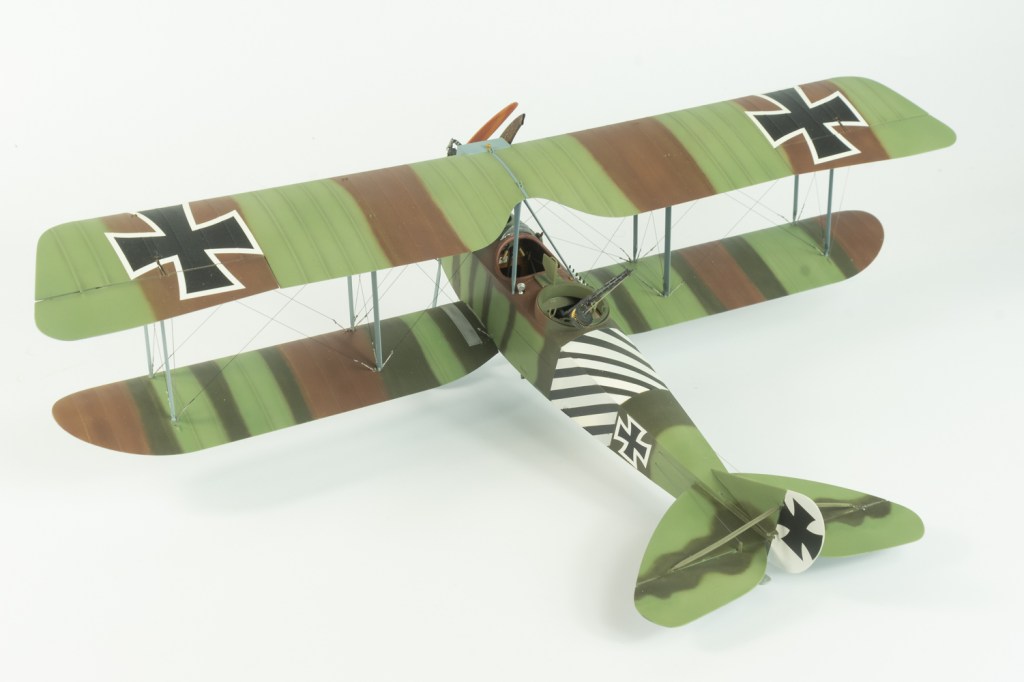
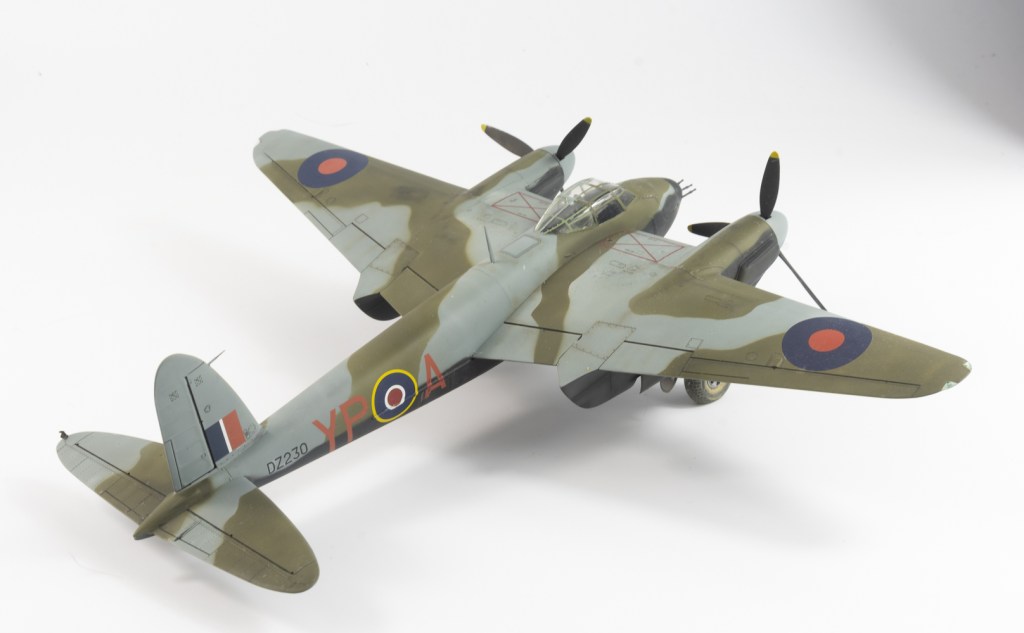
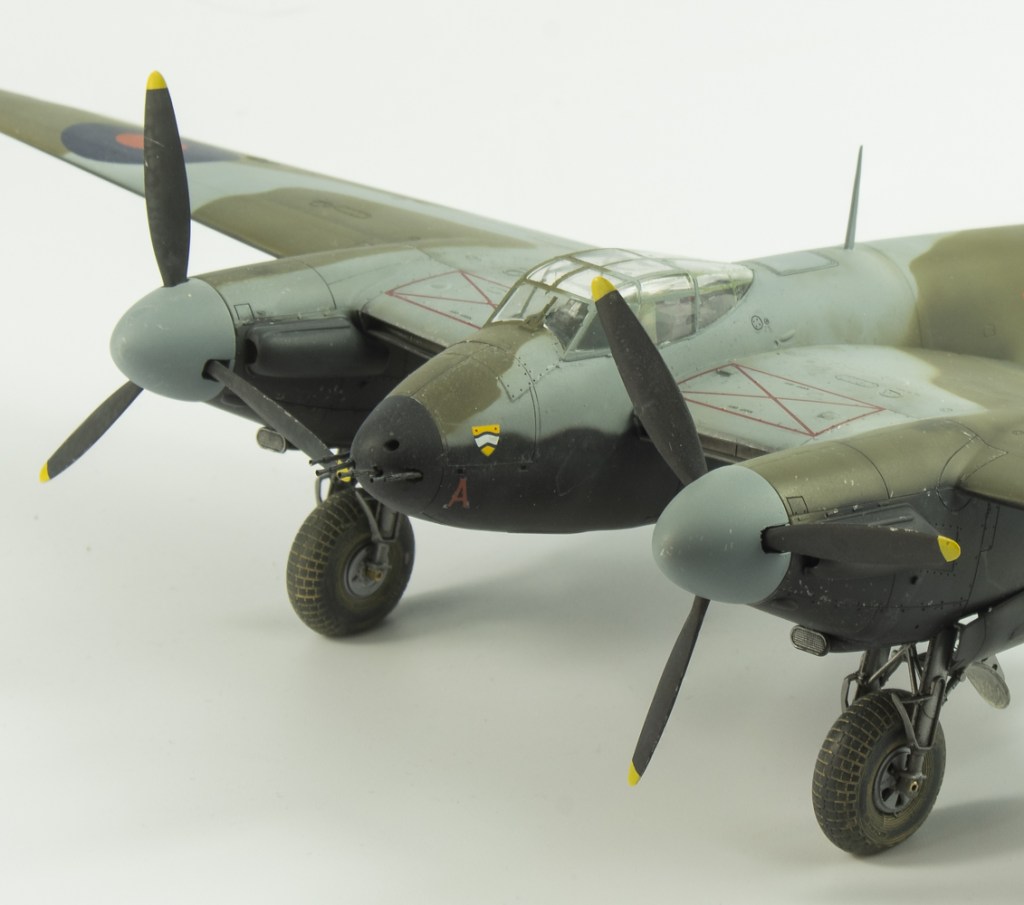
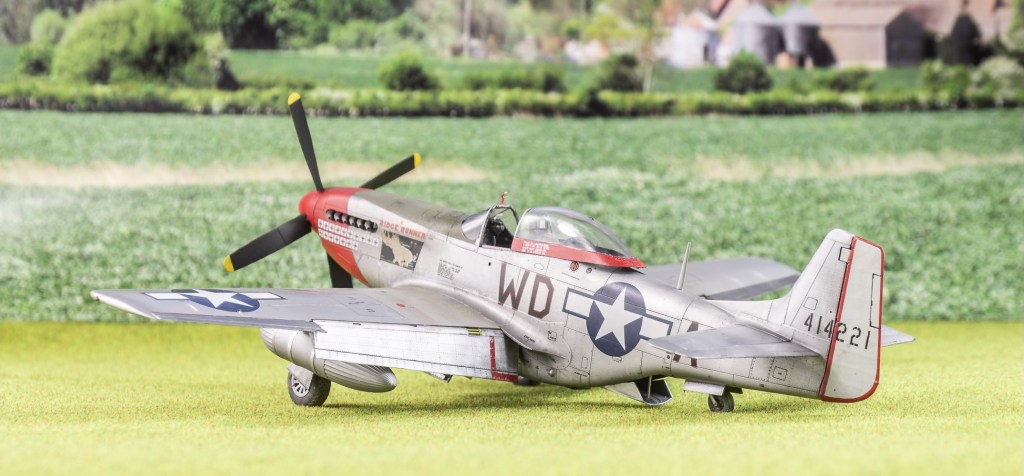
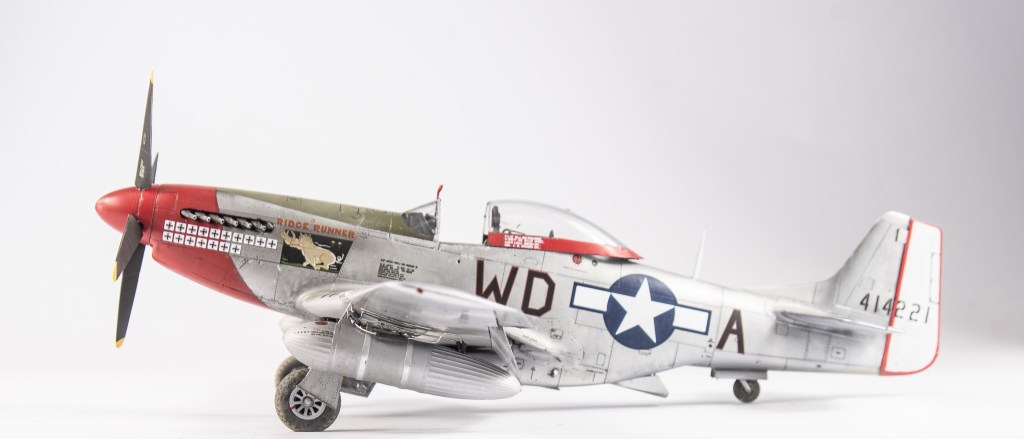
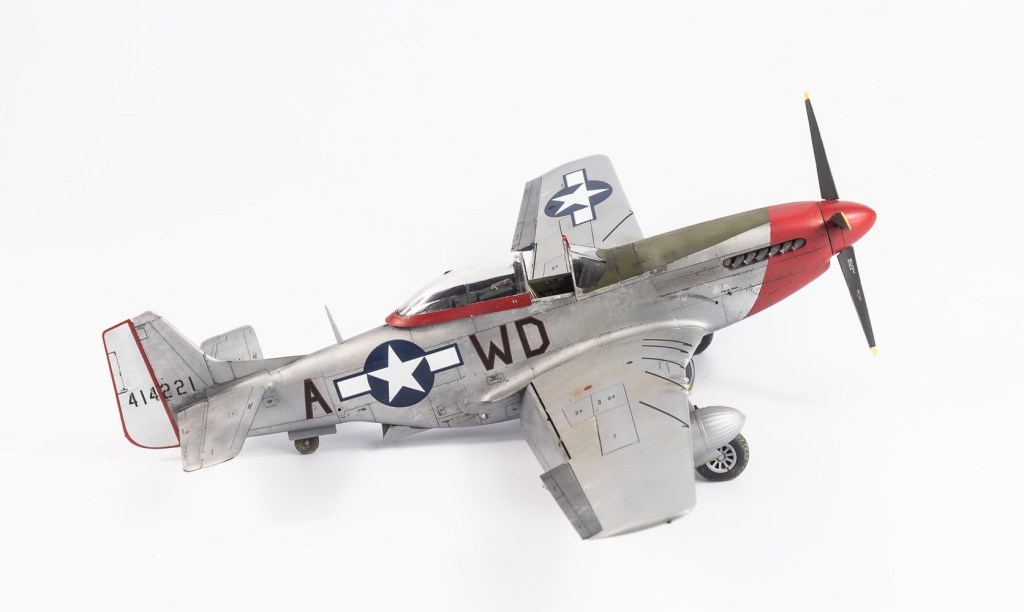
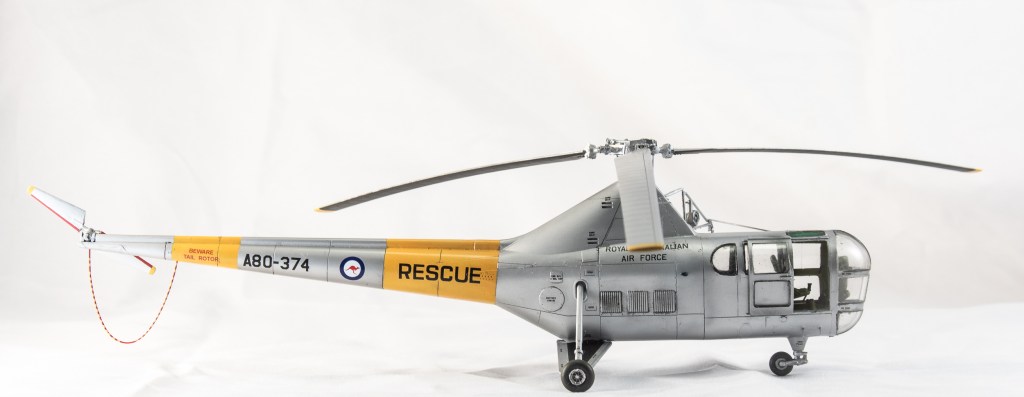
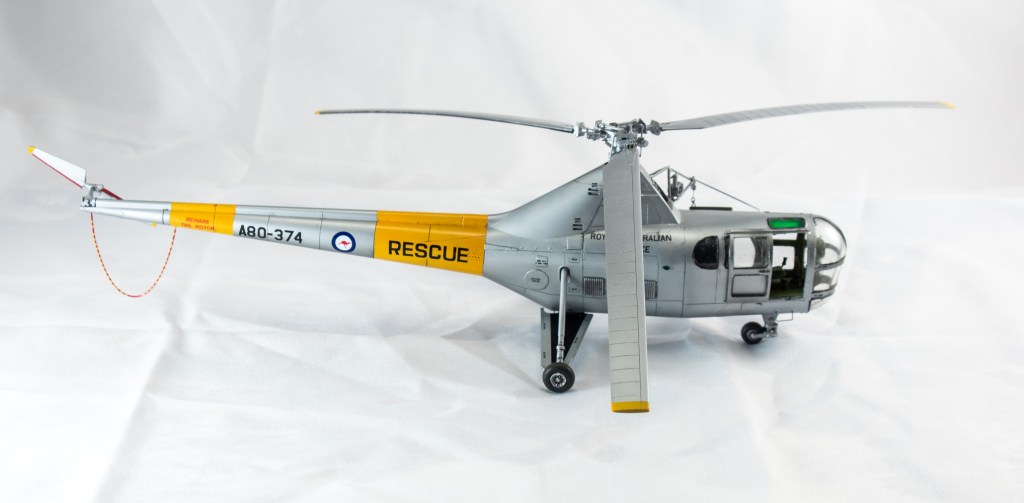
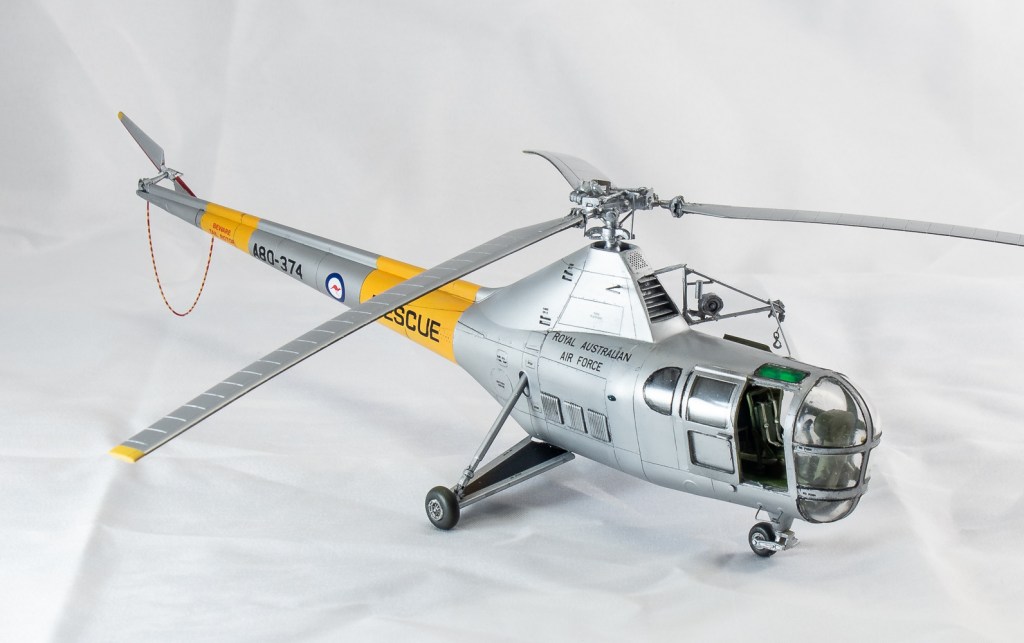
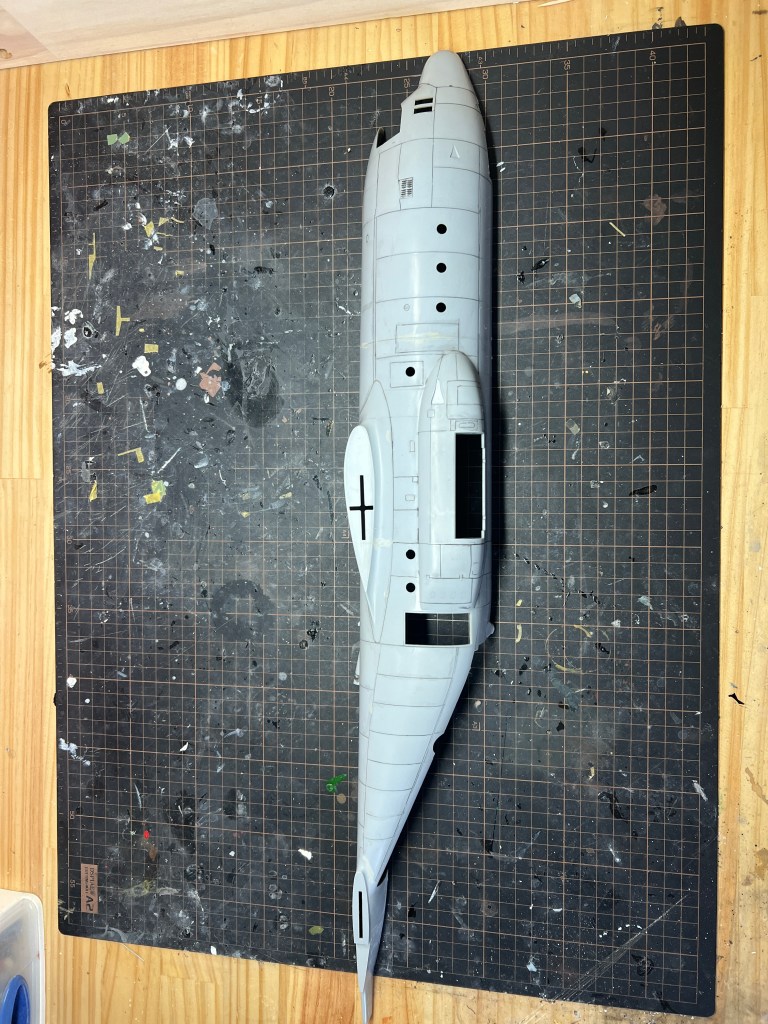
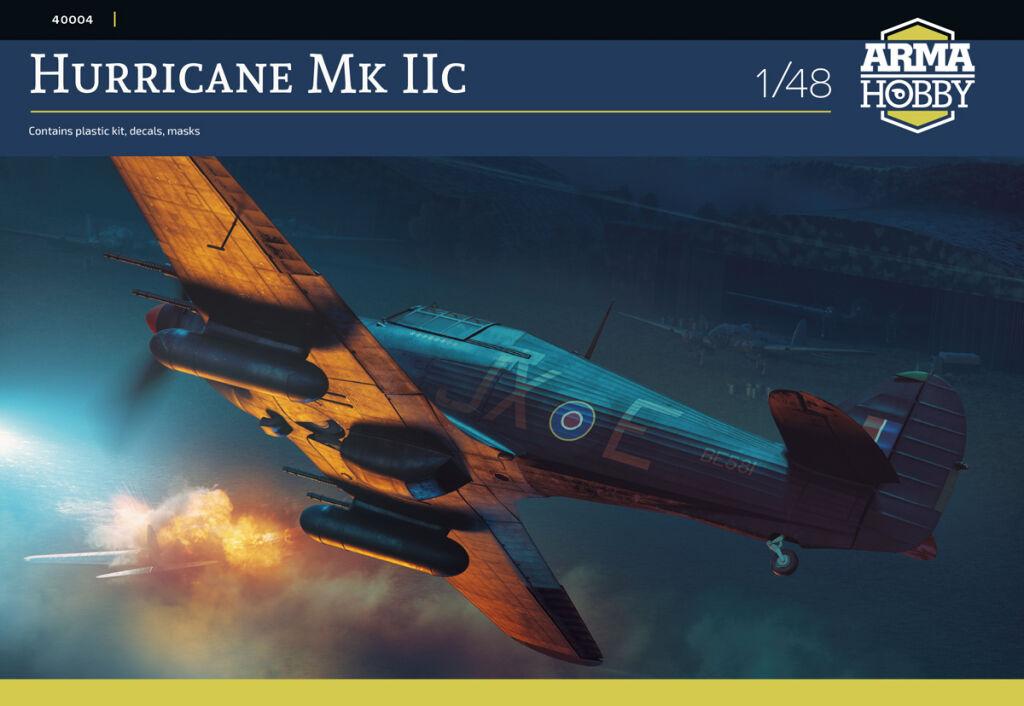
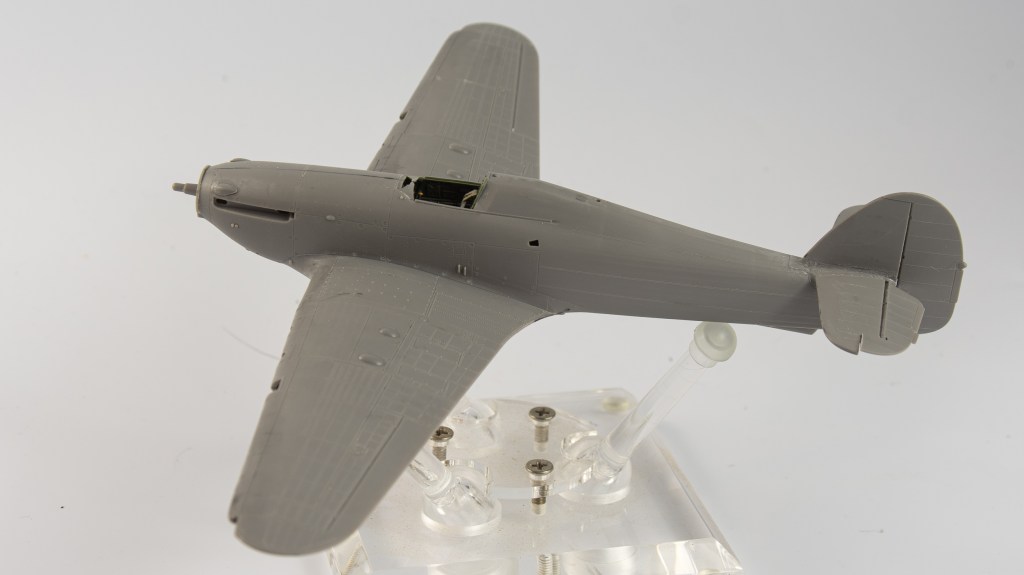

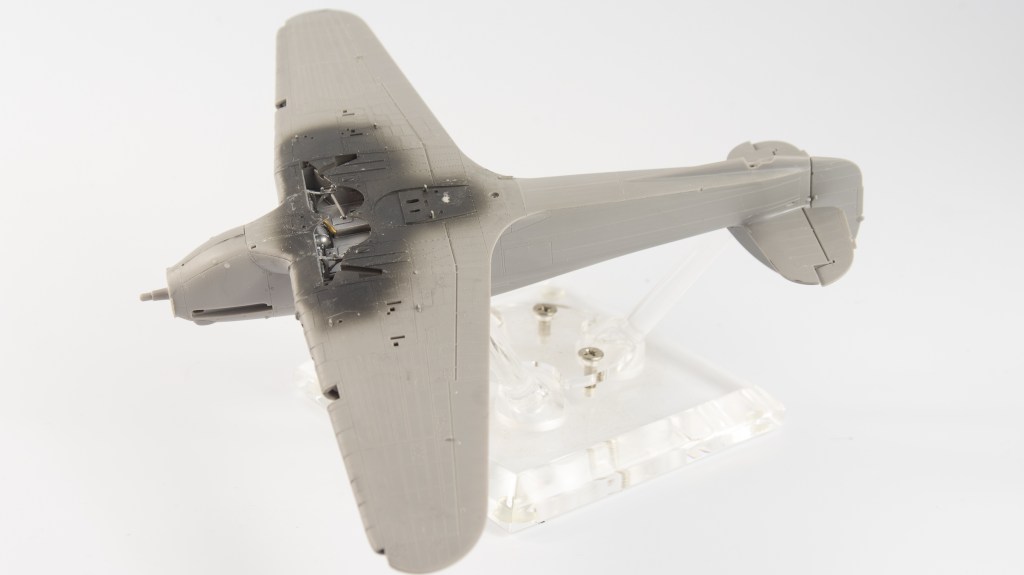
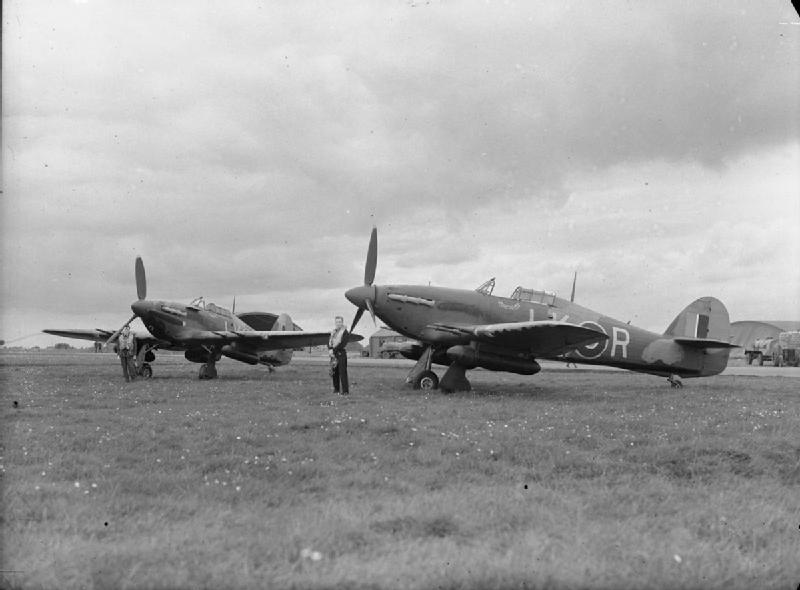
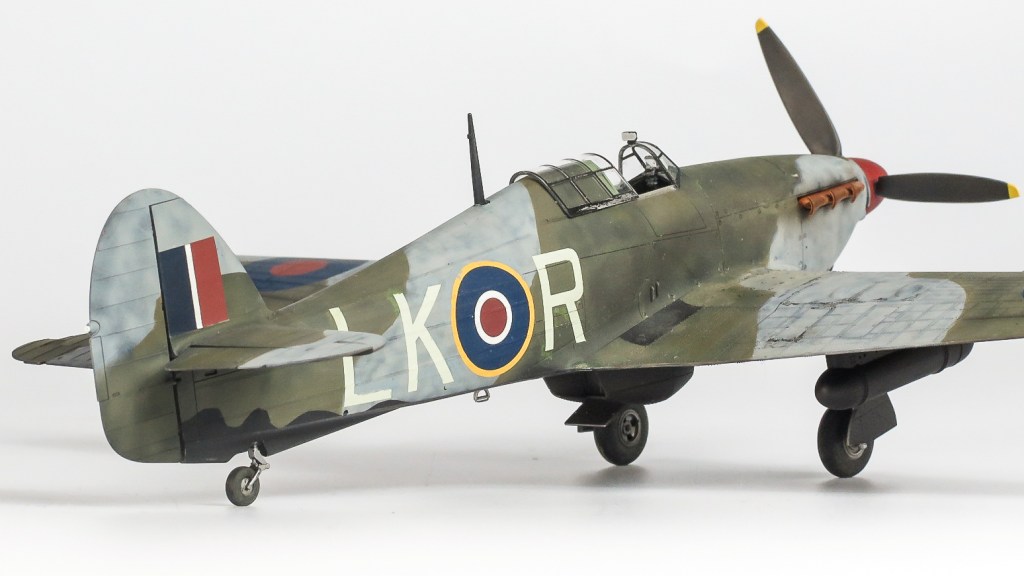
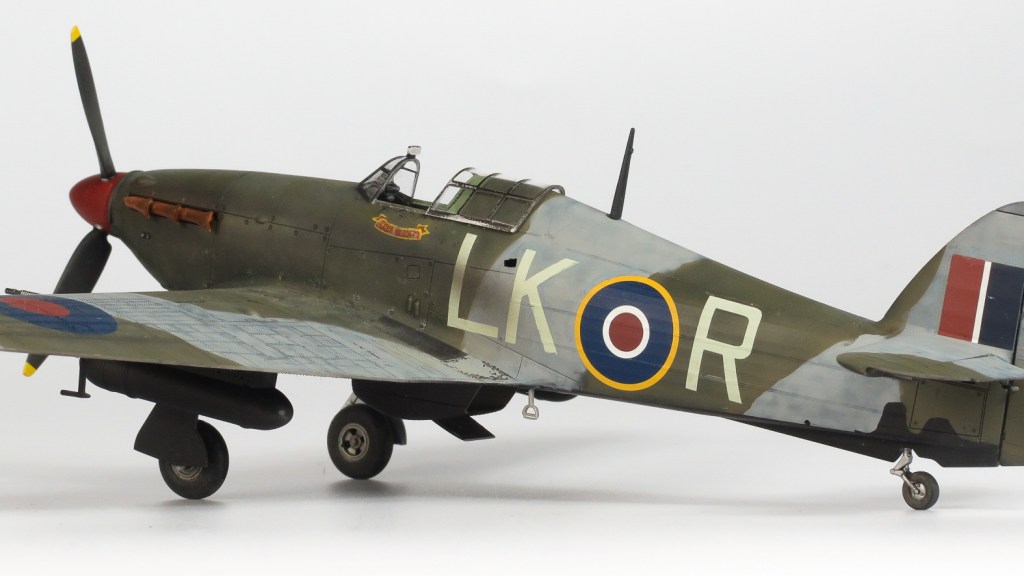
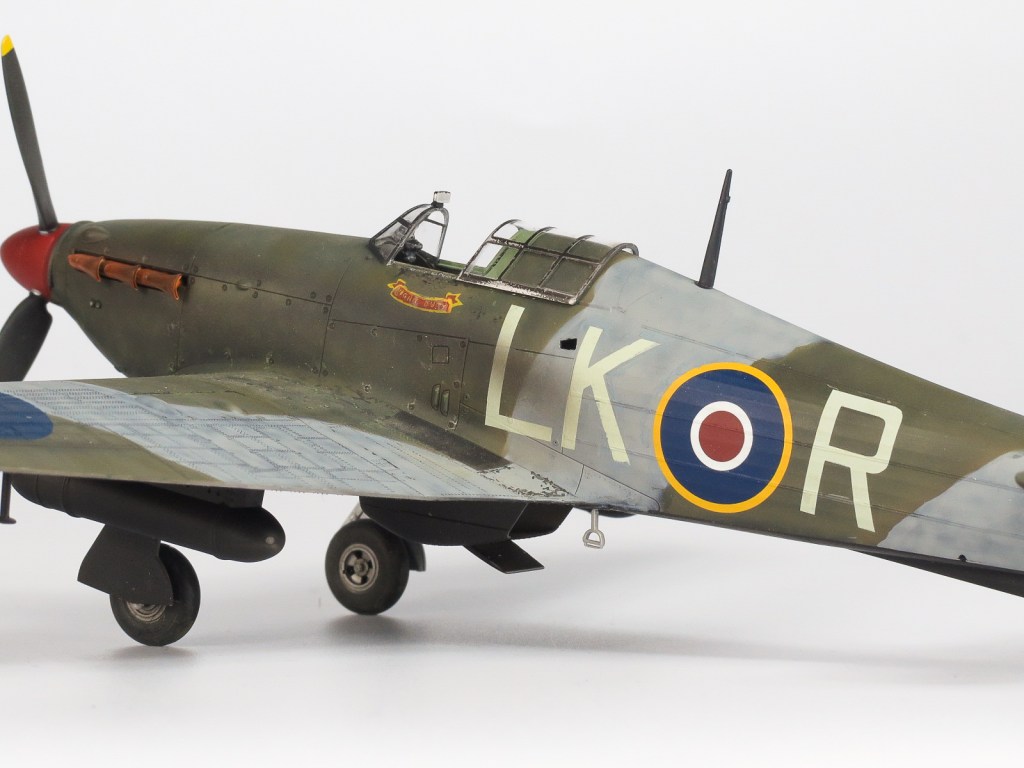

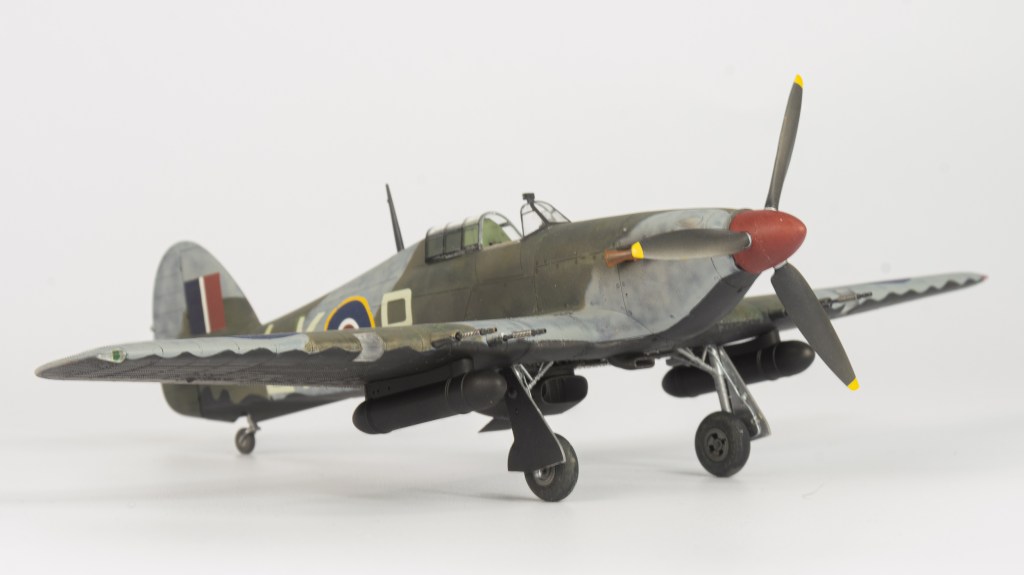

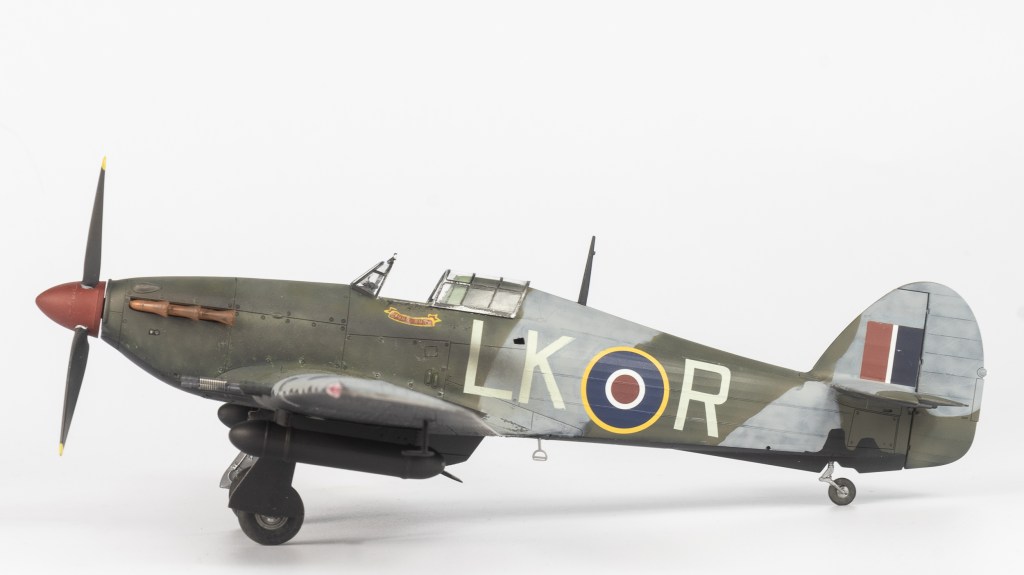


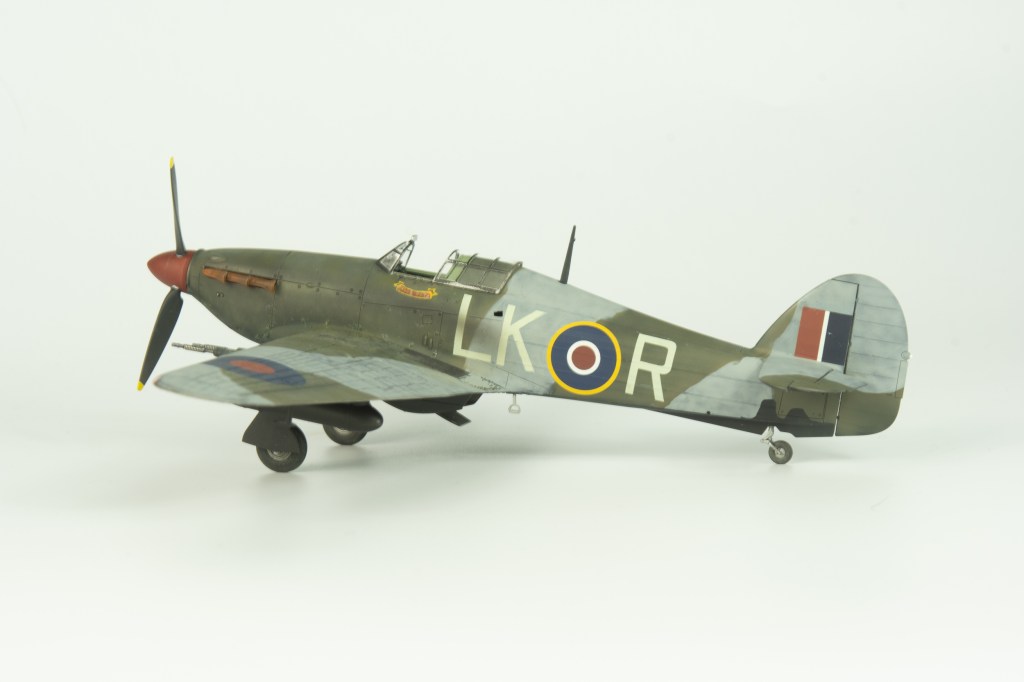

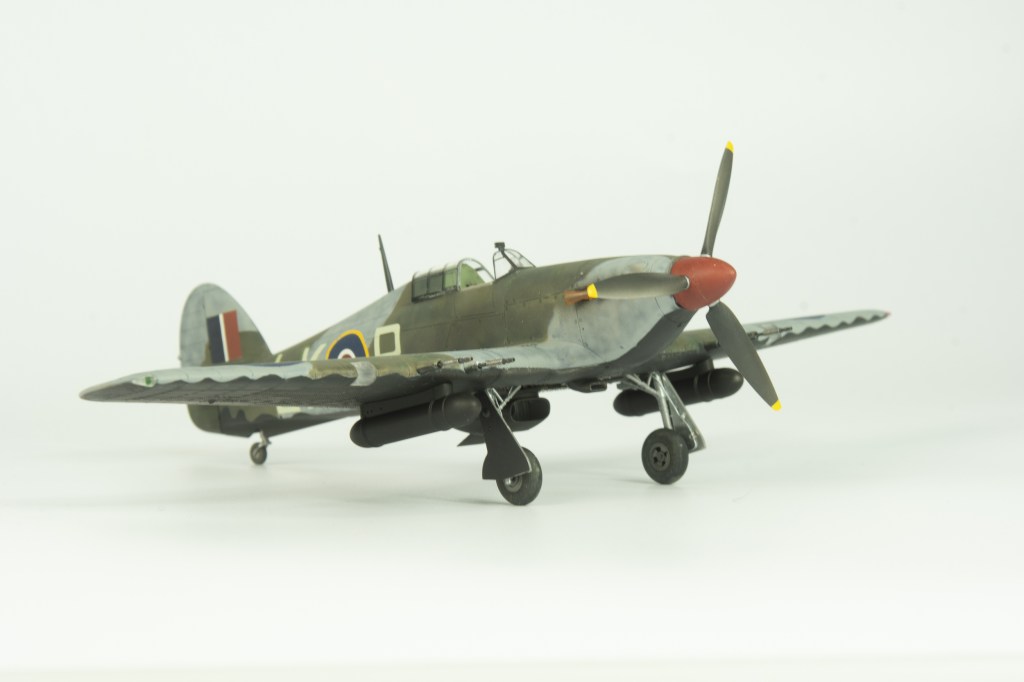
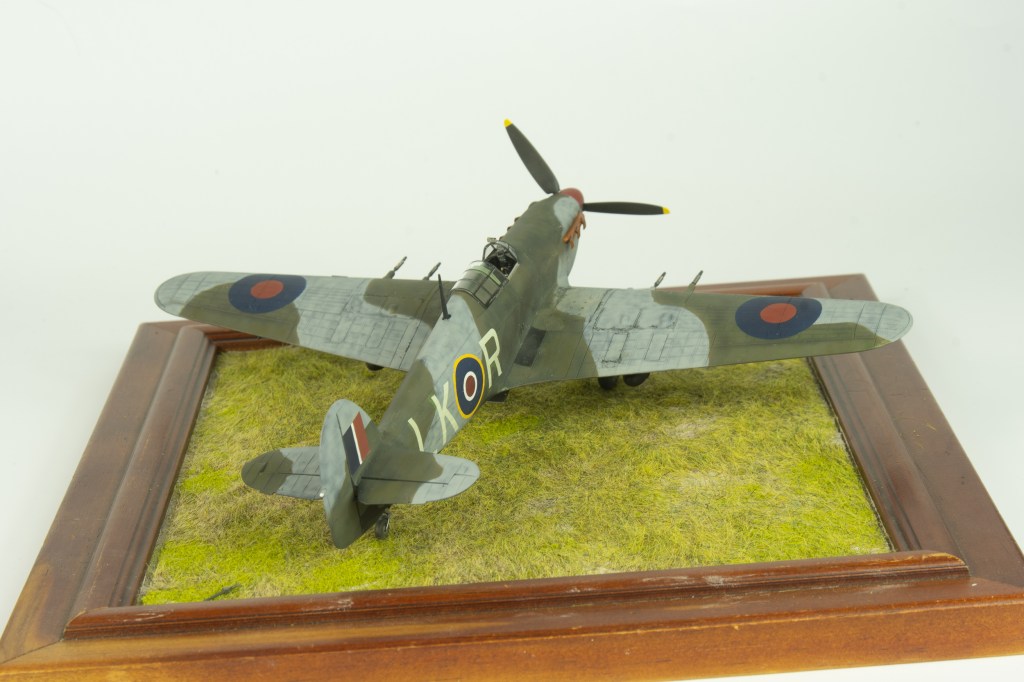
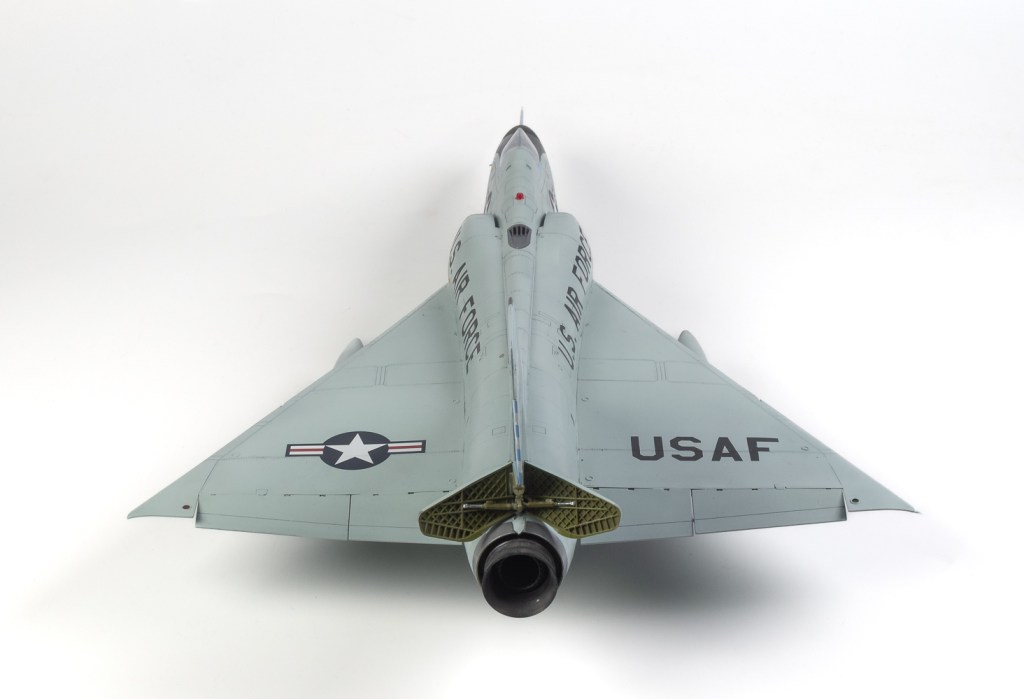
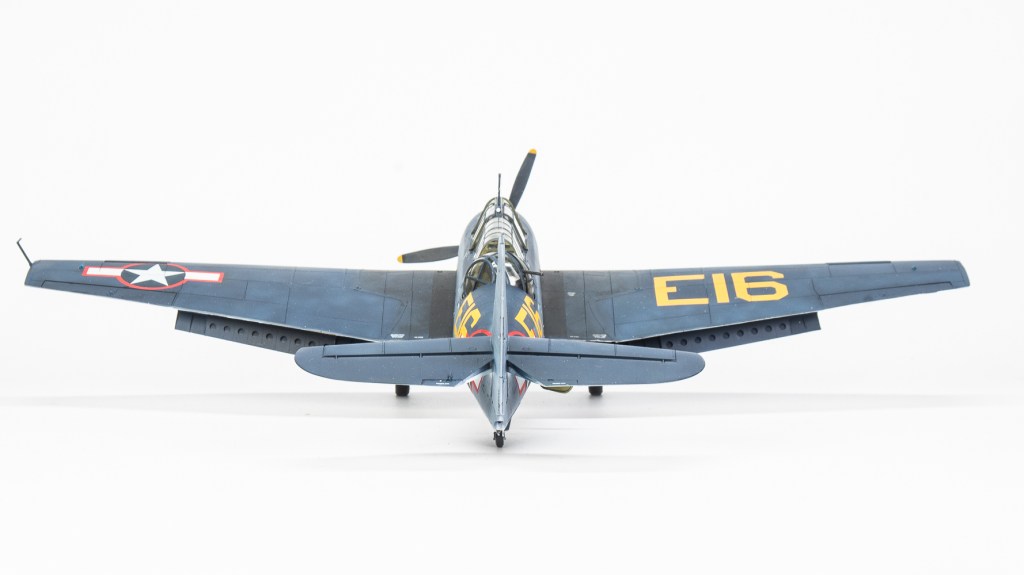

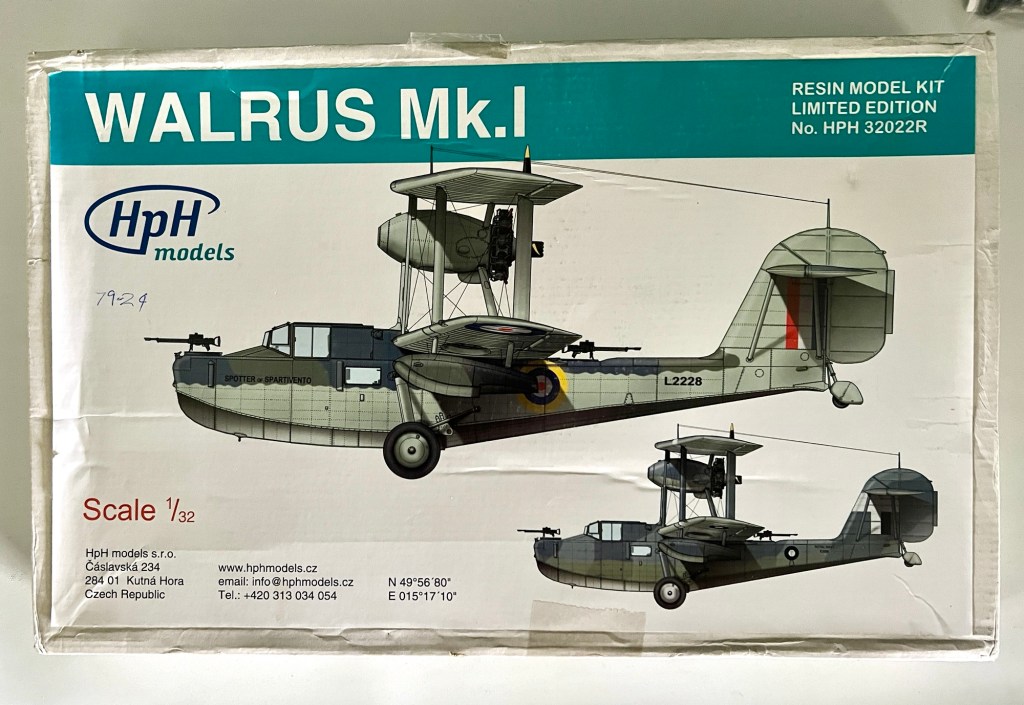

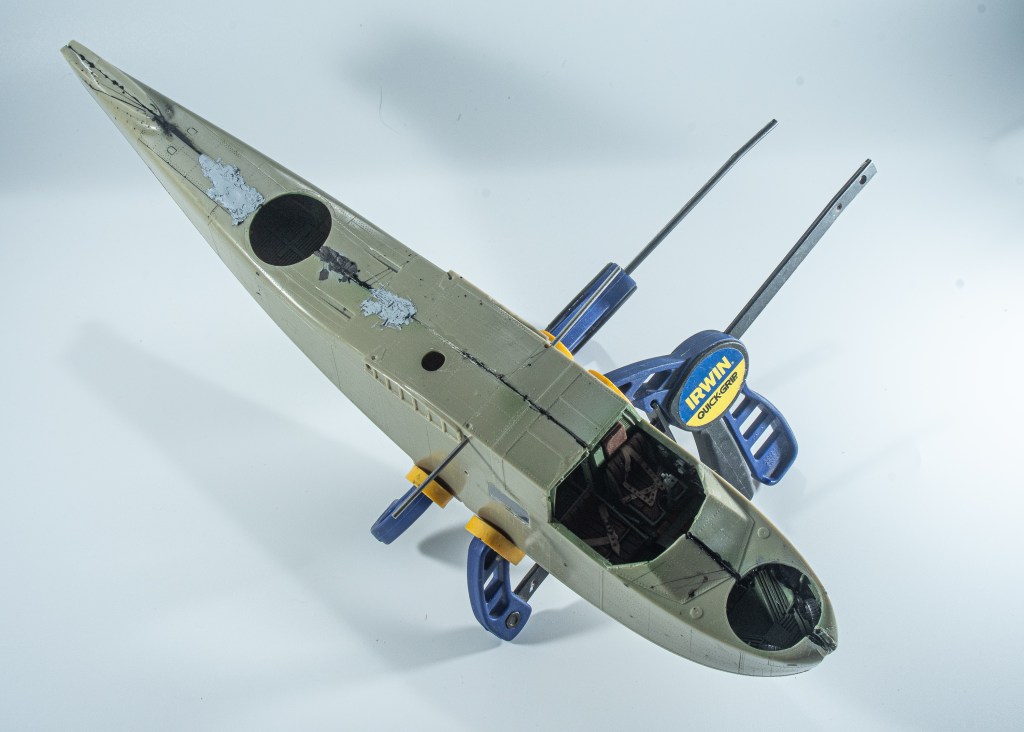

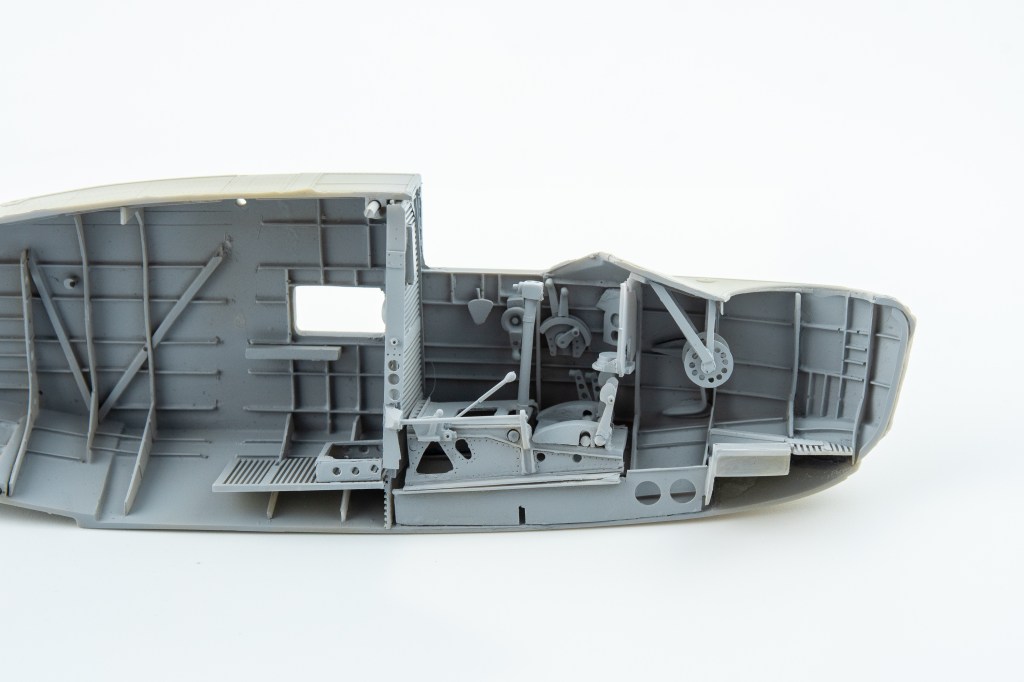

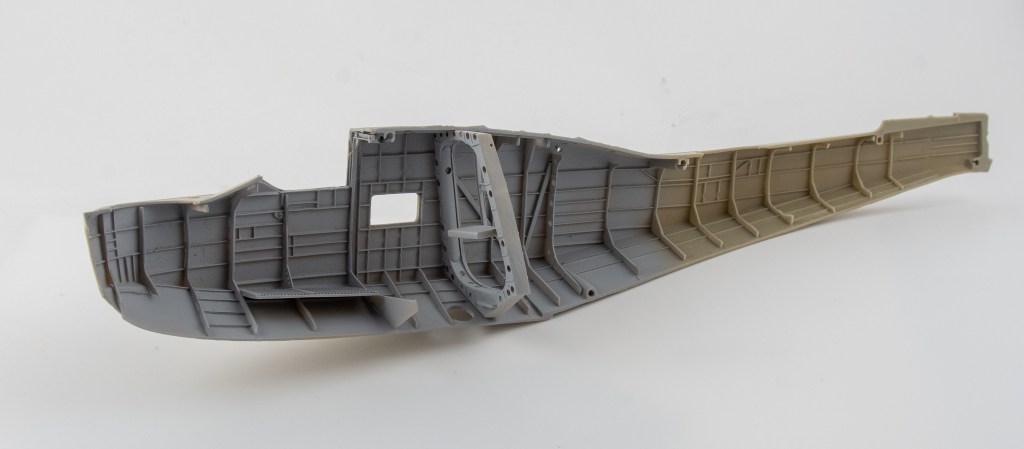
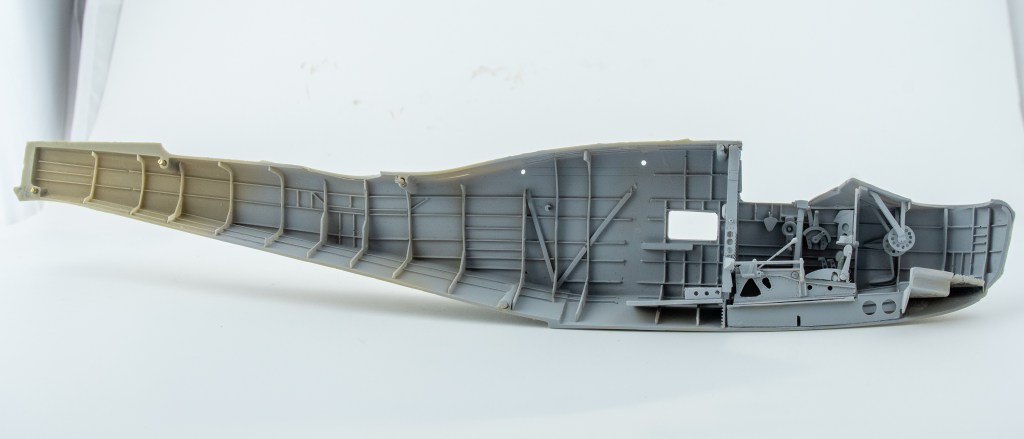
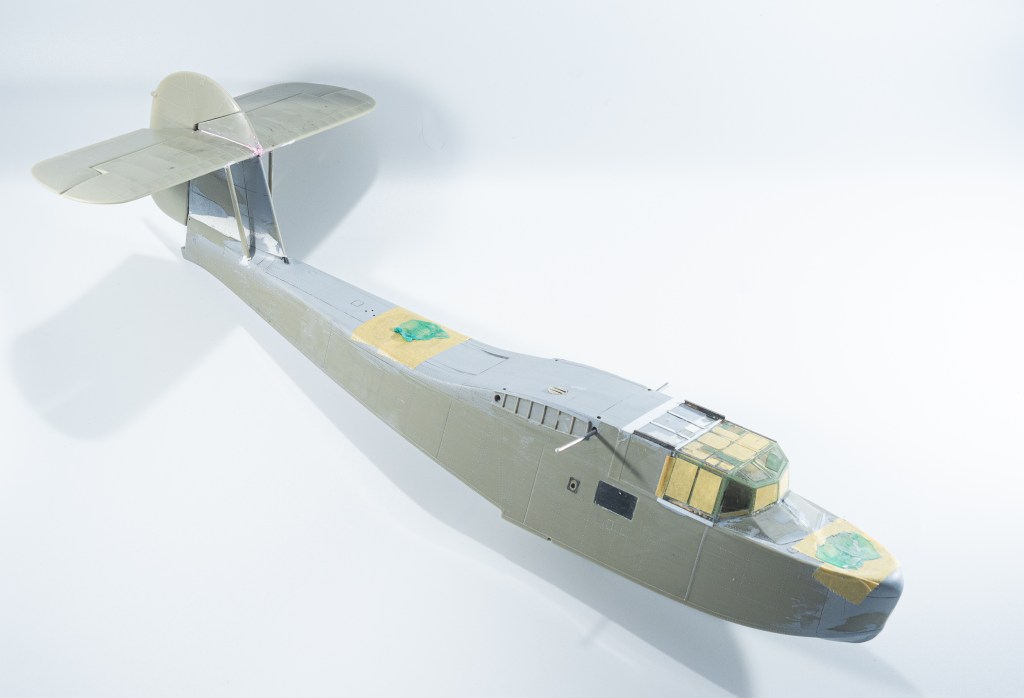


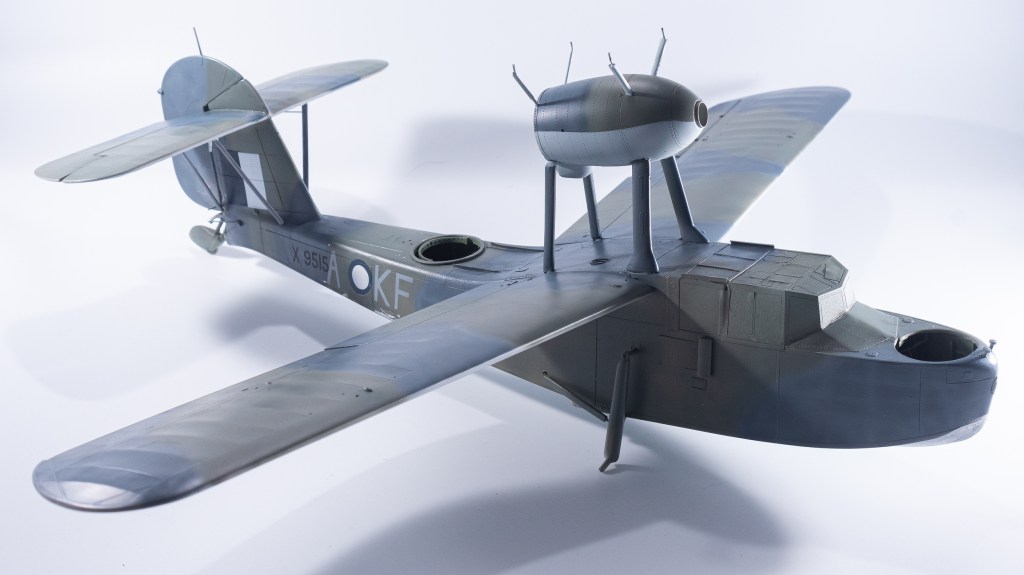
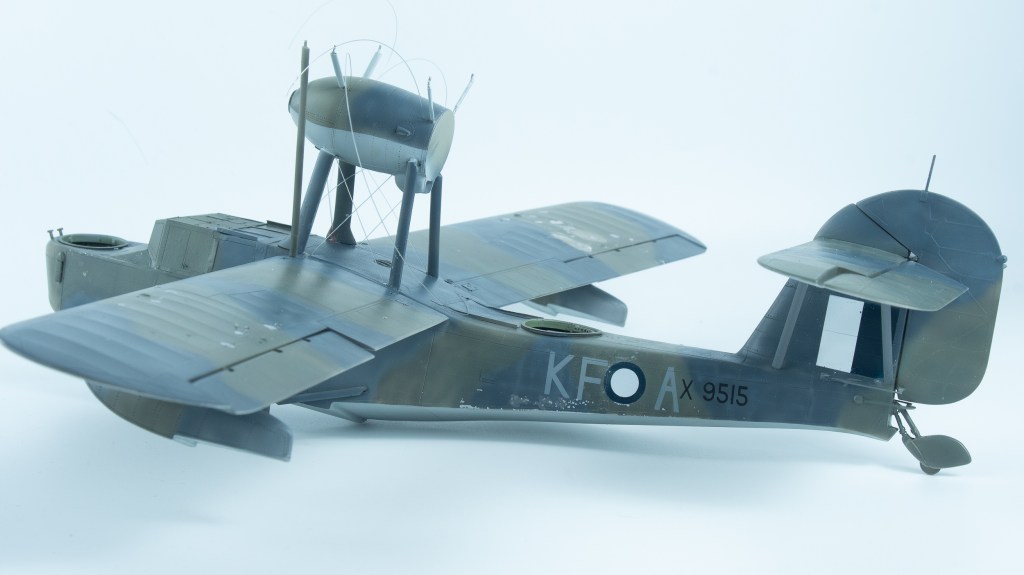
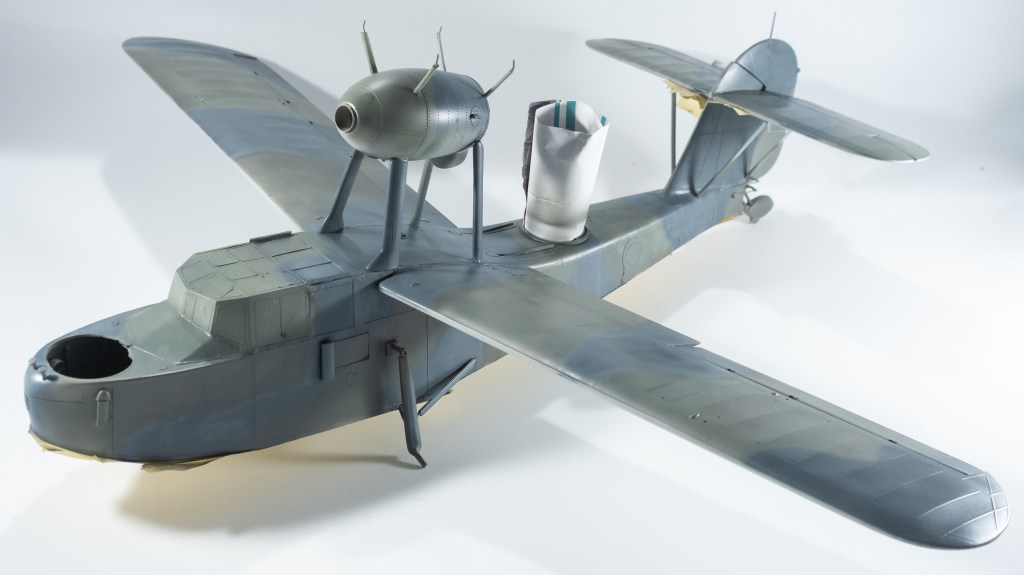
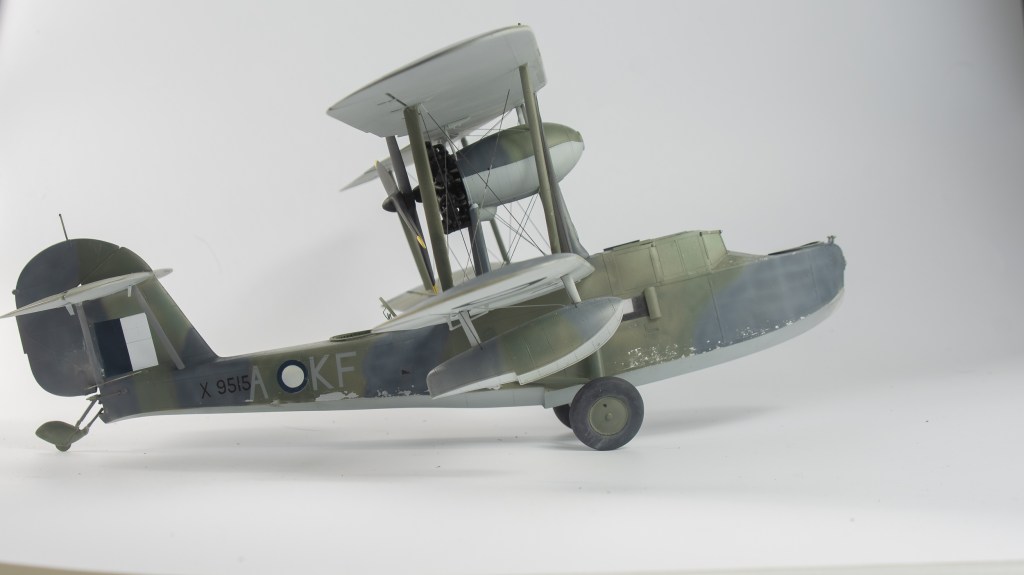
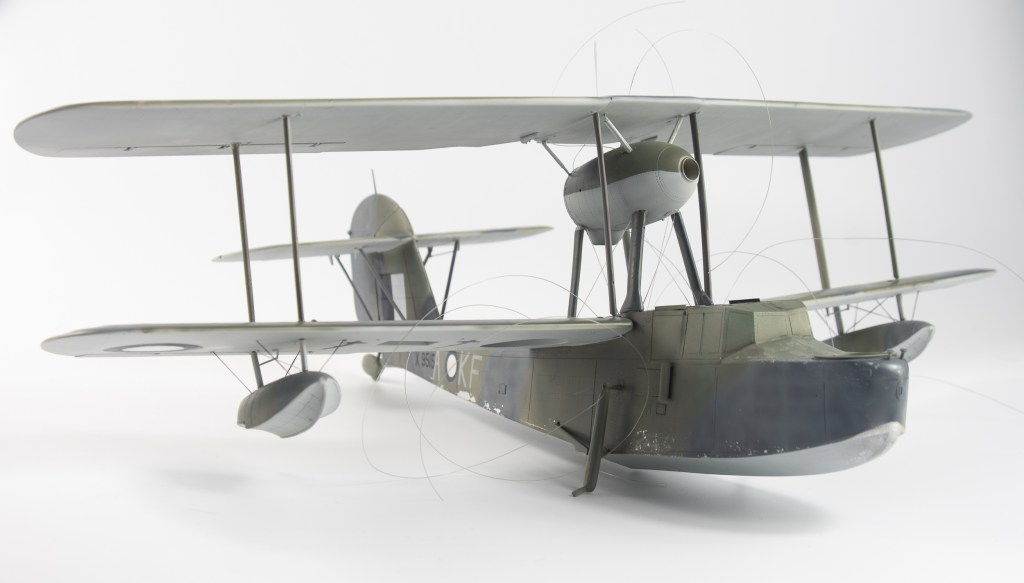


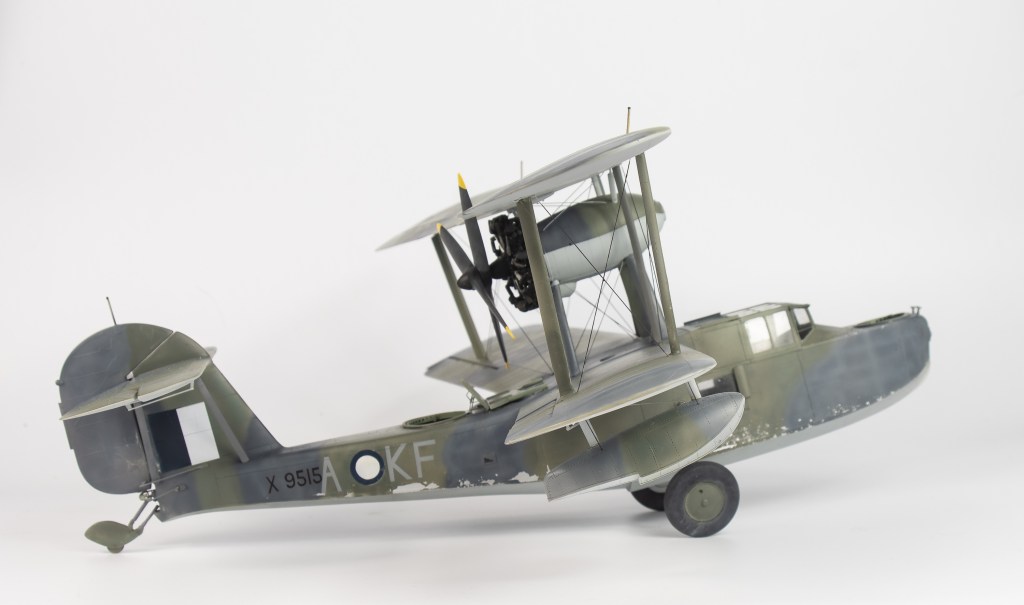
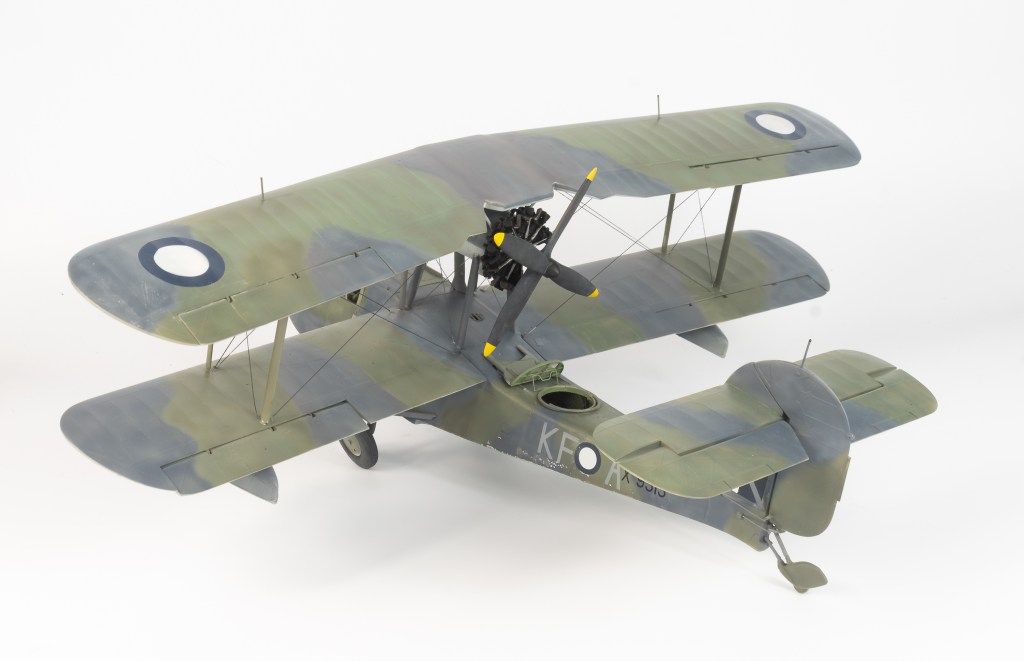
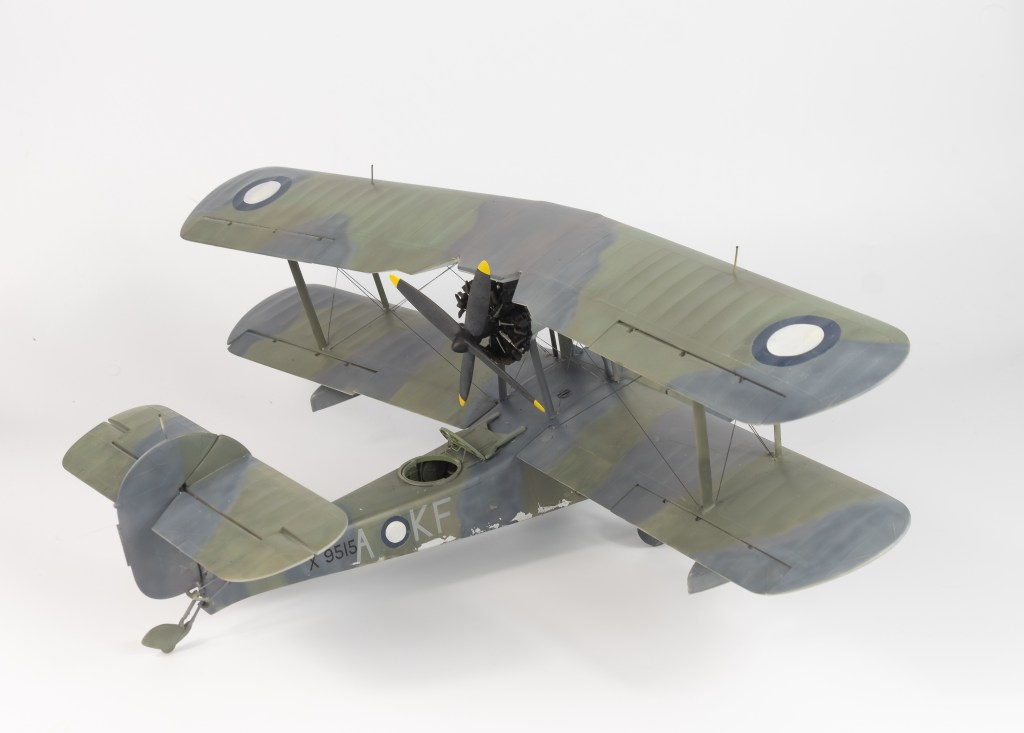
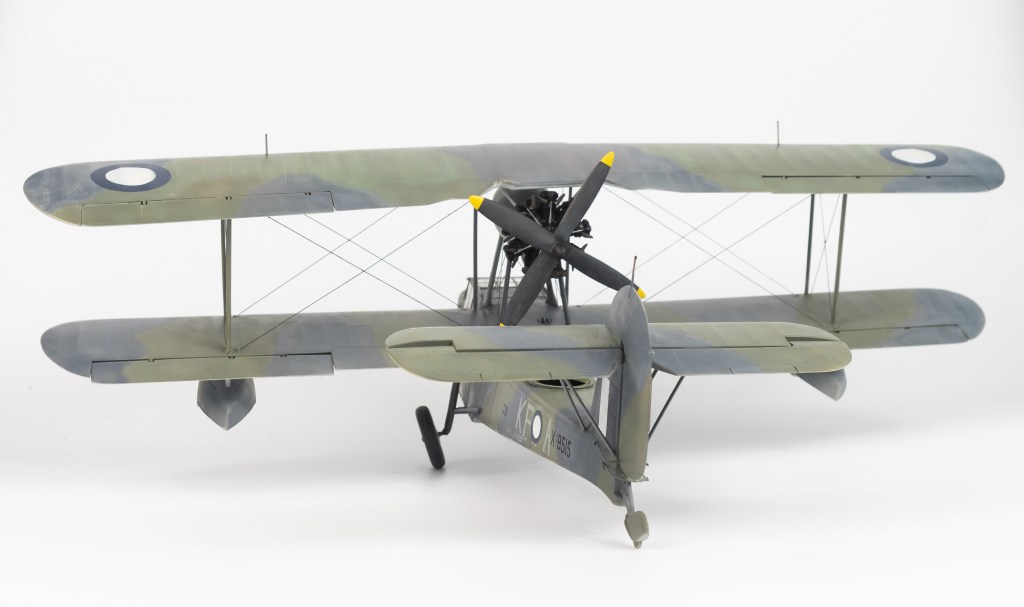

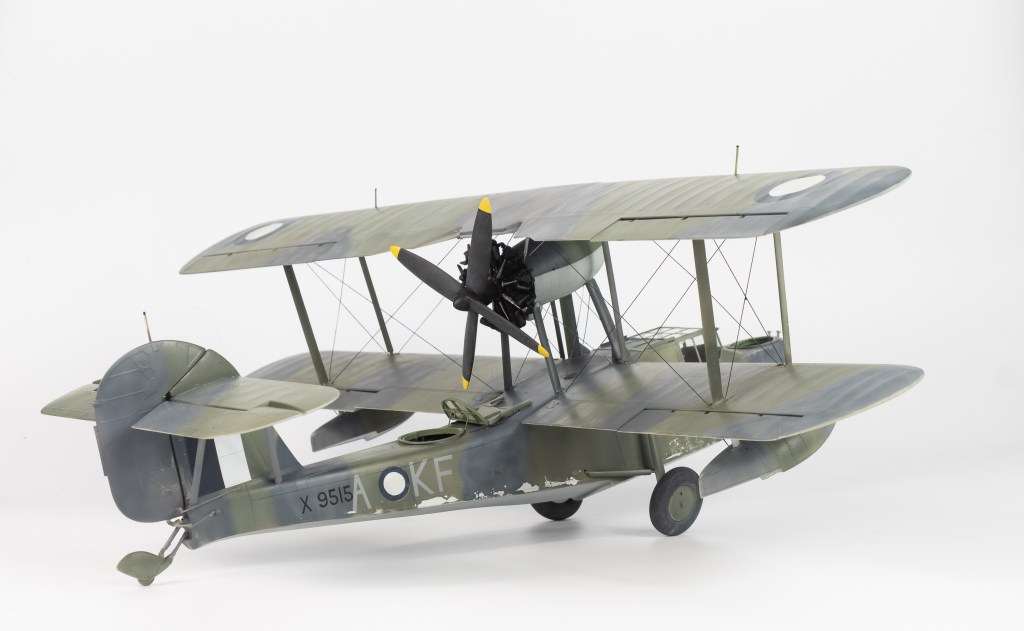


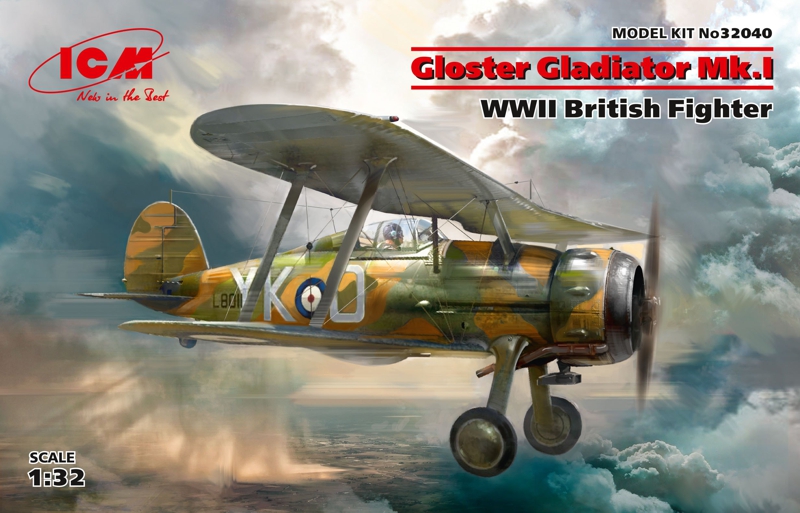

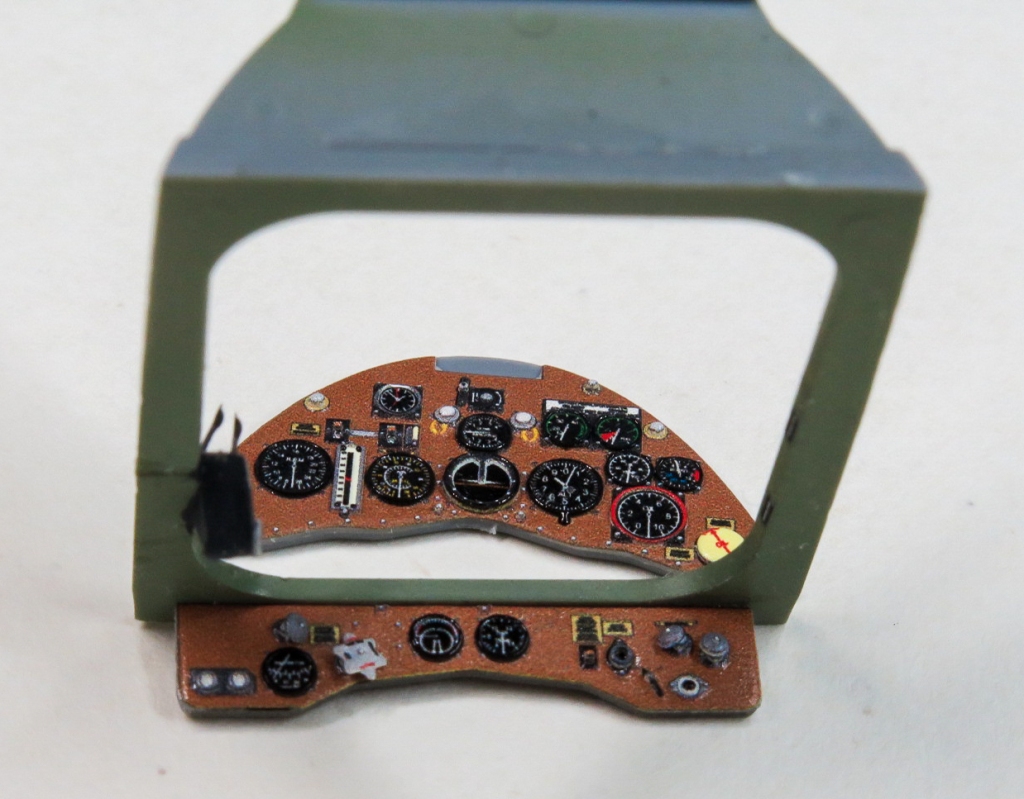
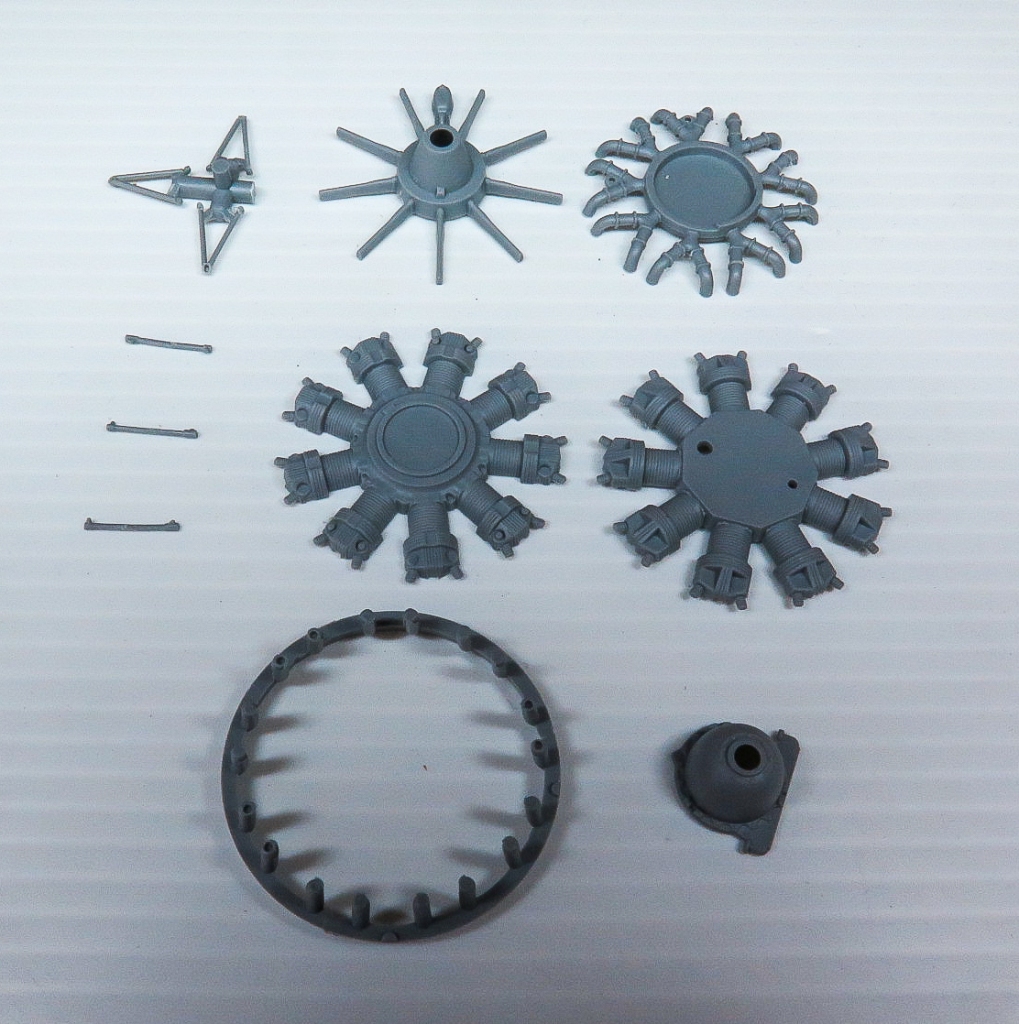

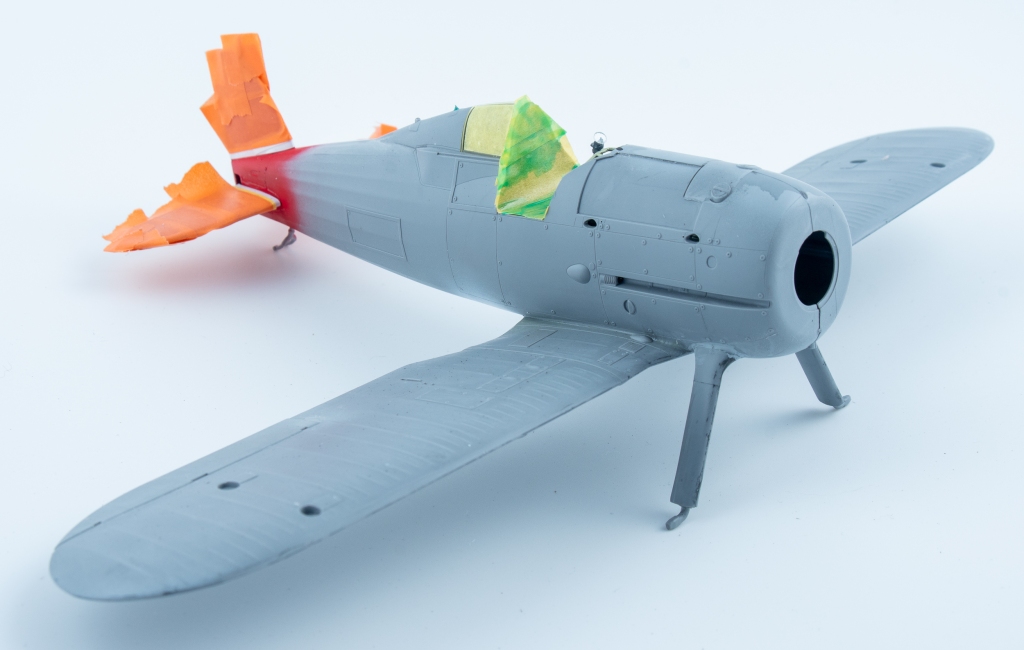

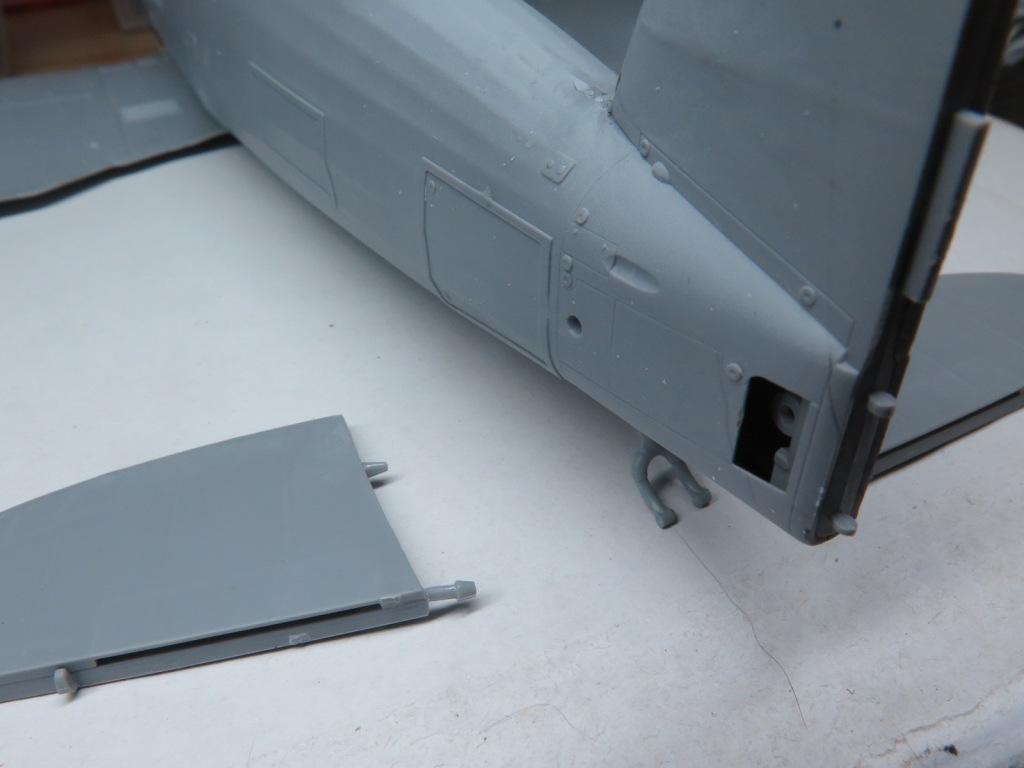

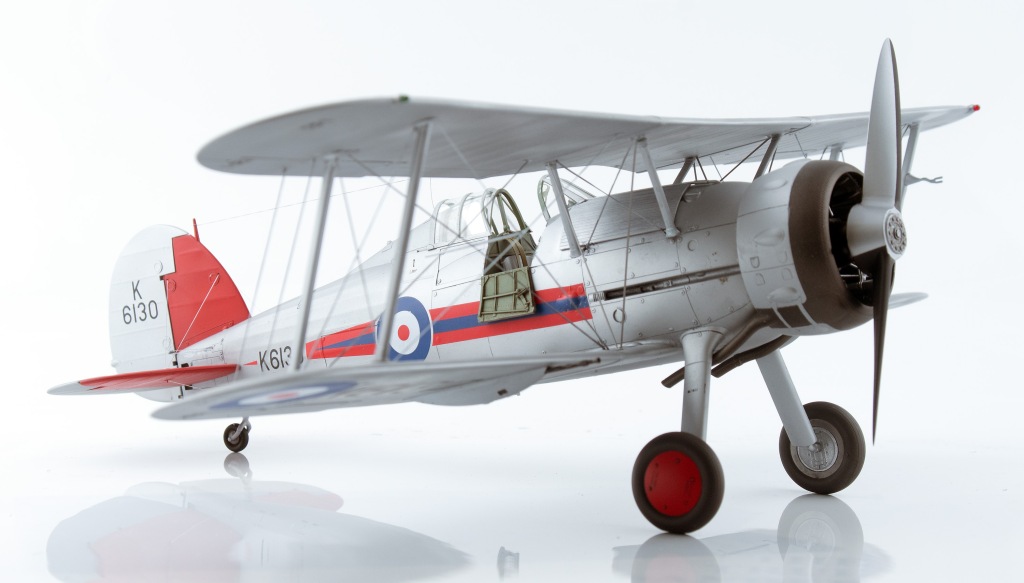

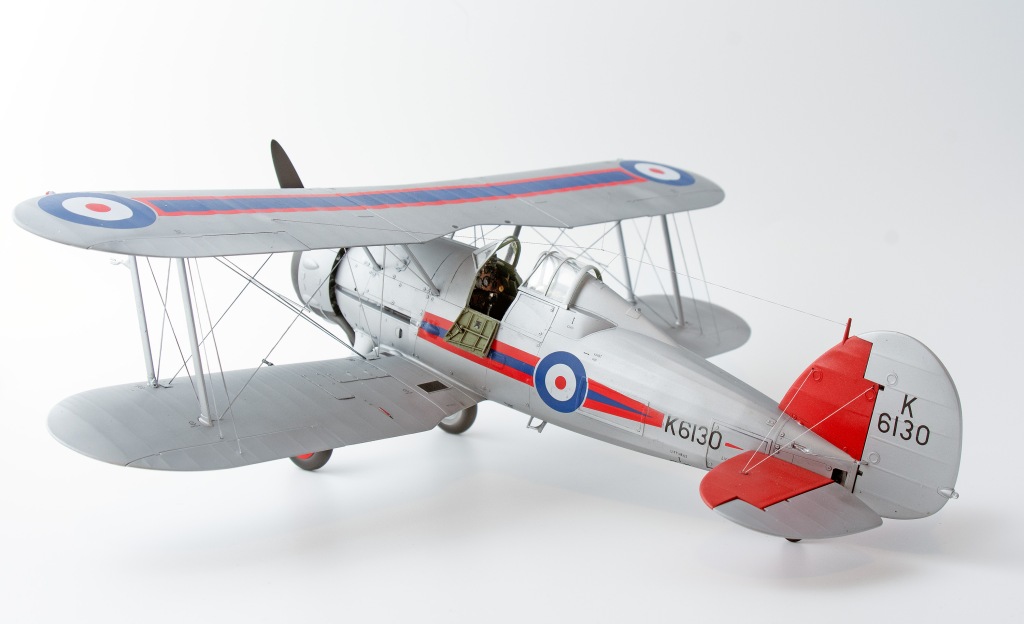
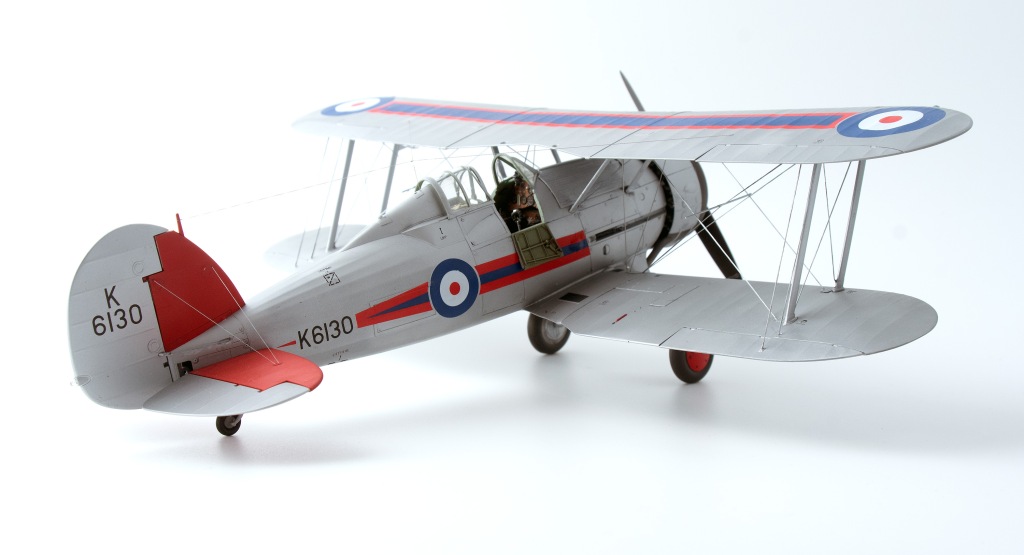


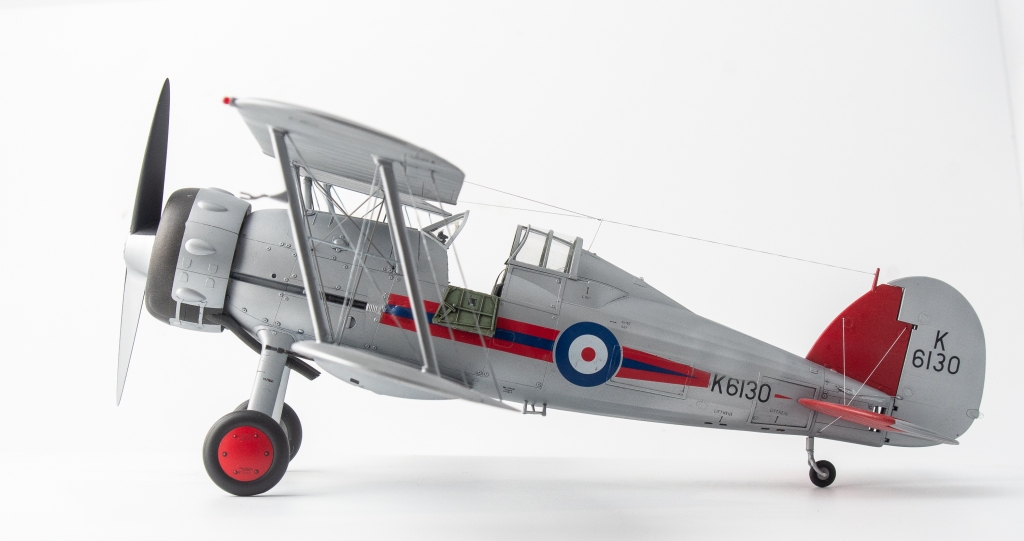


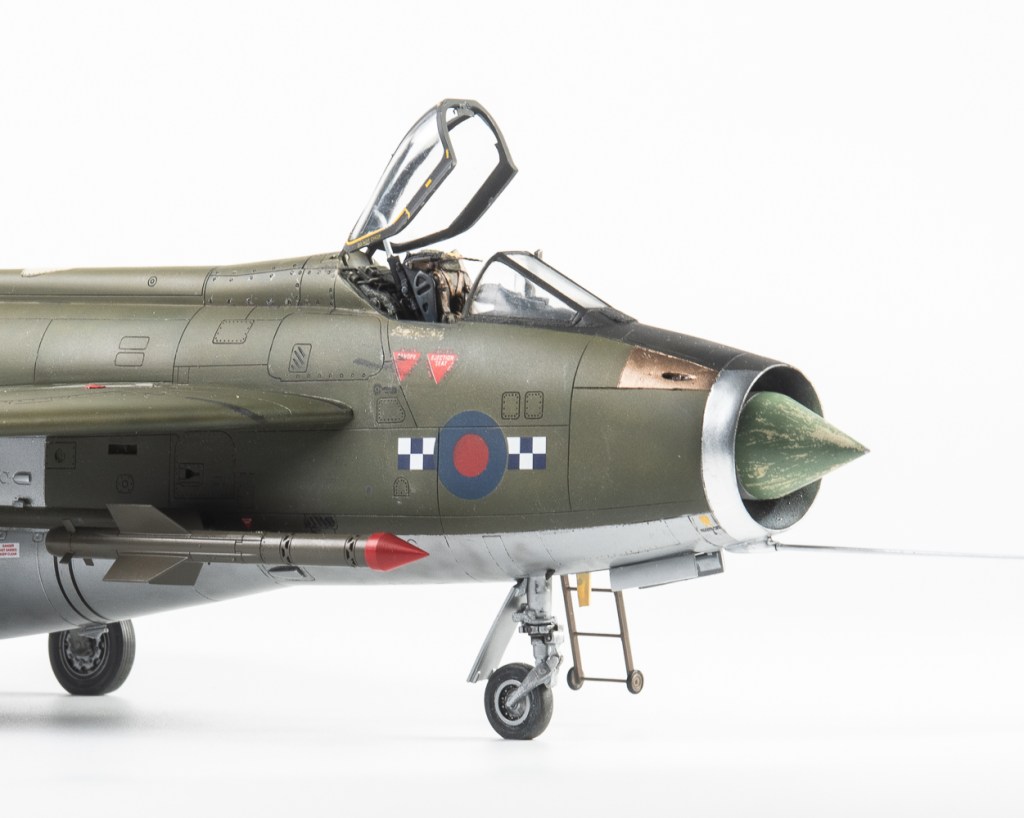
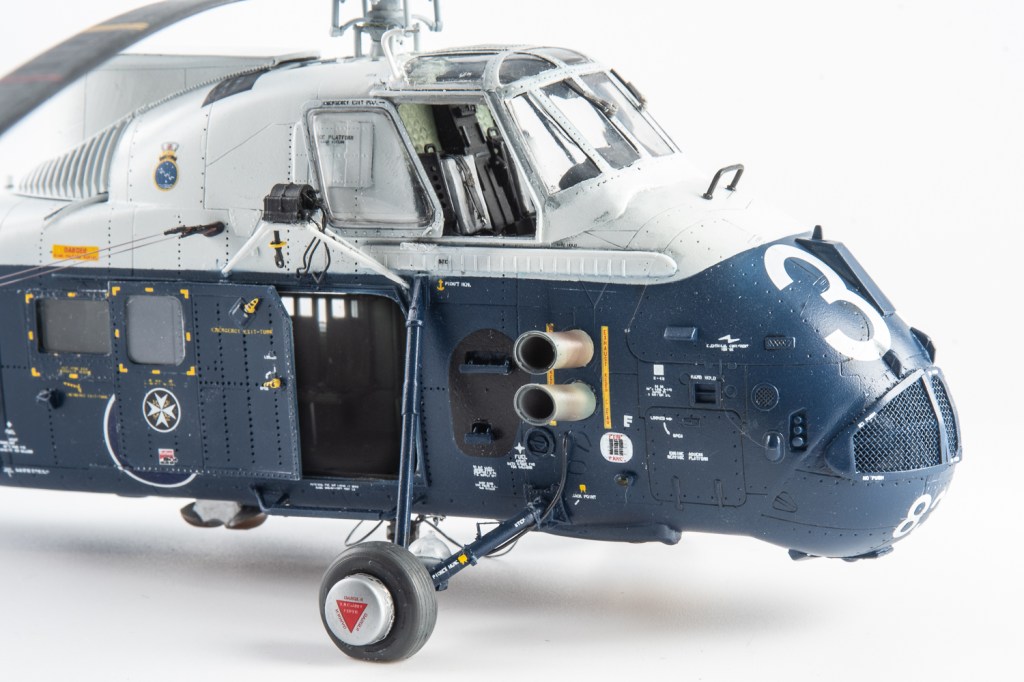

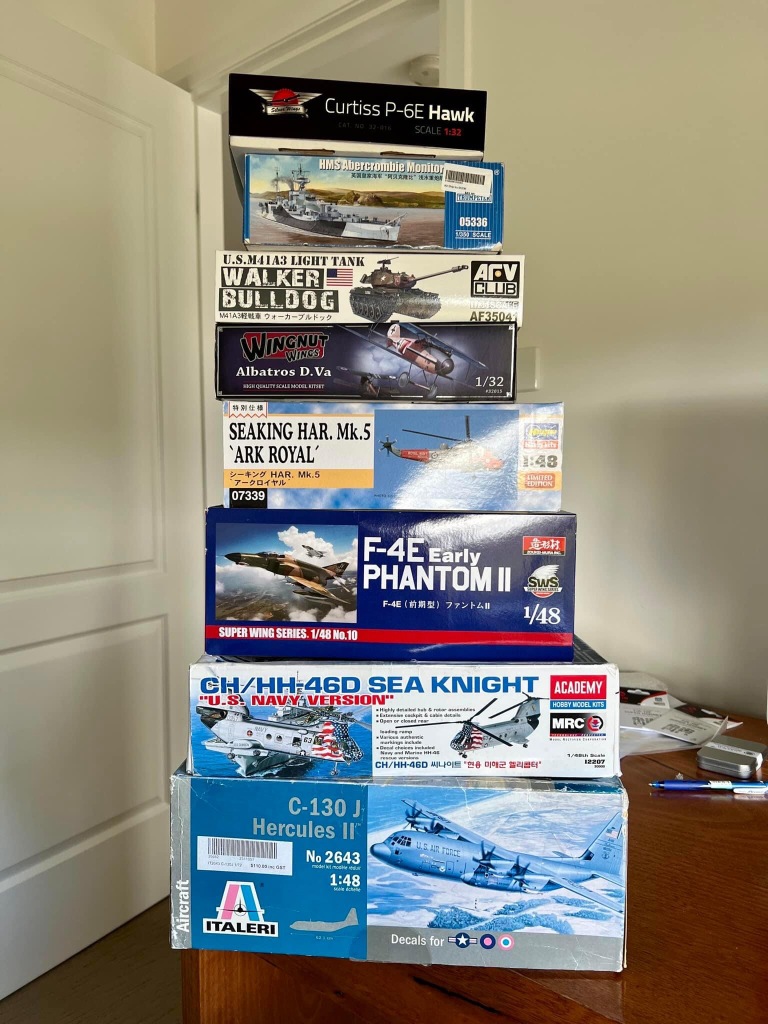


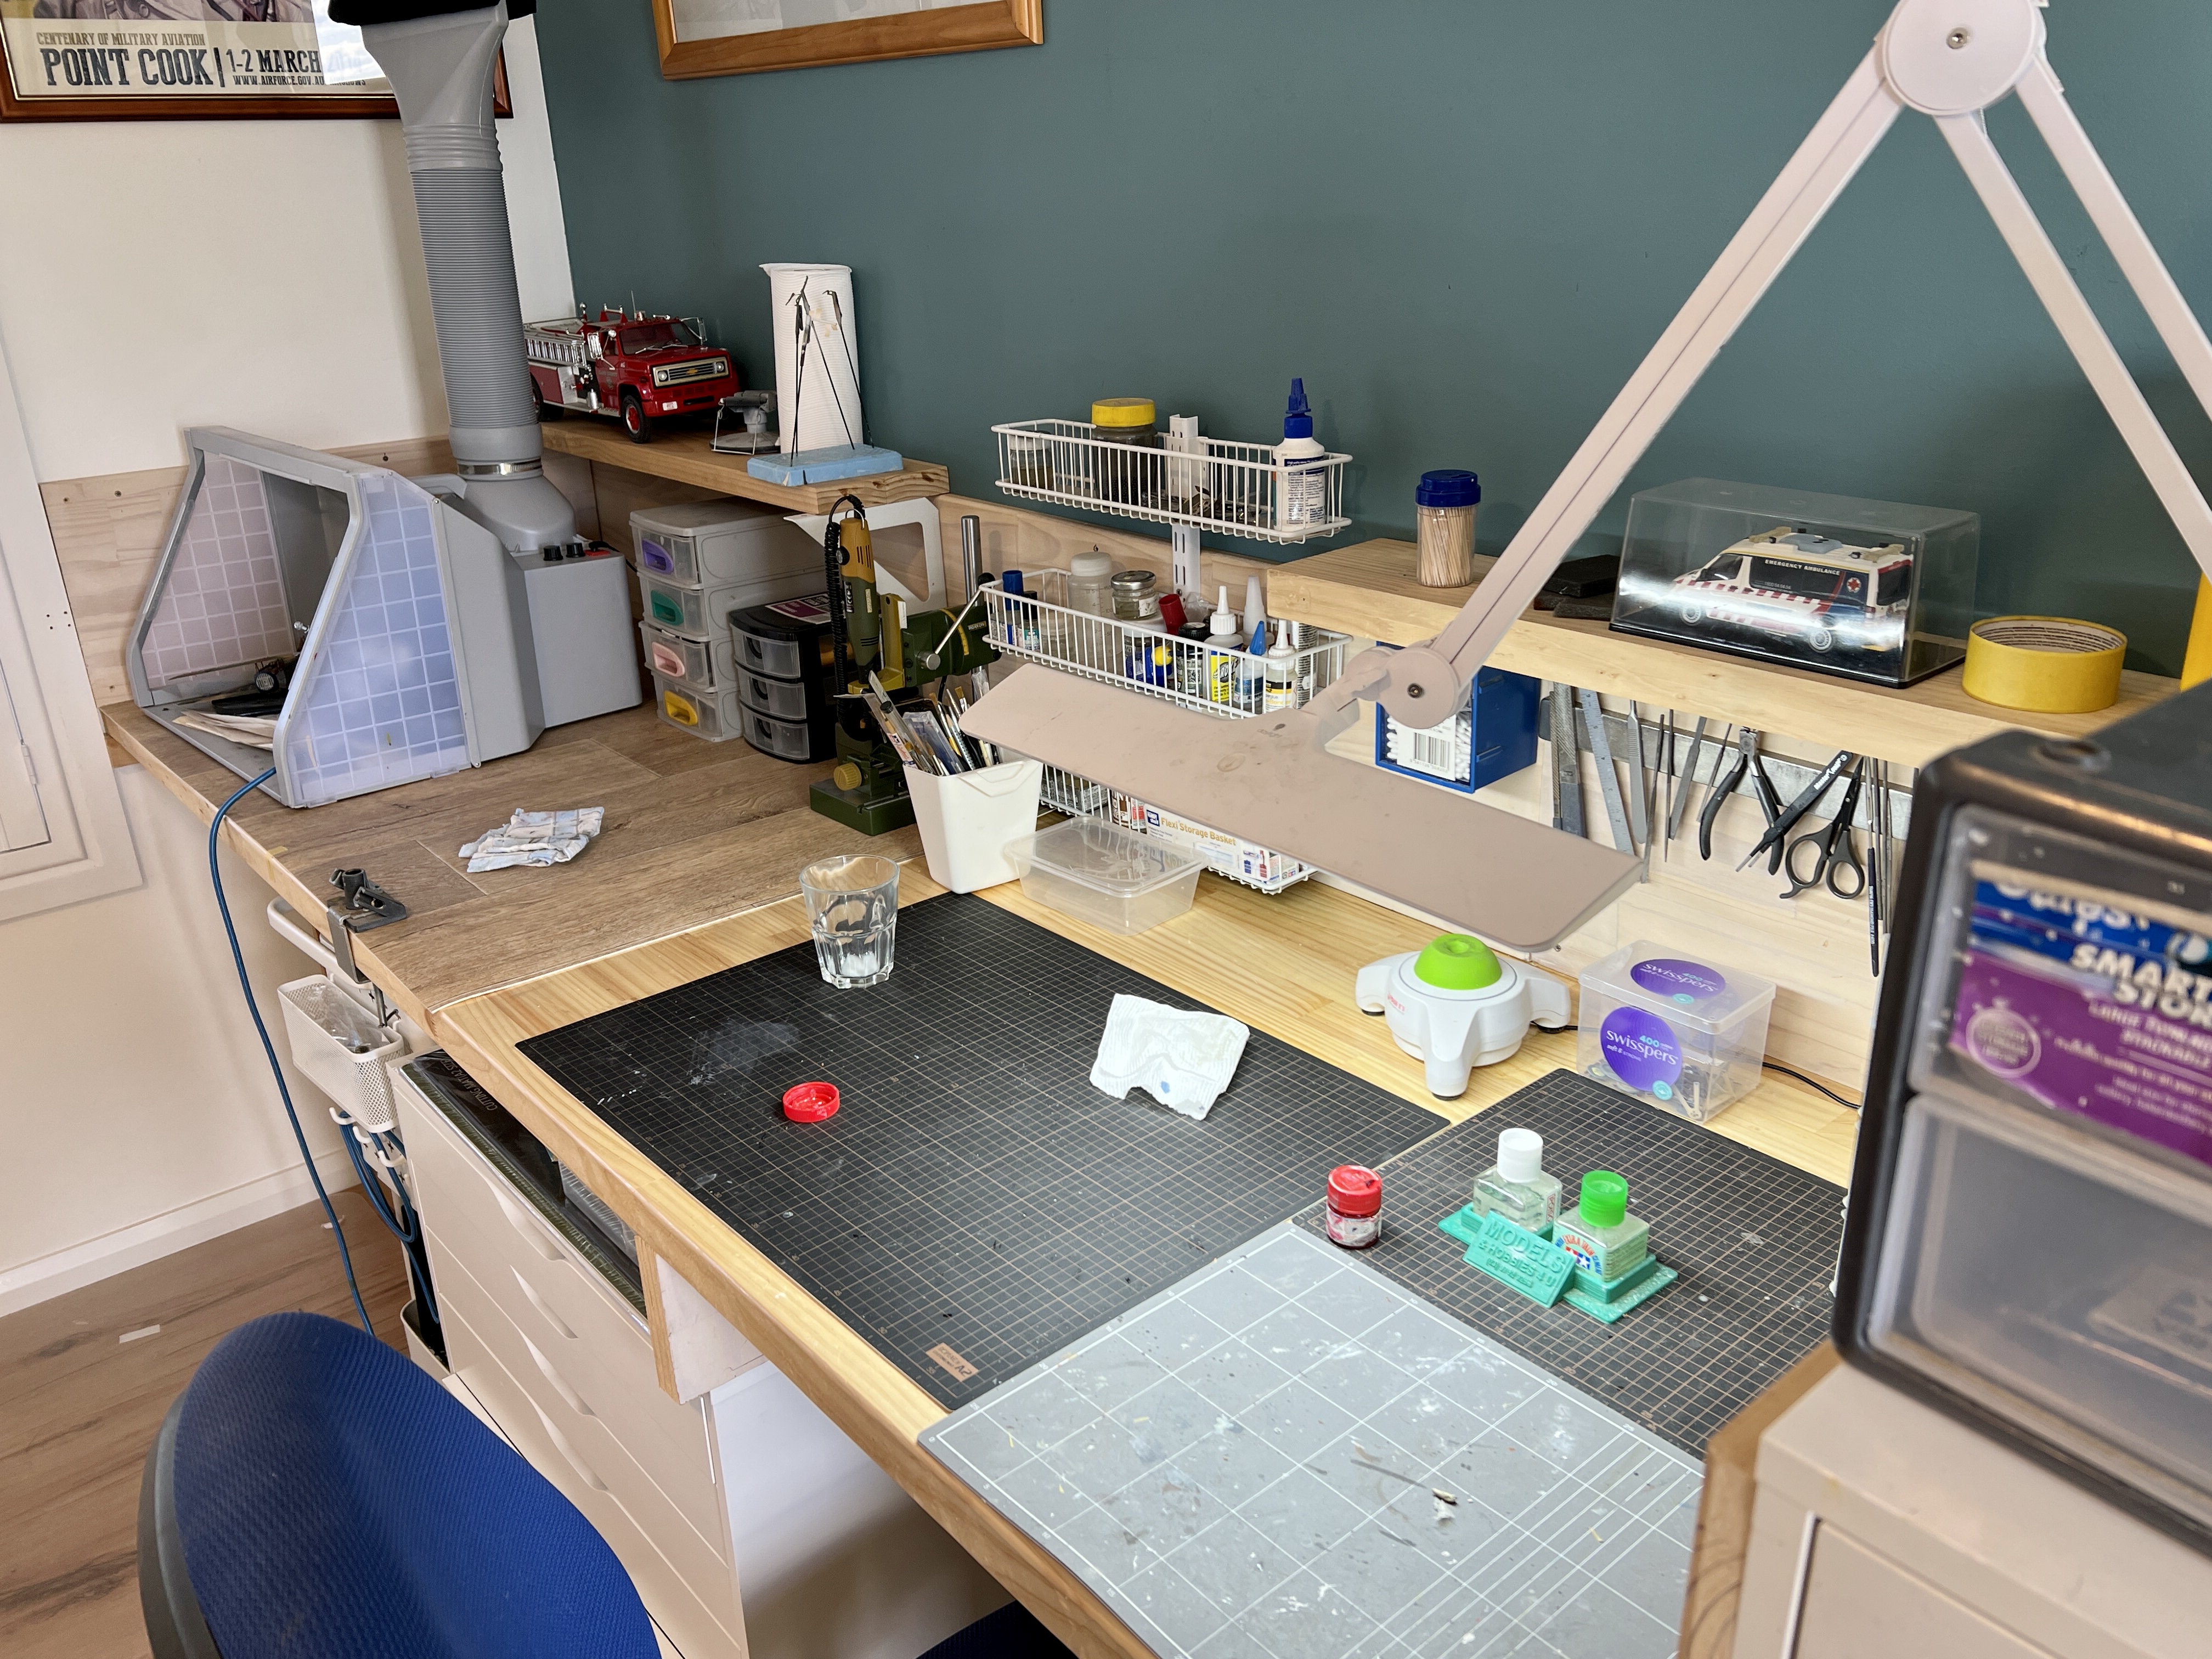


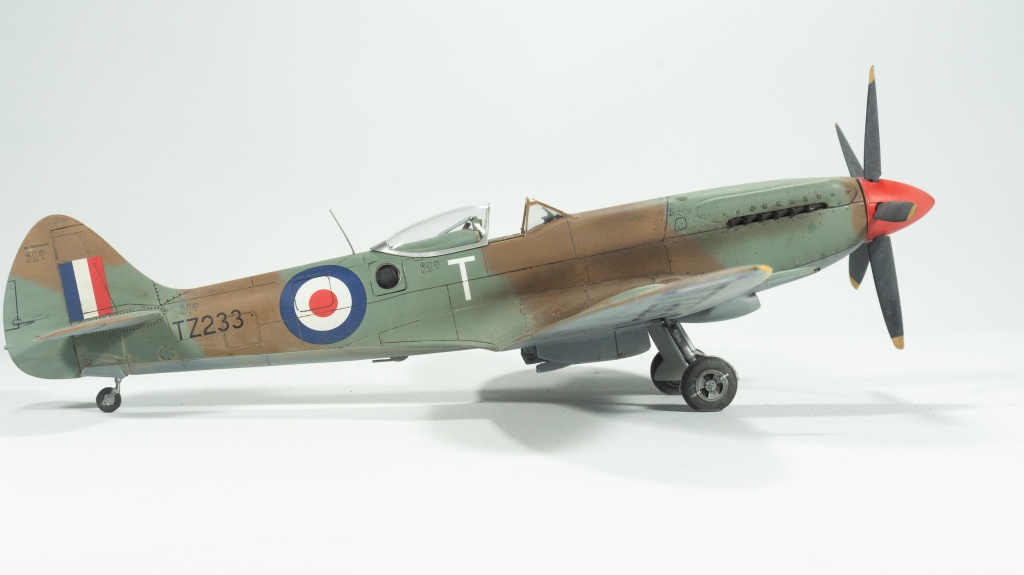
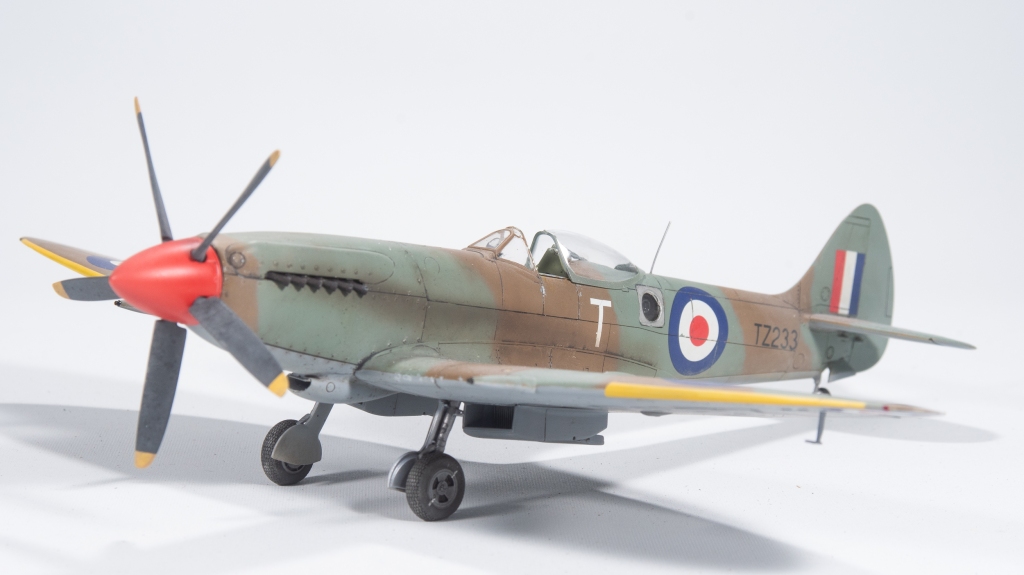


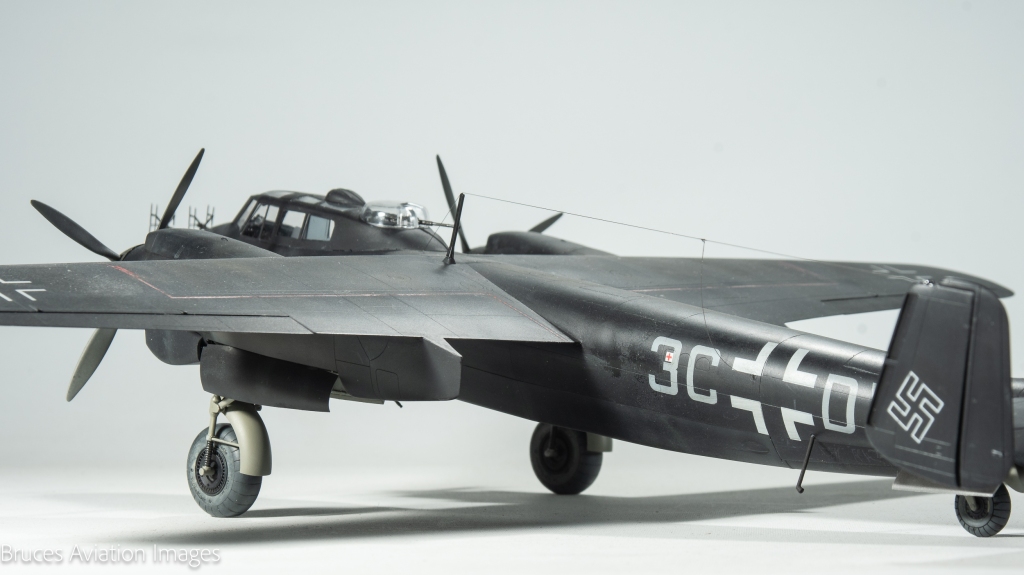

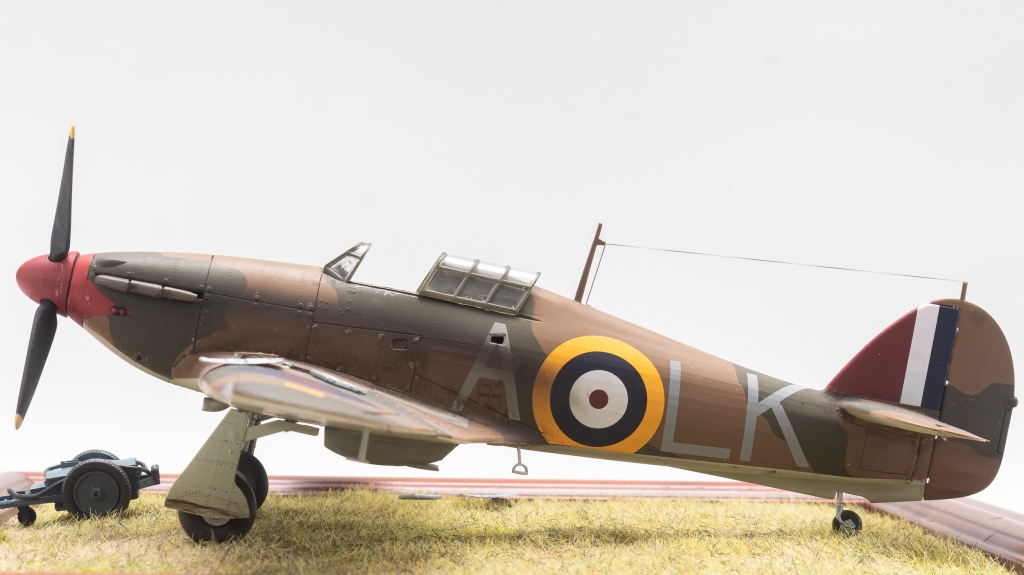


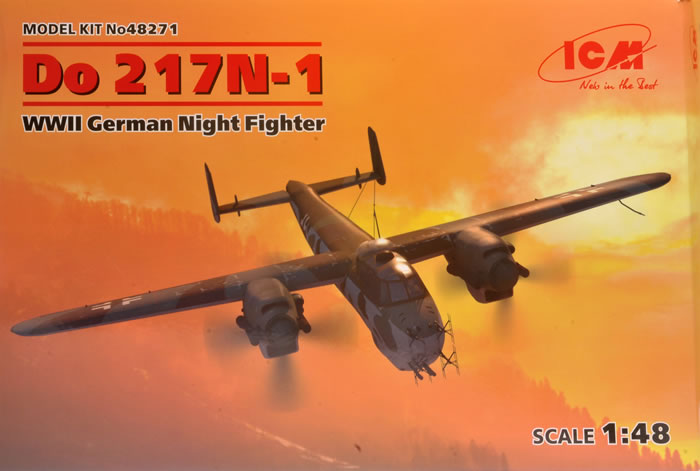
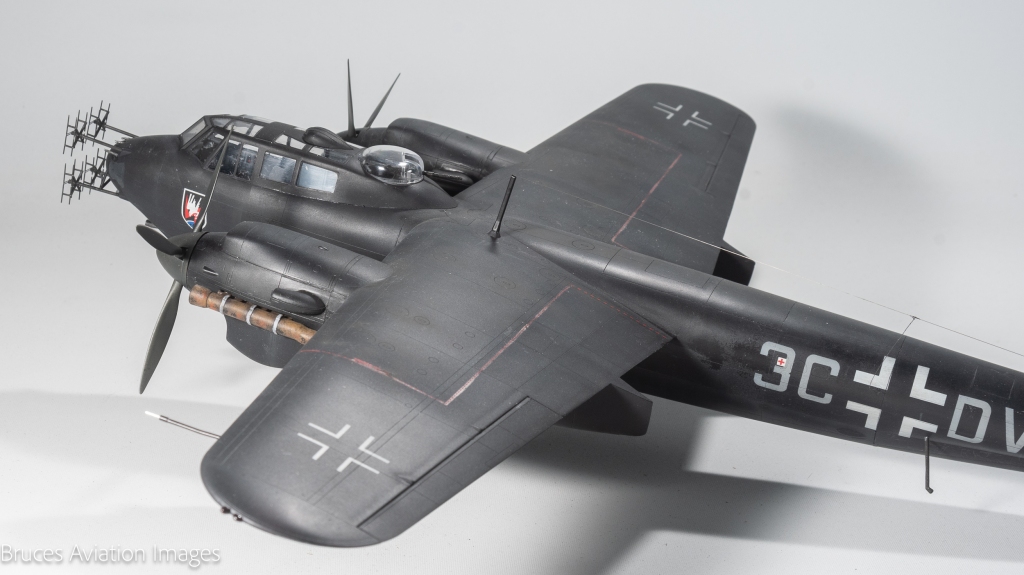


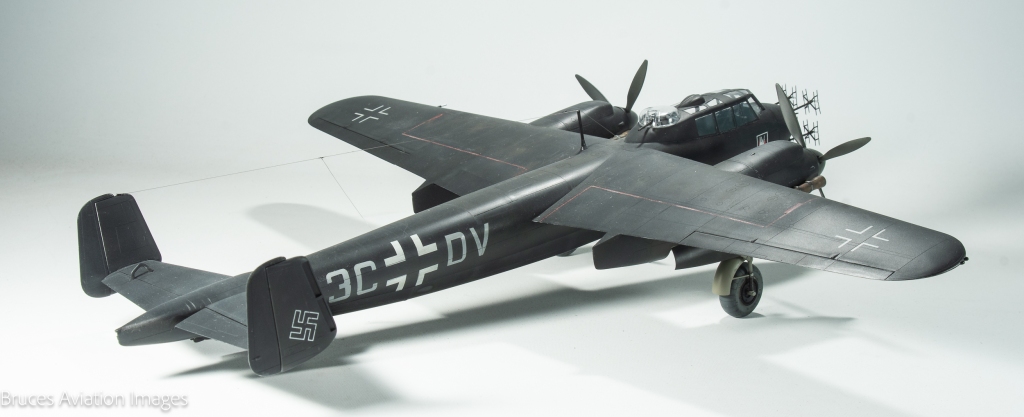


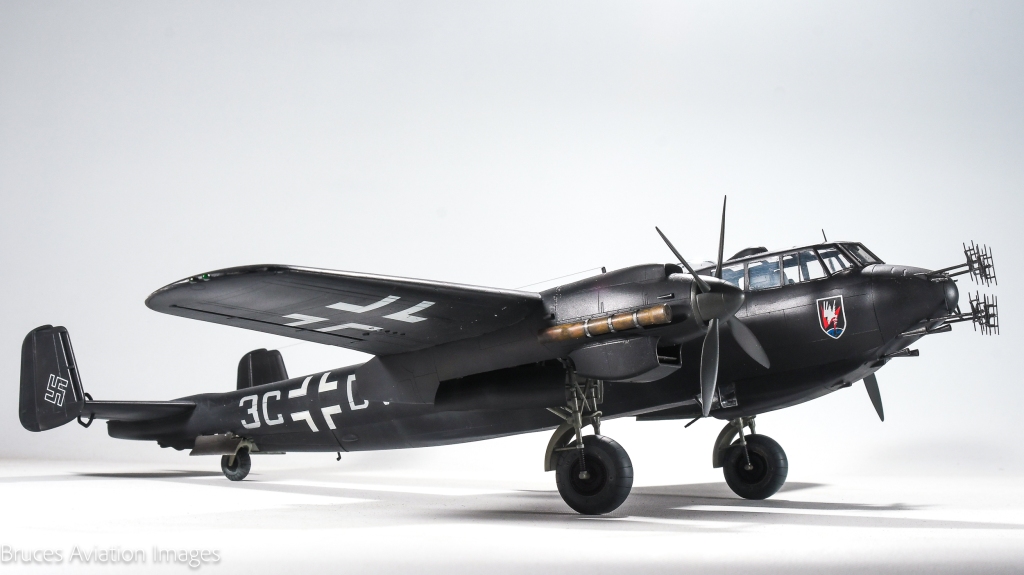

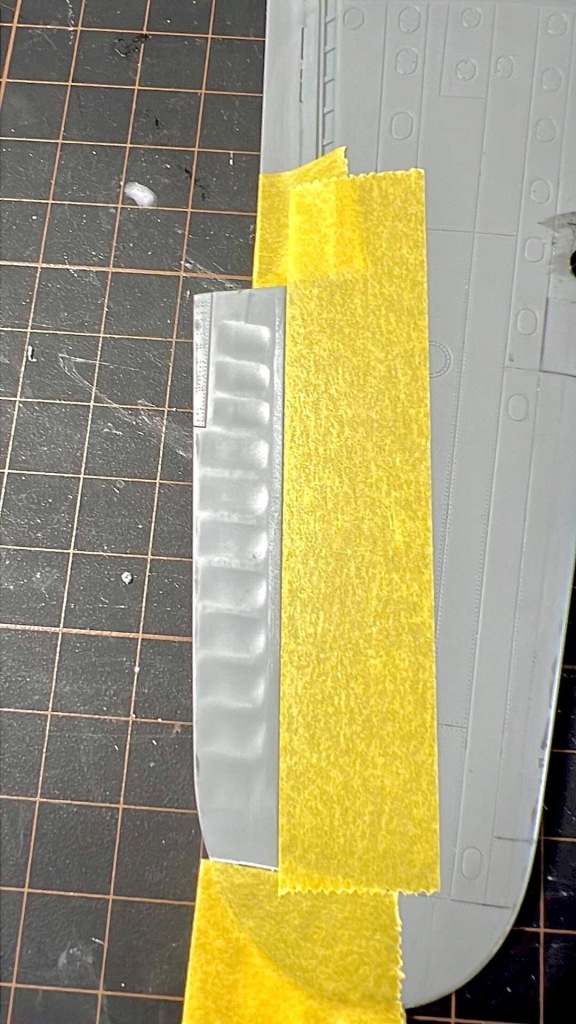
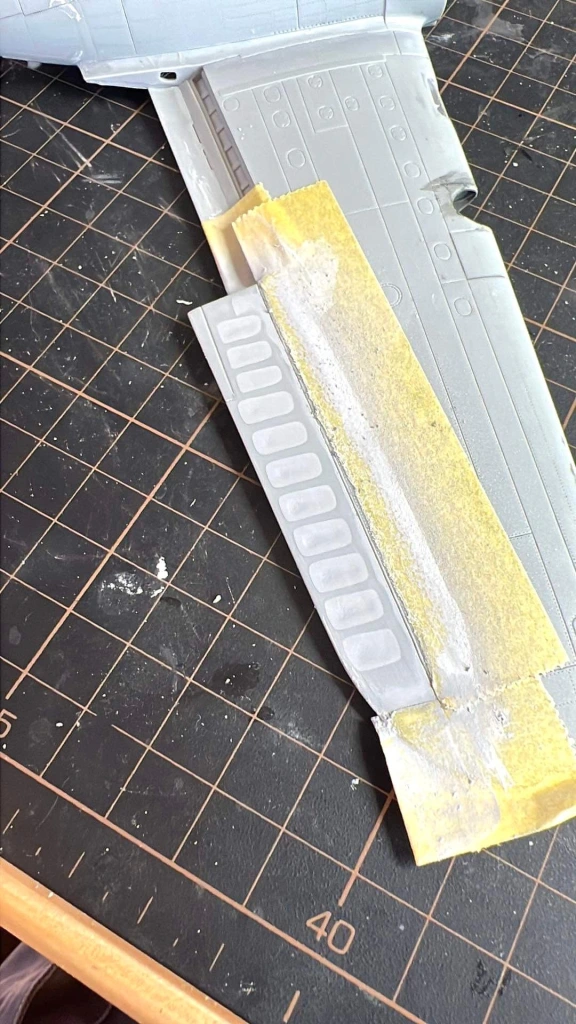


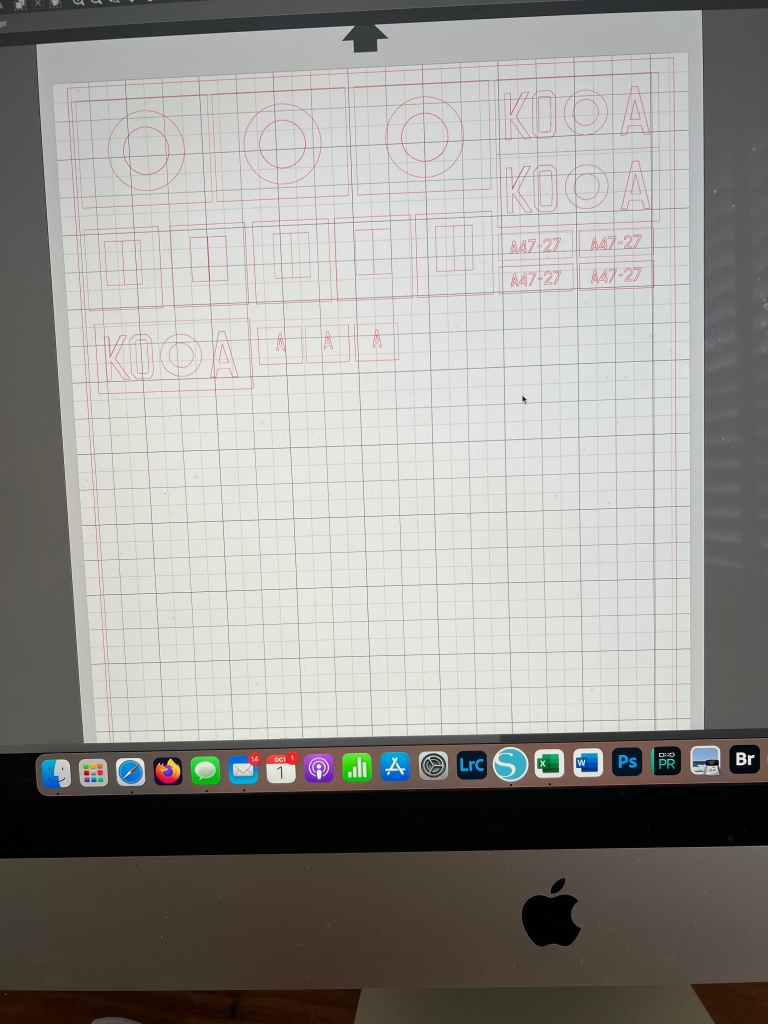


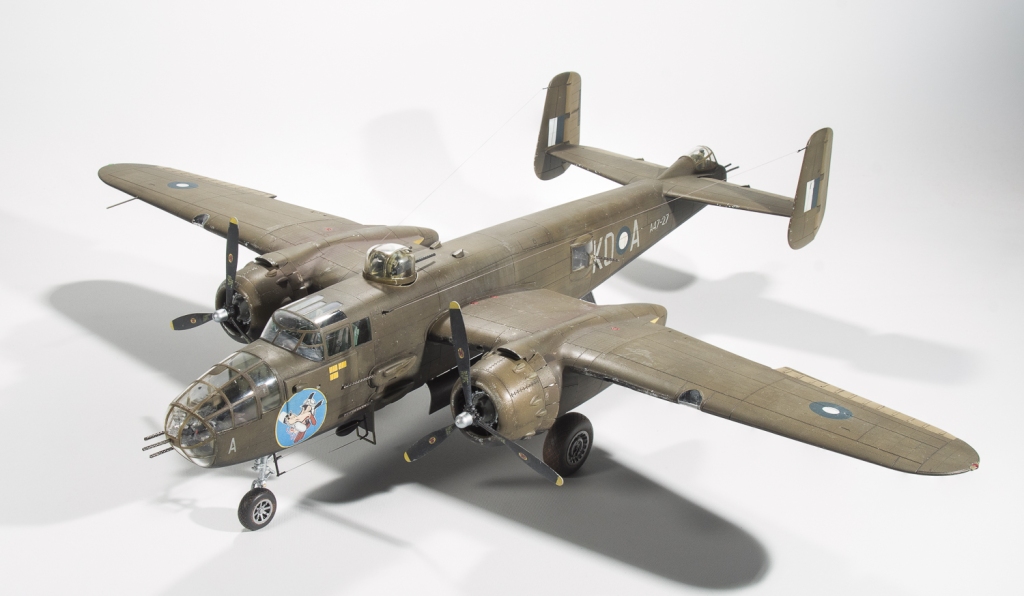


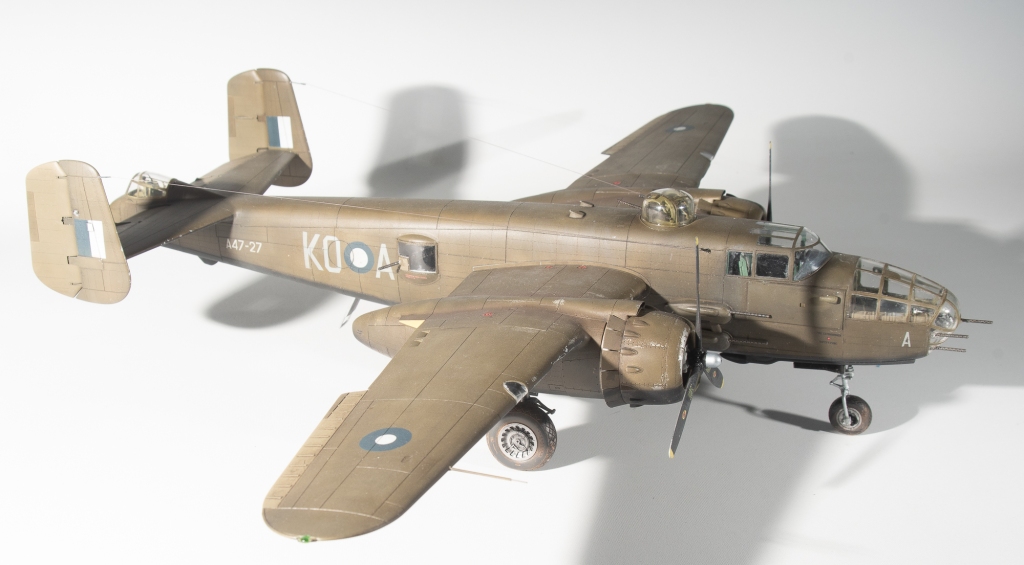

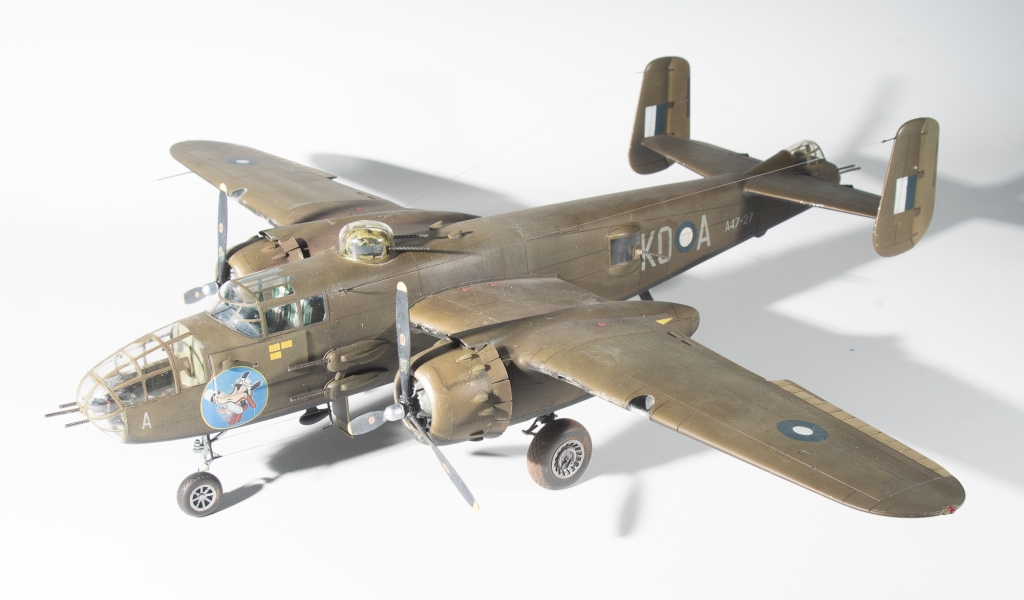


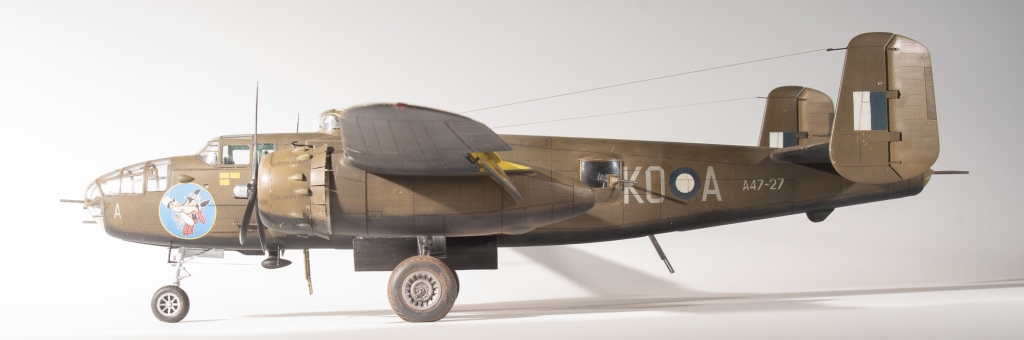


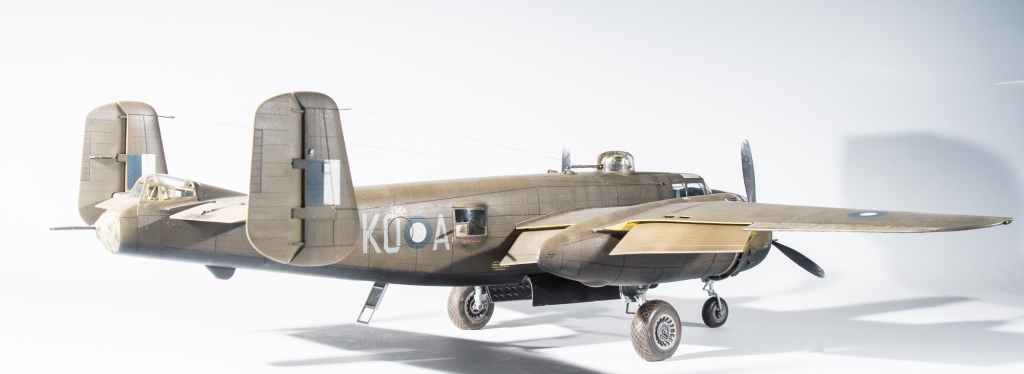


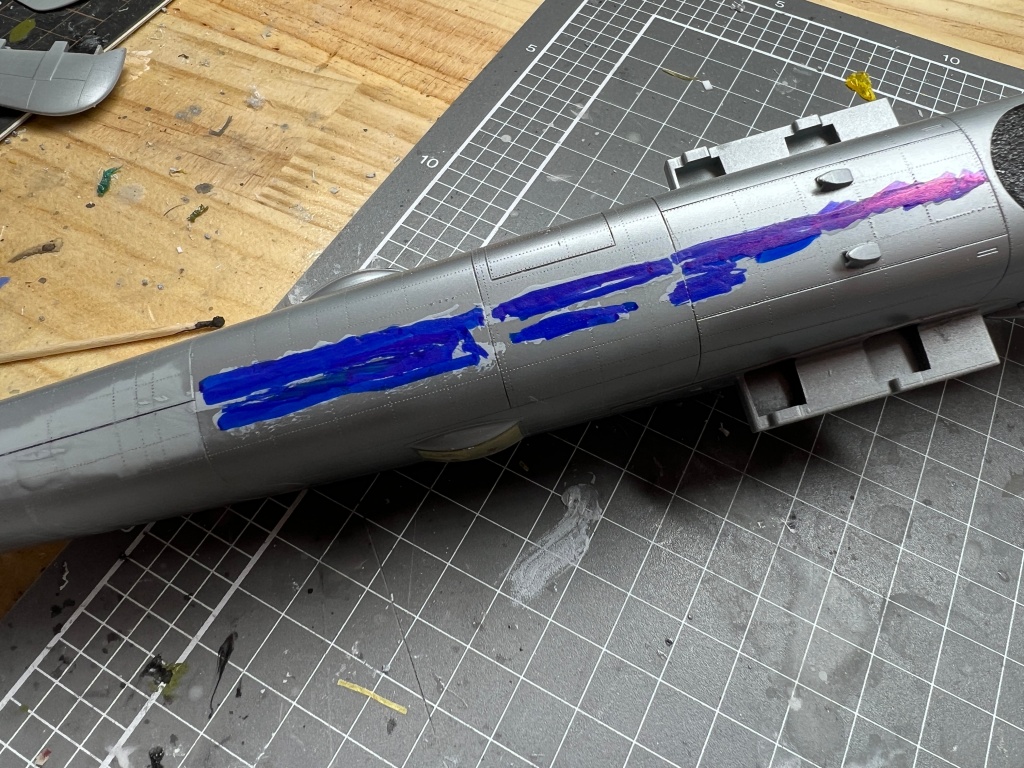


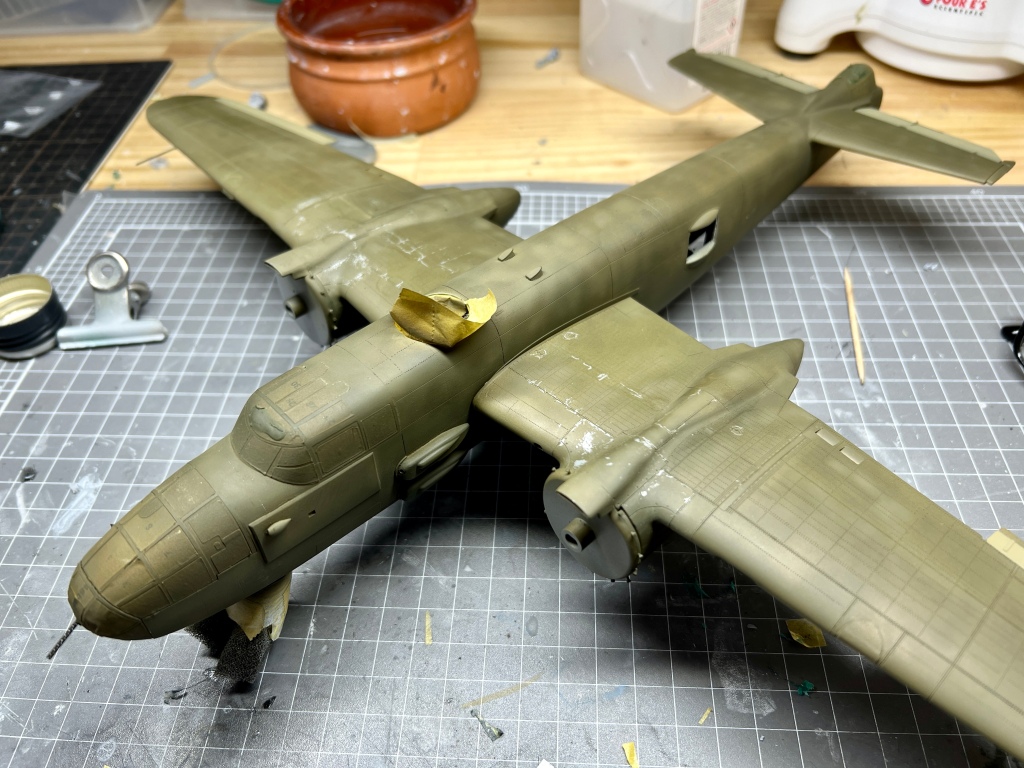


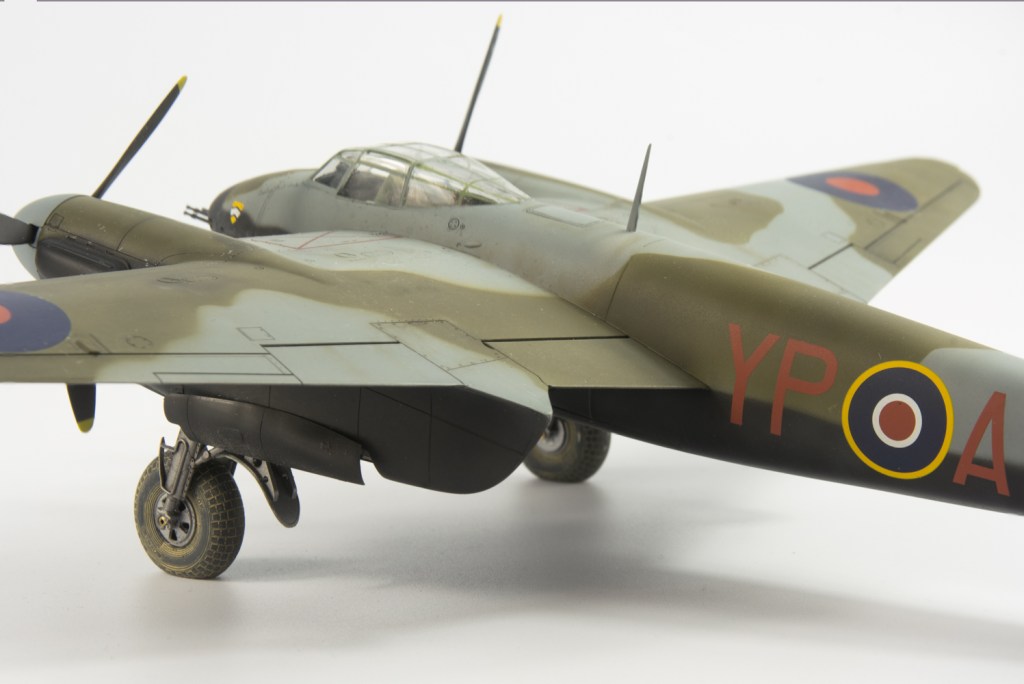


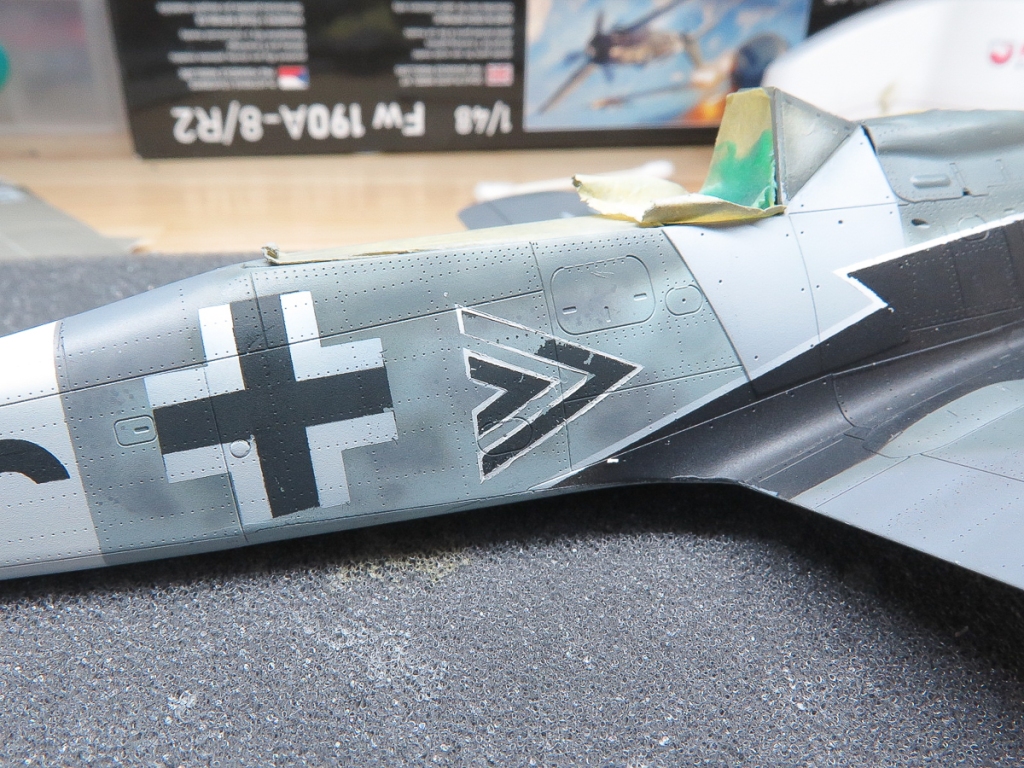


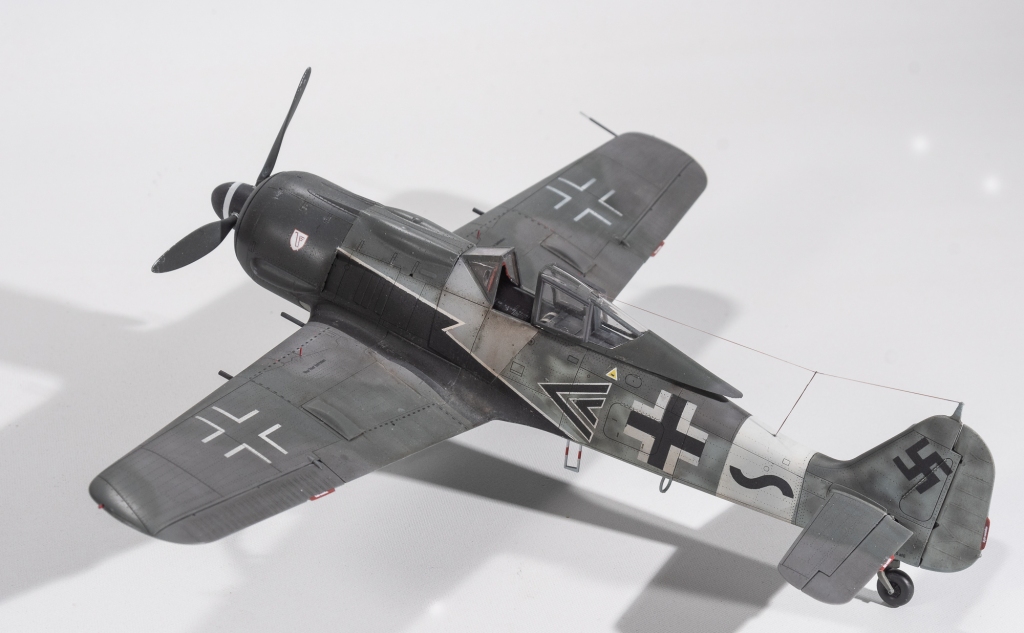
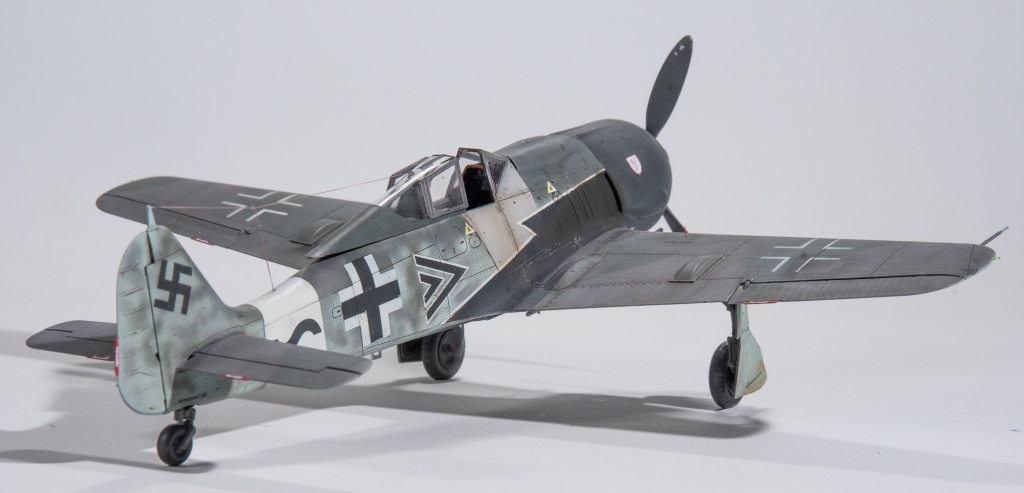

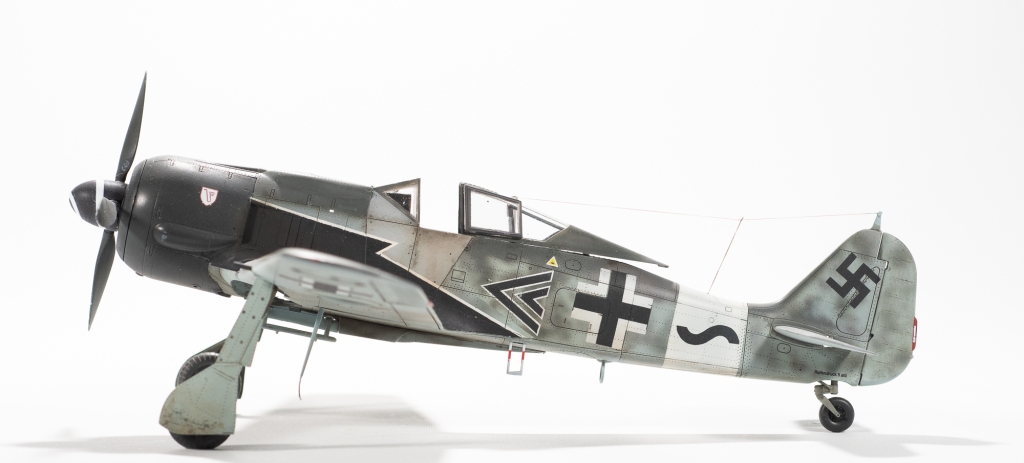


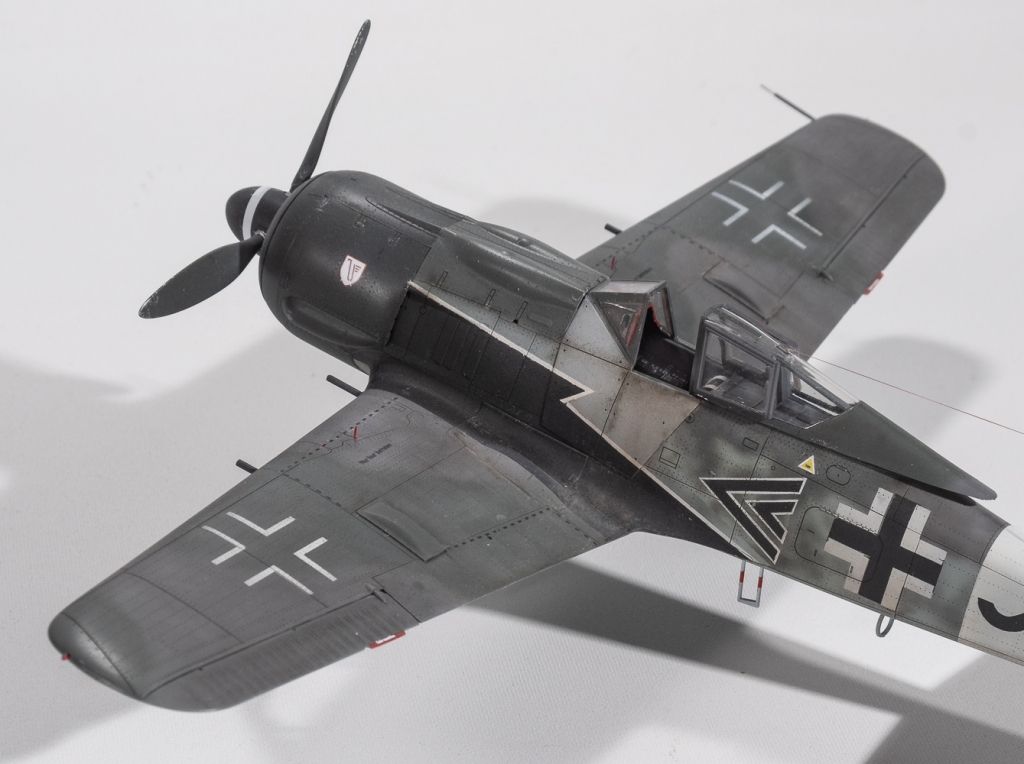
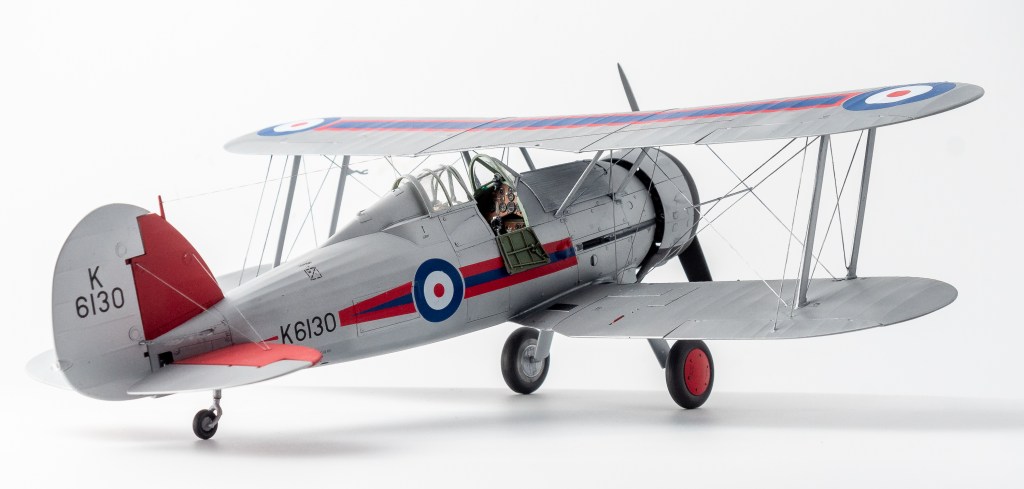


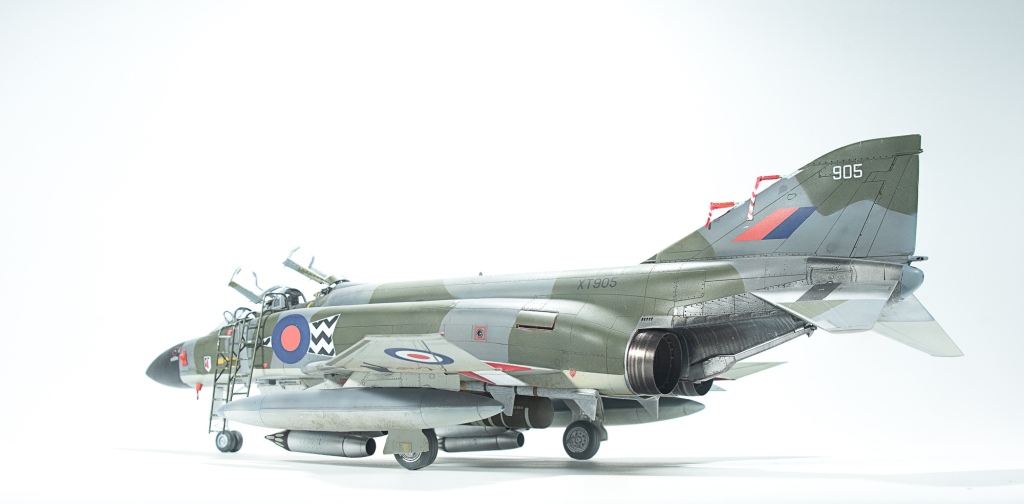

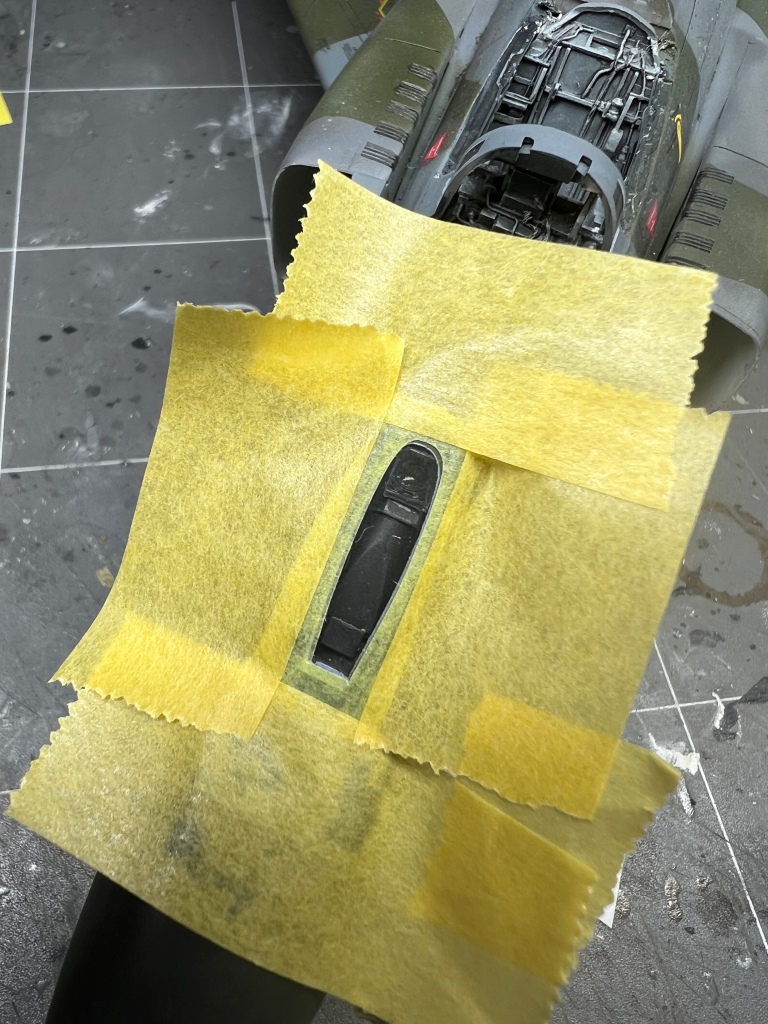
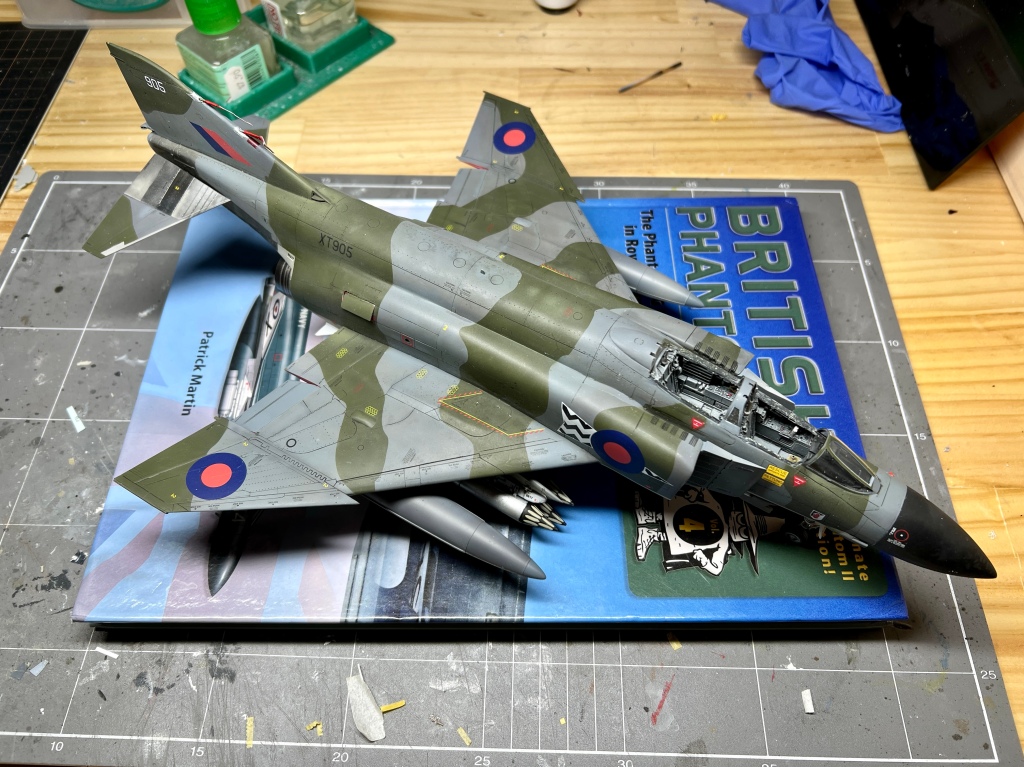


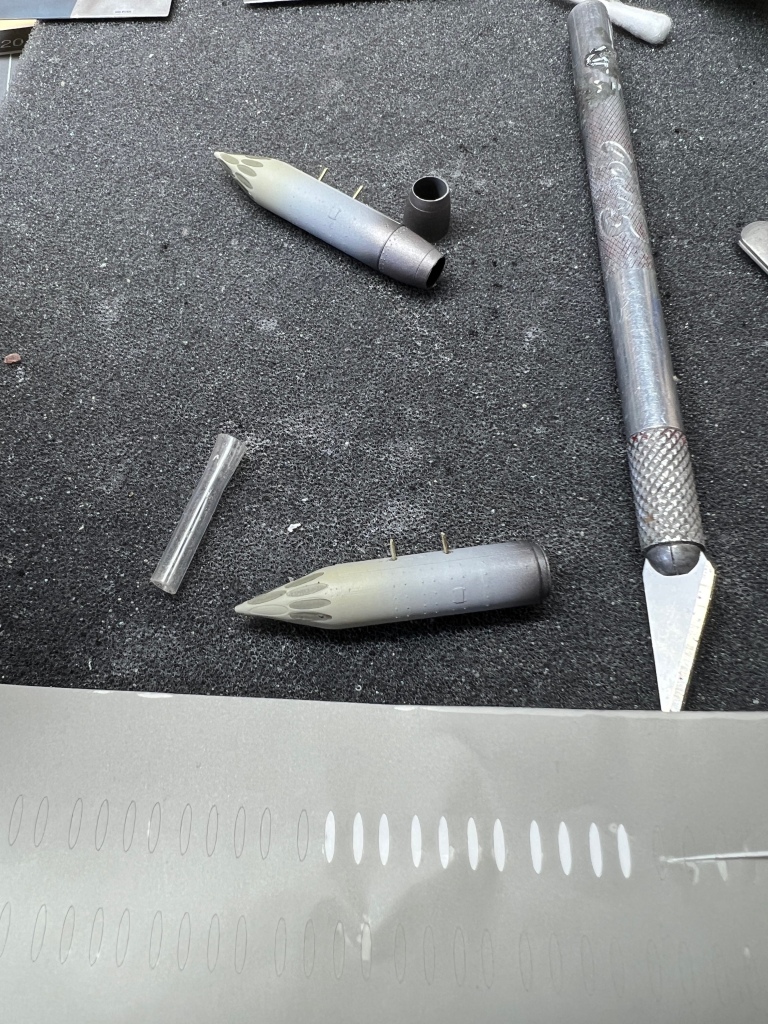
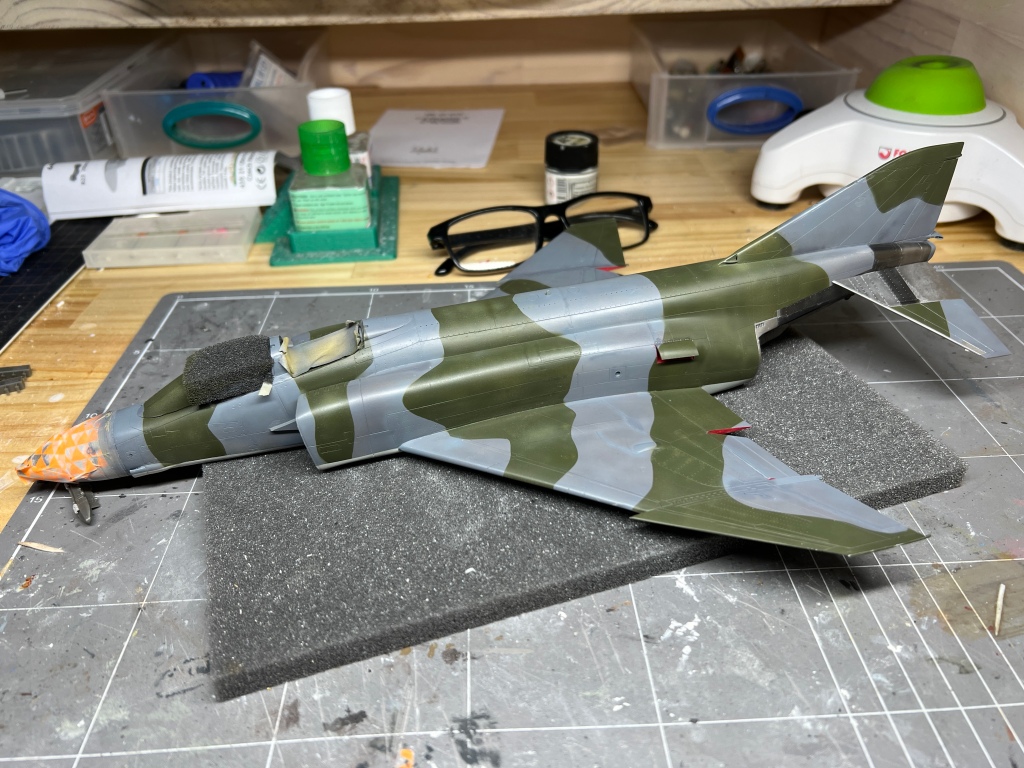
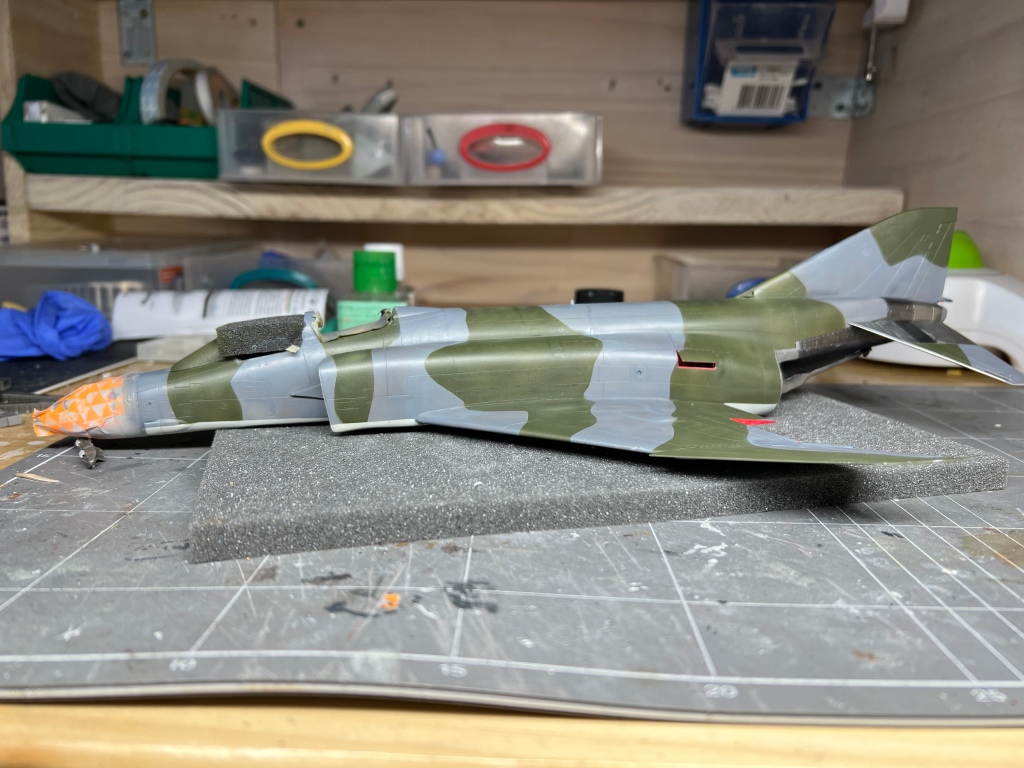


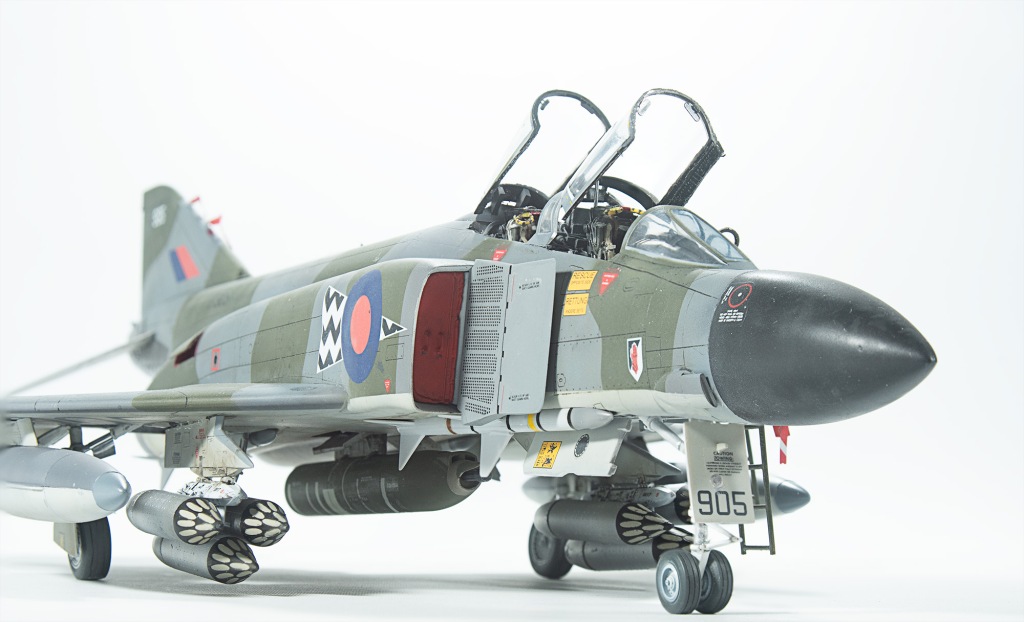


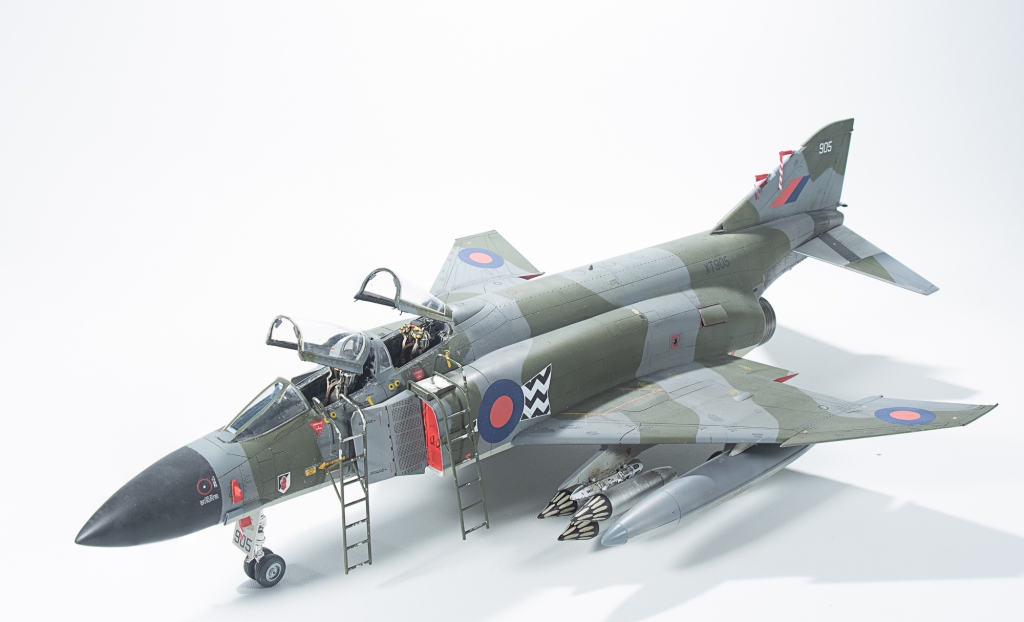
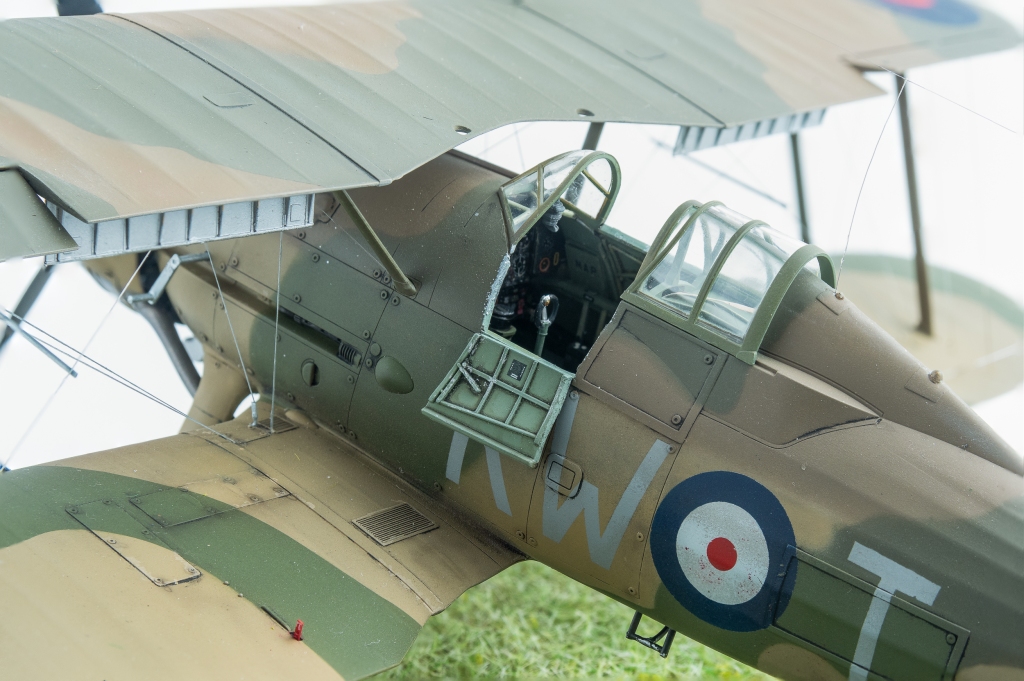
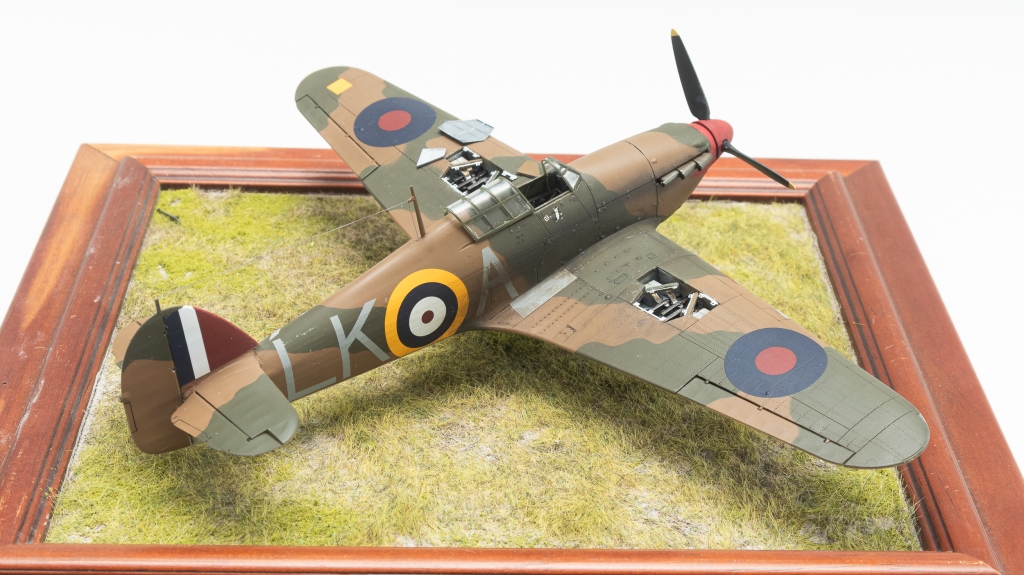
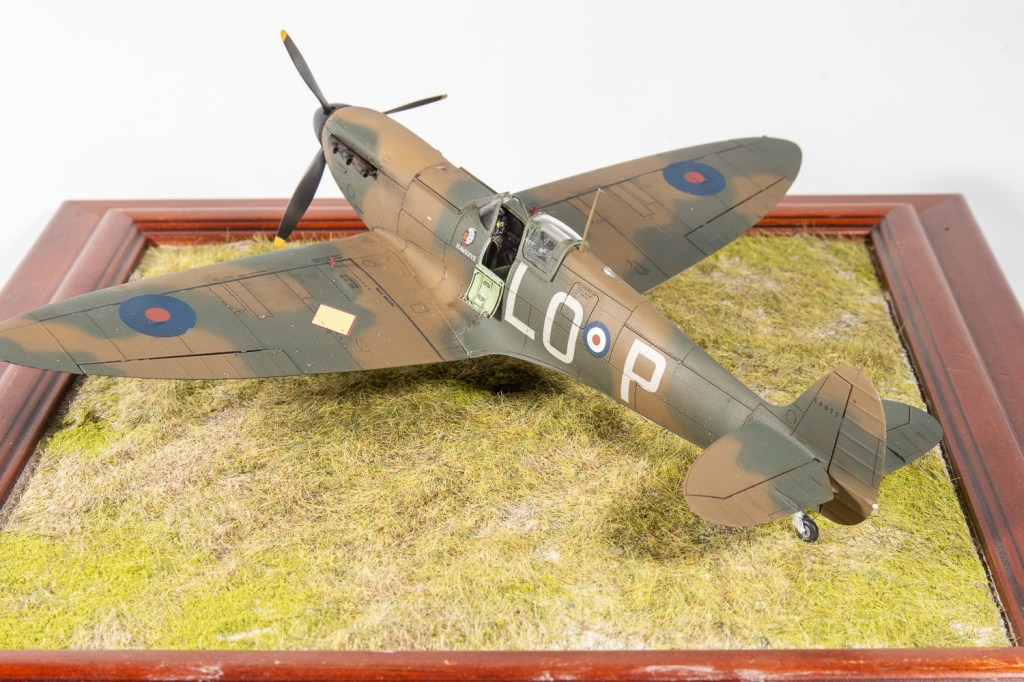
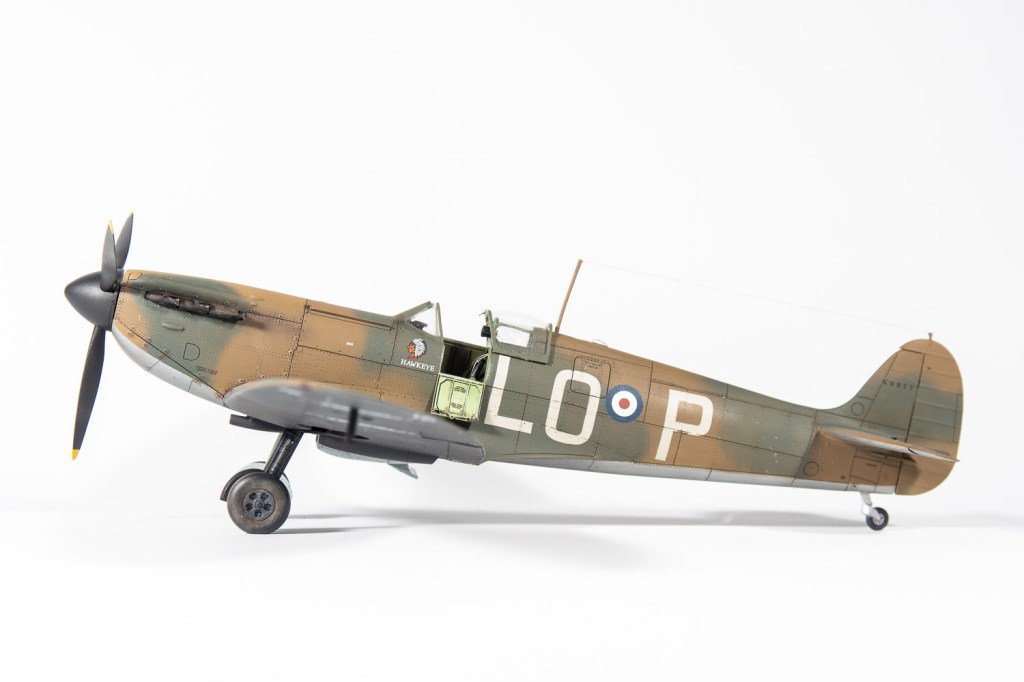
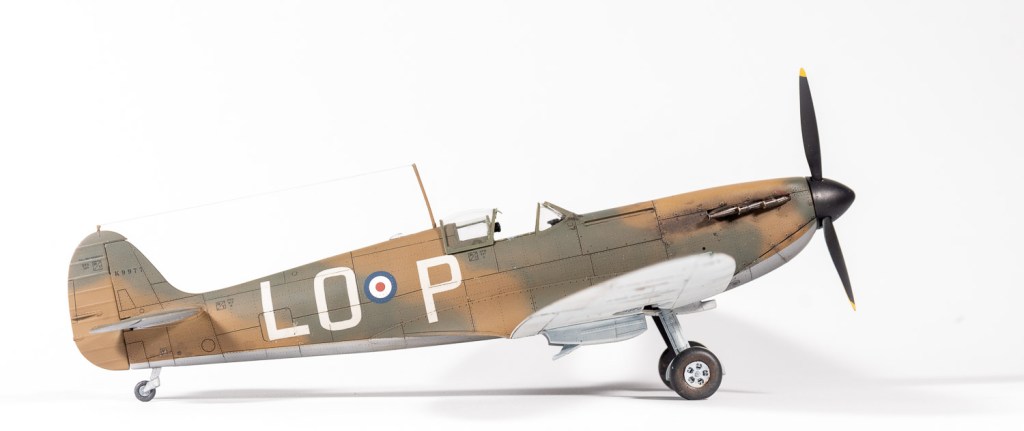


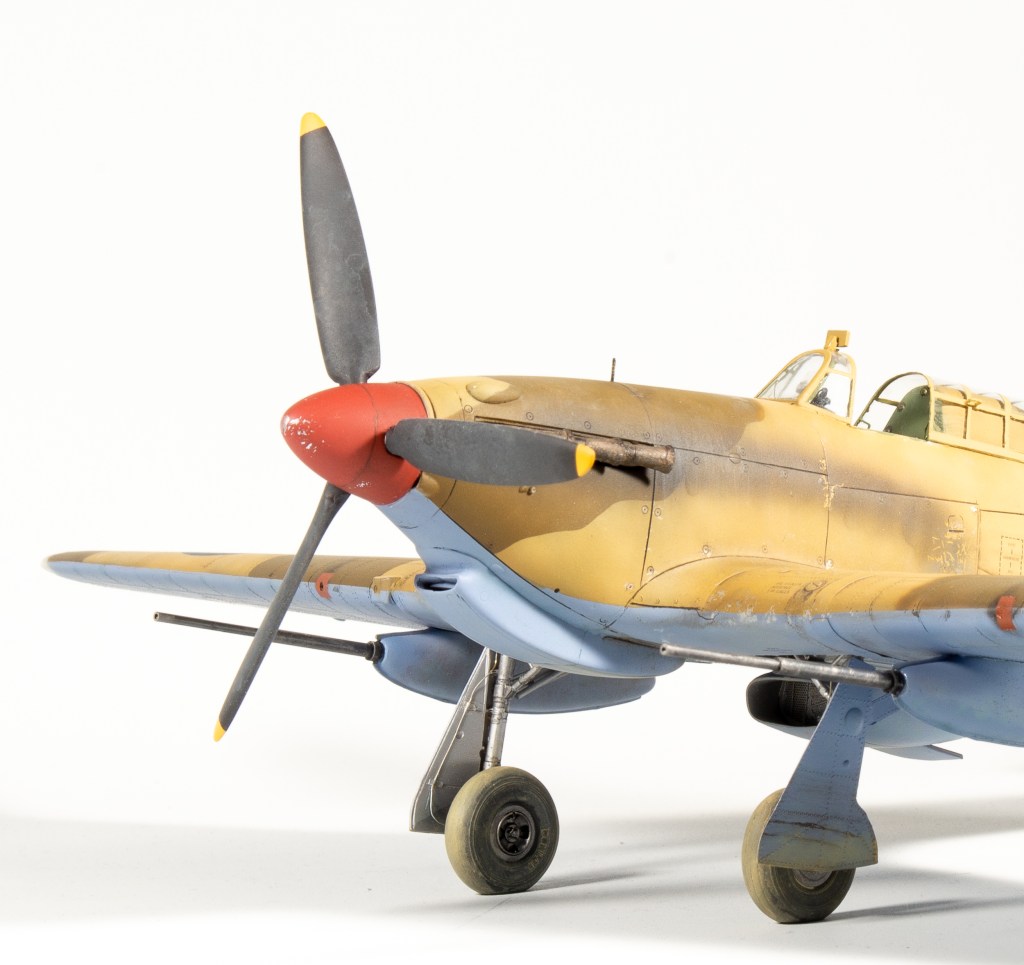
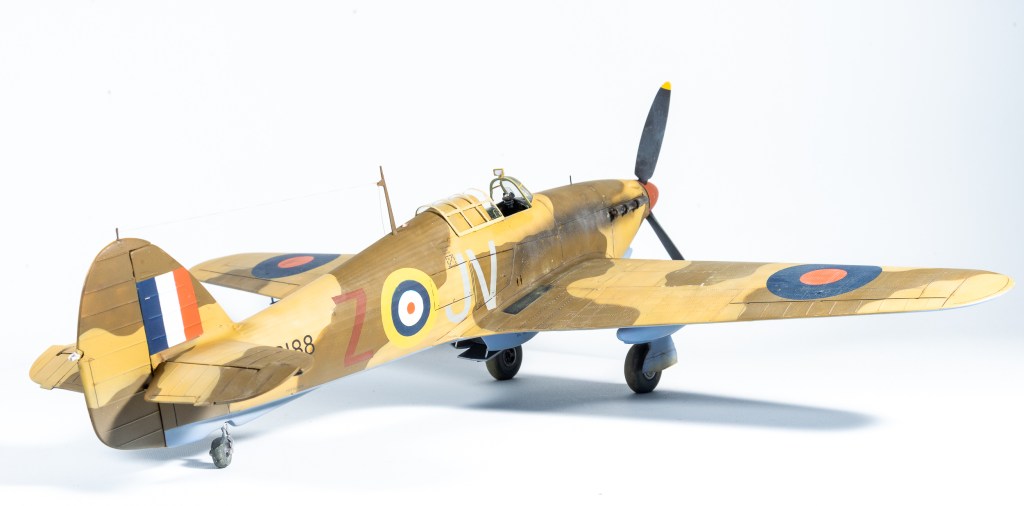


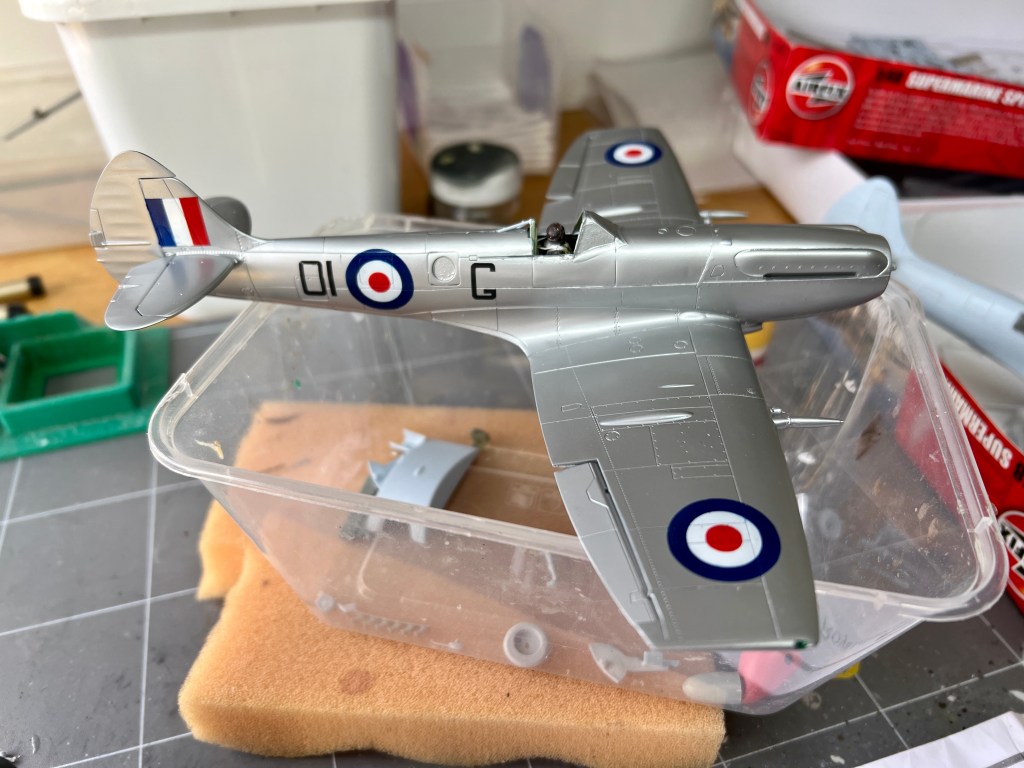

Leave a comment