Accurate Miniatures 1/48 B-25C/D Mitchell

  • Completed: 2022
  • Enhancements;
  • Wheels-Reskit
  • Machine gun barrels-Master Model
  • Decals: Eagle-cals Dutch Mitchells
  • Formation lights– CMK
  • Seats-Quickboost

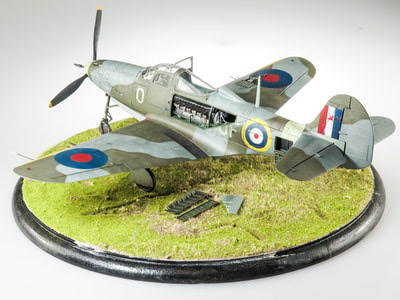
This is the second time I have tackled the AM Mitchell, the first one ending up in the bin, having never got to the painting stage, so Im very happy to final have a completed AM Mitchell in the cabinet, albeit not the first Mitchell to grace my shelves, having built the old Monogram B-25J about two decades ago.

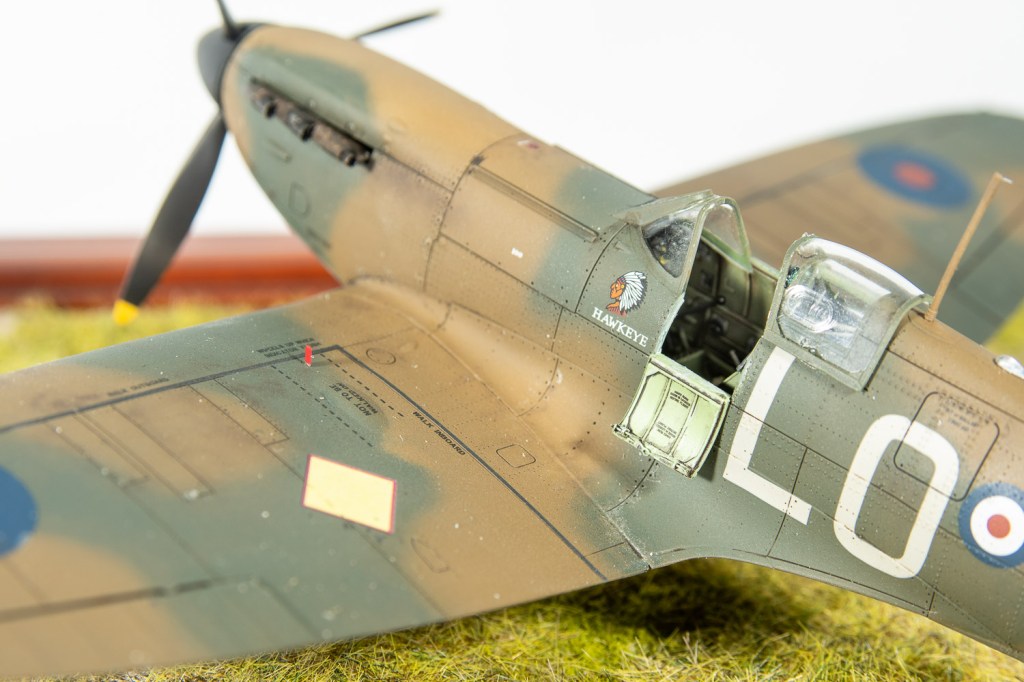
My memories at the time of the A.M Michell was its fine engraved surface detail comprising rivets and panel lines plus fasteners, and its detailed interior, both features which garnered it praise in the modelling press at the time of its release. Critiques were too narrow cowl openings and a nose transparency which perhaps sloped too much in profile

Fast forward to this year and a third of the way into the build, my over riding thought was “this aint as good a kit as I remember”

The surface detail was in places shallow, rivets and panel lines were definitely not consistent in depth, fit was average, especially the nacelles and intakes, and transparencies were certainly not crystal clear.

The instructions I remembered being clear and informative did not really point out location points of some parts accurately, leaving the builder to guess on a couple of occasions. That said enough alternative parts are included to build a few different modifications of the B-25C/D Mitchell. The instructions helpfully pointing these out for the kit schemes. If you are doing another scheme though, as I was, you’re best off consulting images.

Construction Notes

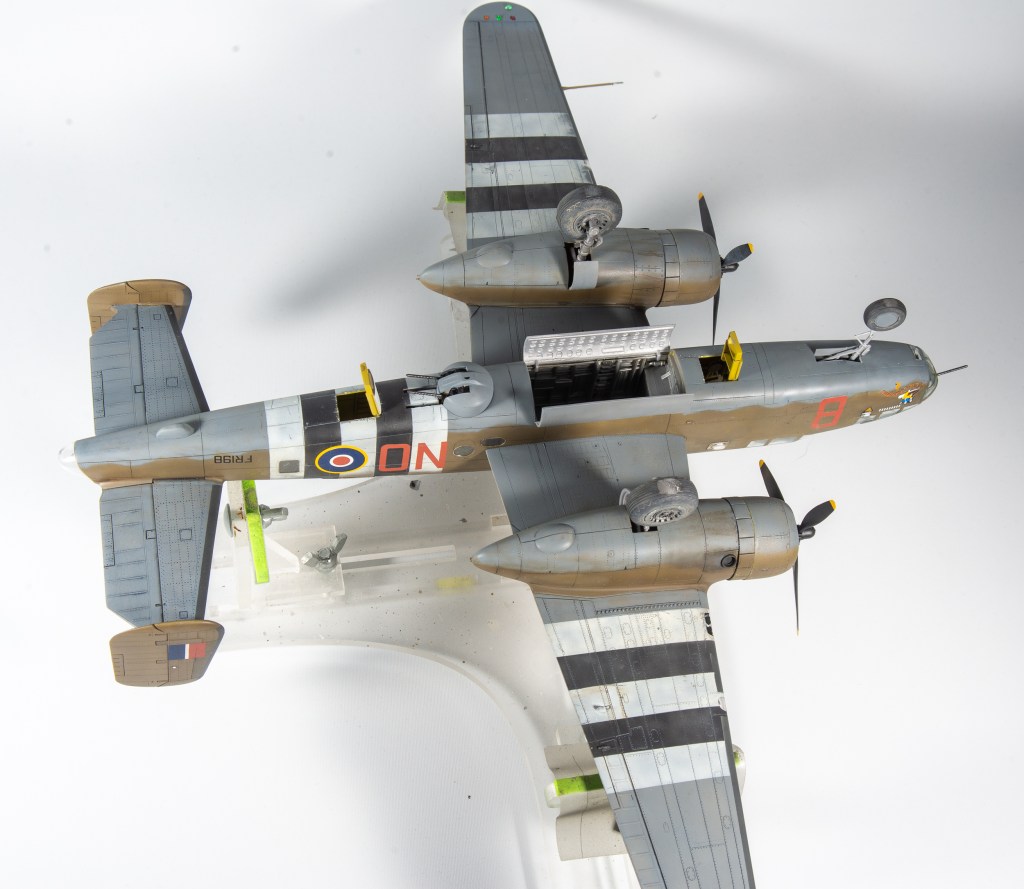
I pretty much left the interior in the aft fuselage out as you will never see it. The kit pilot seats looked a little chunky, so were replaced with the quick boost resin seats, complete with belts. Rather than painting the rear interior yellow Zinc Chromate, I think I should have used a green chromate. The first hint of fit problems came with fitting the bomb bay, the rear bulkhead not matching the contour of the fuselage at all. A not insignificant gap had to be filled with thick plastic strip. This being an original A.M boxing, the brass shim nose weights were included, these being augmented with some small lead shot poured into a couple of crevices. This precaution proving its worth with the completed model still only just balancing on all three points.

Blast panels in front of and behind the upper turret were cut from thin card on my silhouette machine using the templates printed on the instructions. I still think they are a little oversized though. The ventral turret and guns were a sloppy fit, the soft plastic not helping, the glue join breaking several times. In the end I replaced the kit gun breeches with blocks of plastic strip drilled to take the brass barrels, this being a lot more solid.

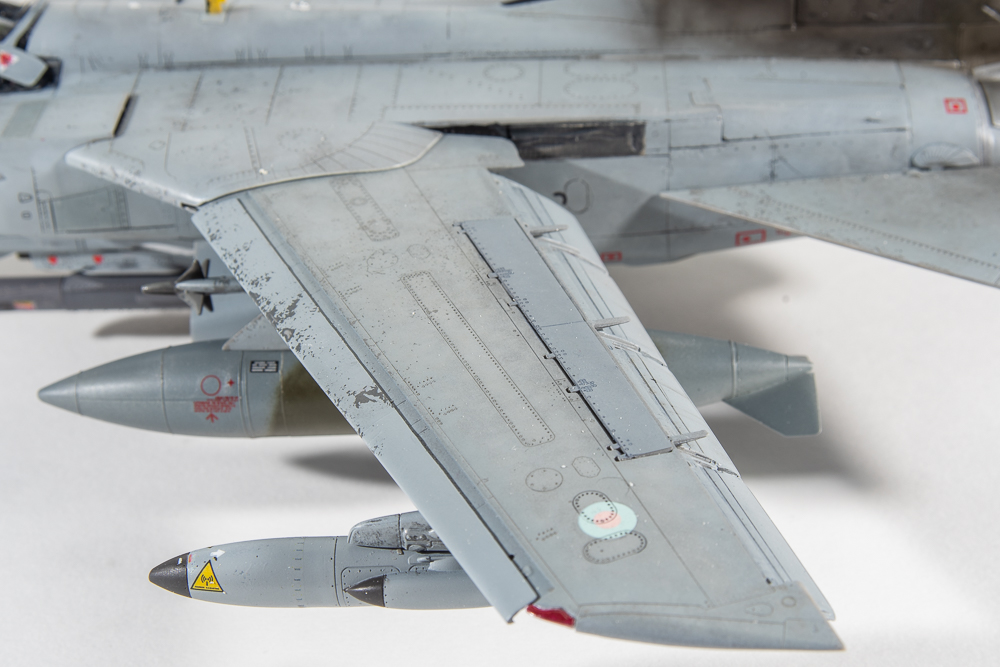
The real fight came with the wings though. Whilst the nacelles were a reasonable fit to the undersides, they left large gaps and steps on the top of the wing, with the separate carberetter intakes not helping. These parts required multiple goes at filing, sanding and re-scribing. Just when I thought I was winning, I noticed plastic on the undersides of one of the wings seemed to be delaminating, sure enough, I could peel up flakes of plastic. More supergluing, sanding and re-scribing followed. The plastic in my kit ws soft, almost soapy, which led to me managing to also break one of the wing spars, and nose wheel leg off It didn’t so much snap off as just bend and break during my repeated handling of the fuselage. The nose strut was rebuilt with brass tubing. The instructions call for it to be added prior to the fuselage halves being closed up, the narrow wheel well not allowing it to be added later.

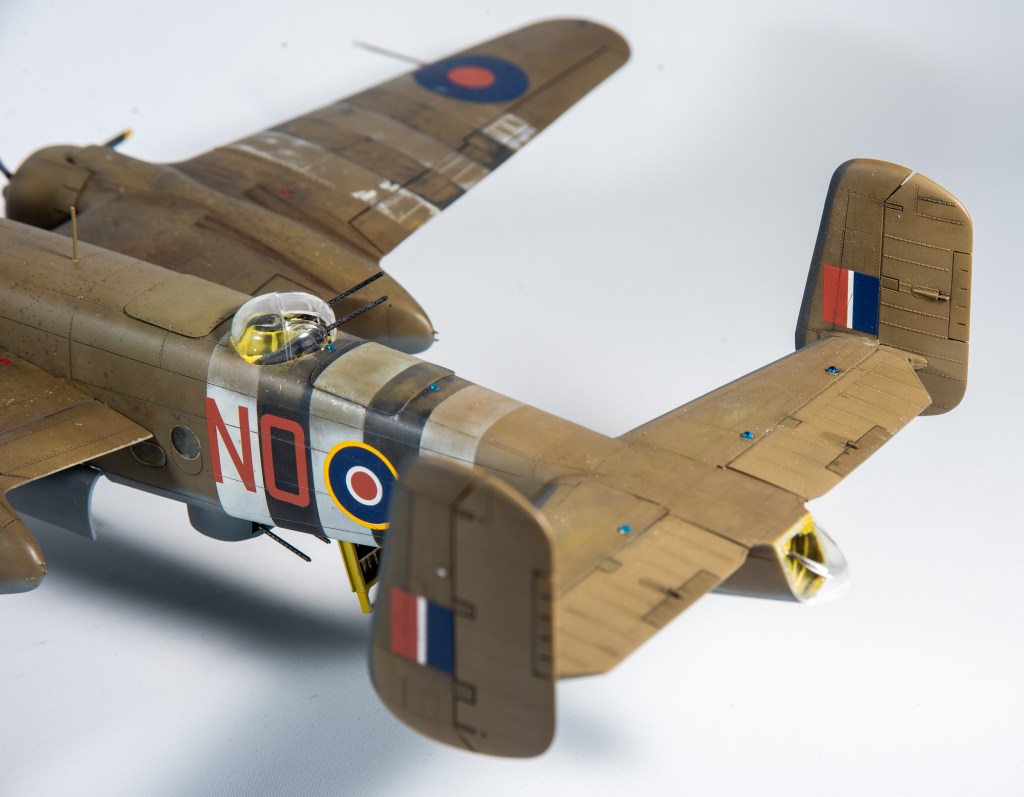
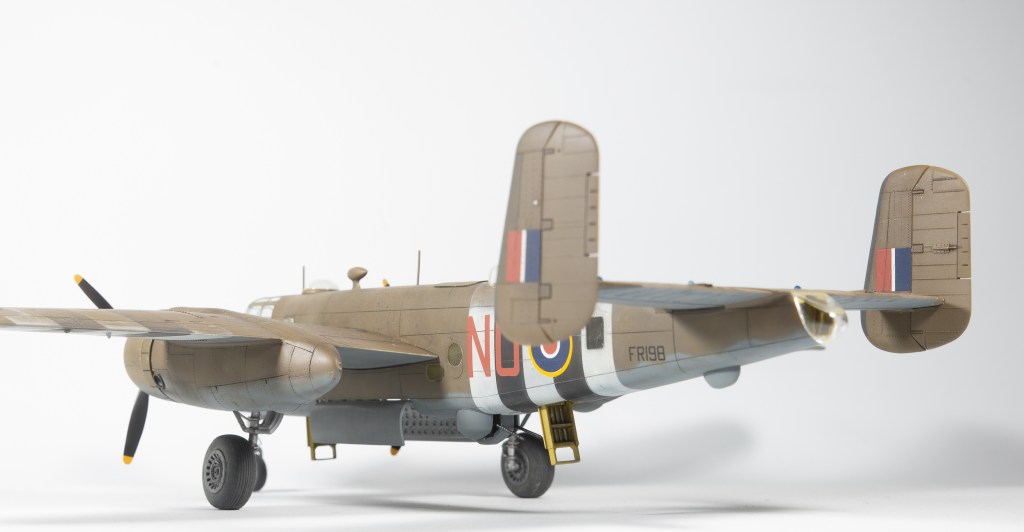
The tail plane assembly fit reasonable well, certainly not as bad as some other online modellers seemed to find, putty was still needed though, but only a smear. The leading edge landing light covers also required a fair bit of fairing in. The separate nose part also came in for some judicious sanding on one side to remove a slight step.

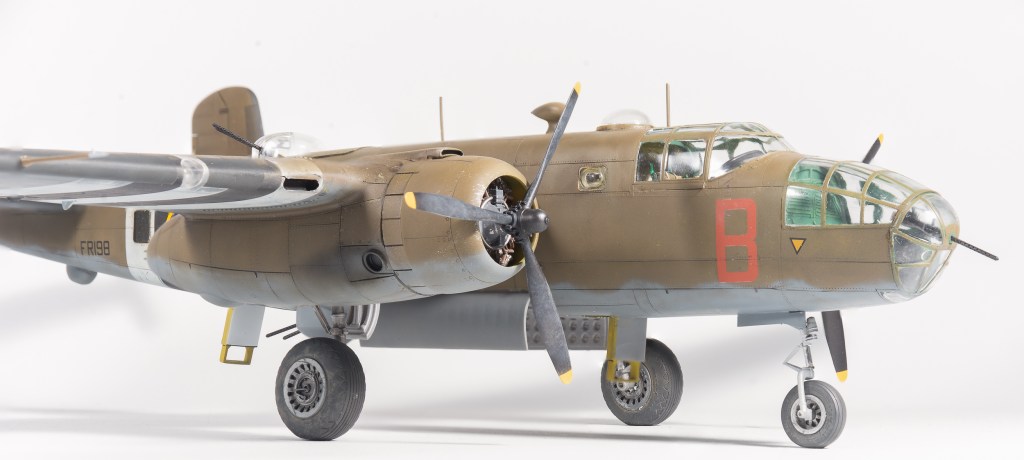
The kit wingtip lights and upper fuselage formation lights were all removed and holes drilled to accept aftermarket CMK lights, although these were the last items added. The kit cowlings were opened out slightly by wrapping sandpaper around an appropriately sized bit of dowel. They do not need much sanding to look a little better. I had a set of quick boost engines which look far better than the kit engines, but they need pushrods and ignition wiring adding and I was losing patience with the build, so used the kit engines after all. If you do use the kit engines, you will need to remove a section of the attachment collar, otherwise the crankcases protrude proud of the cowling face. There is a faint scribed line around the collar, which I used as a cut line.

After an uneasy ride, we had arrived at the painting stage

Paint and Decalling

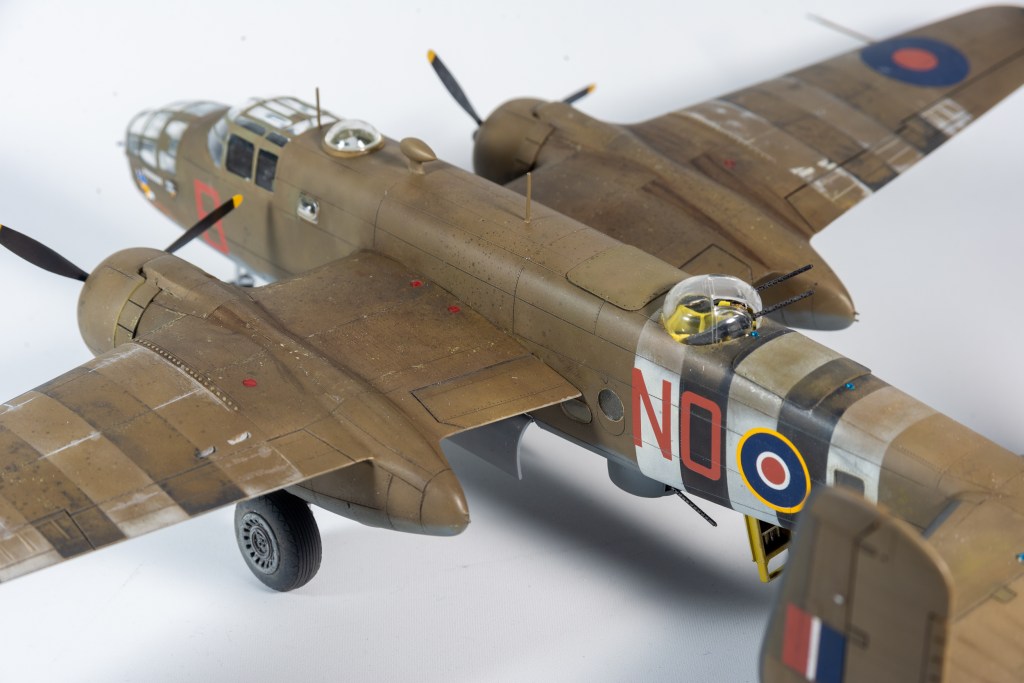
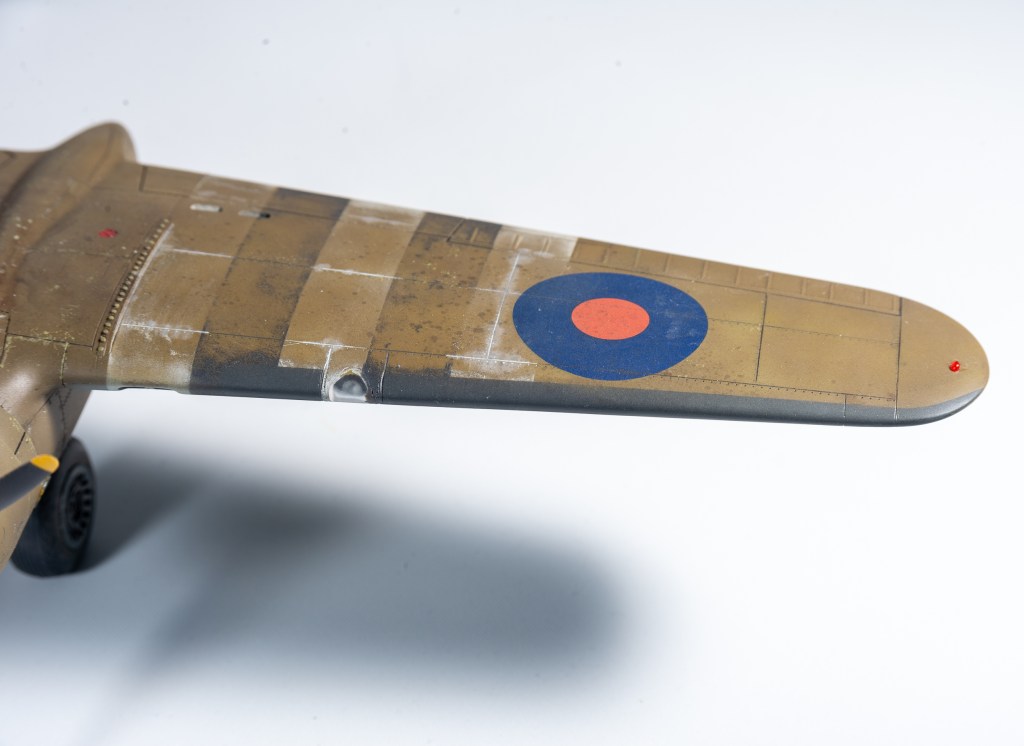
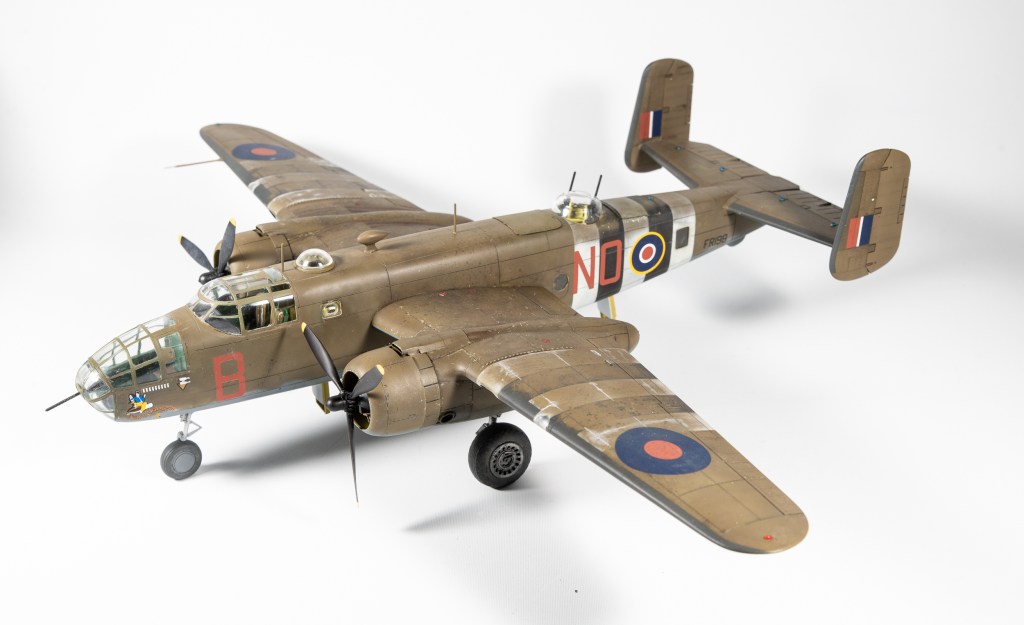
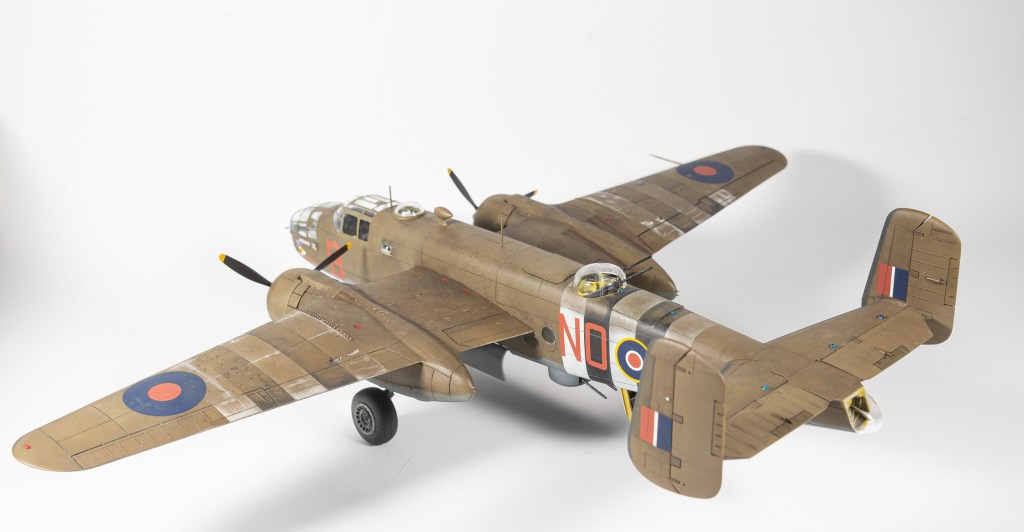
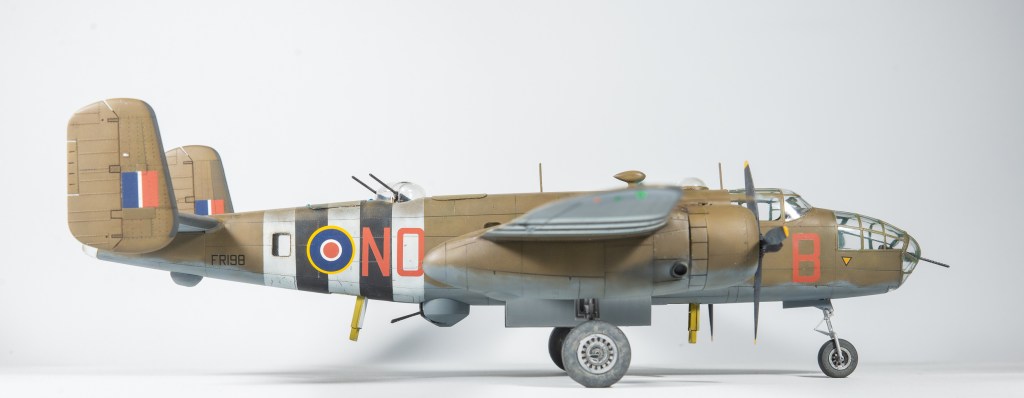
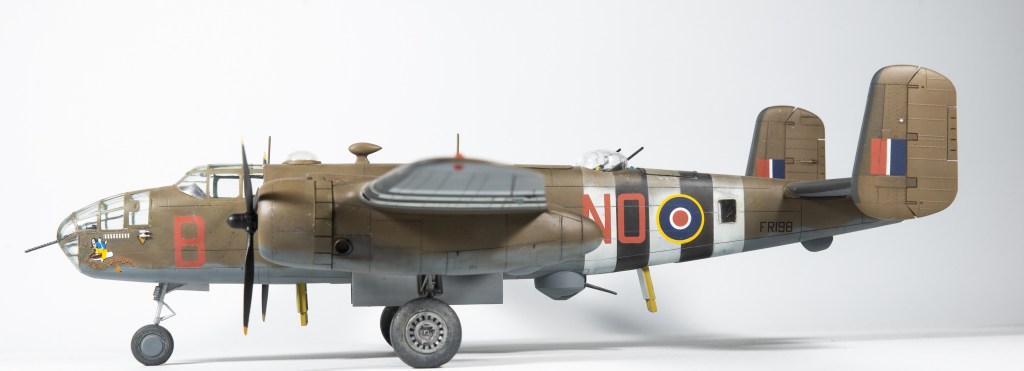
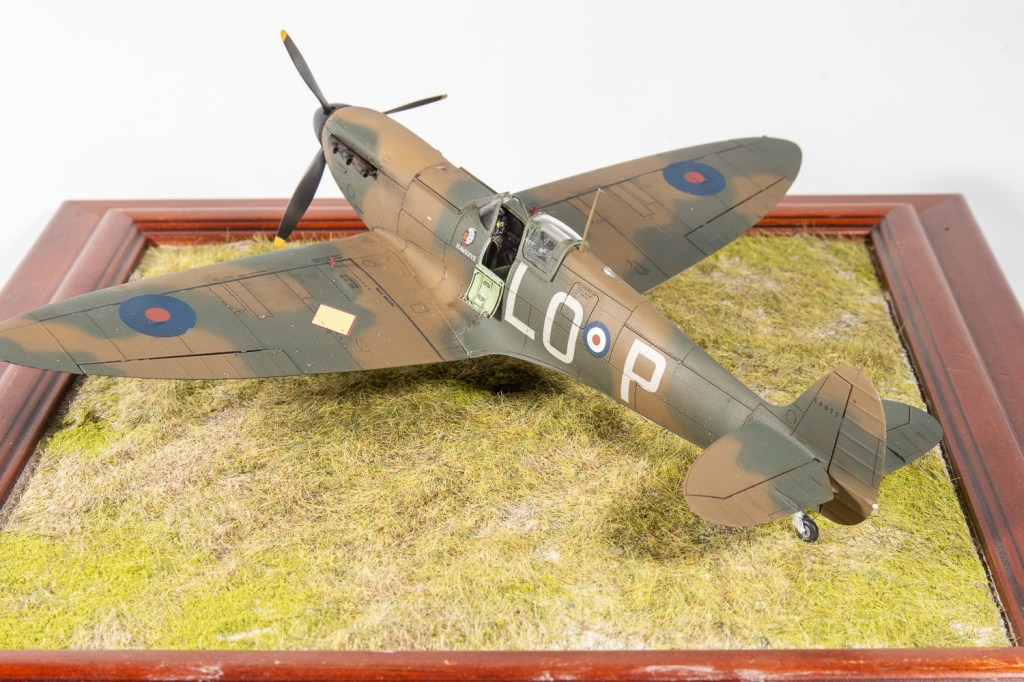
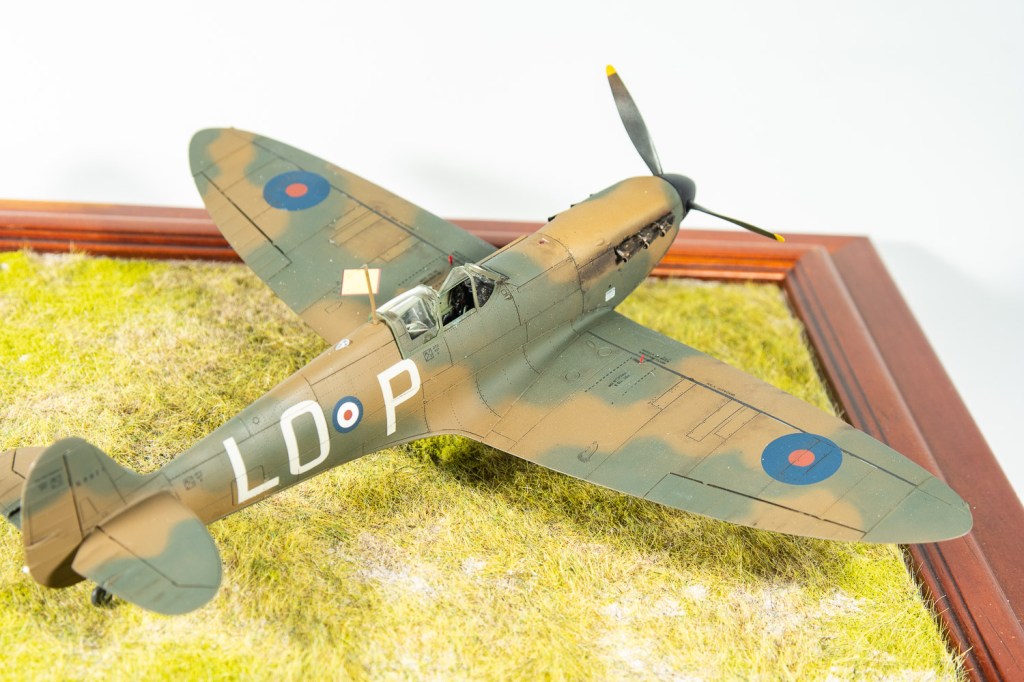
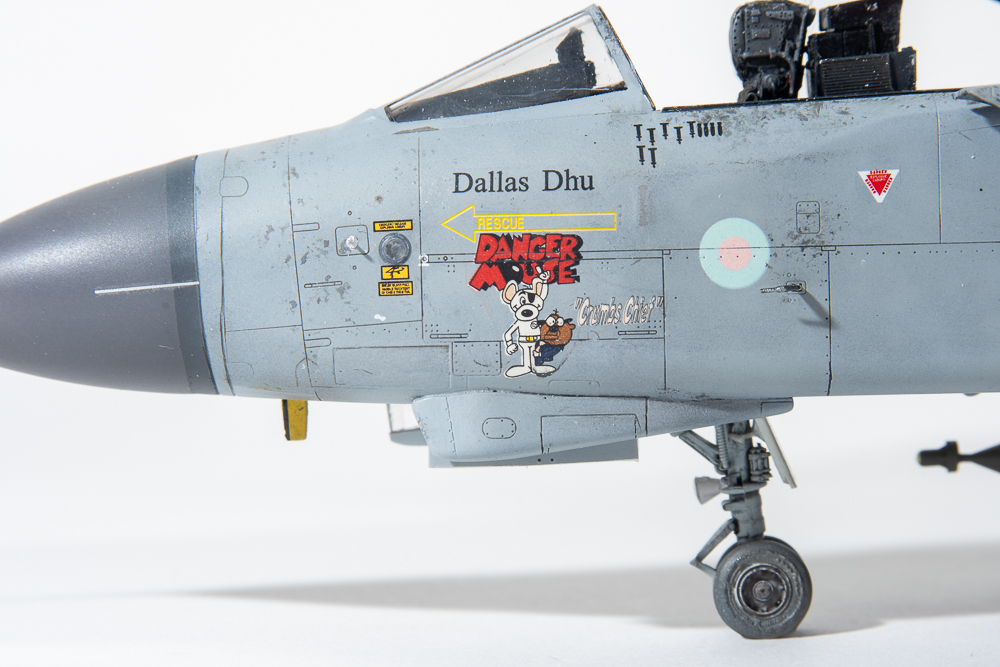
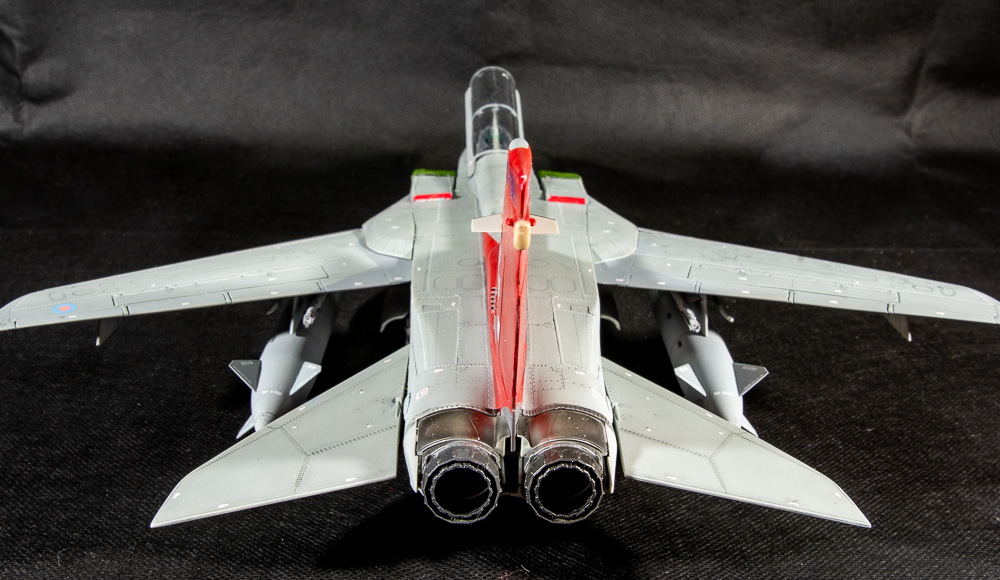
Right from the start, This was going to be finished as a R.A.F 2Tactical Air Force machine with D Day stripes. Two decal sheets from my decal bank contained such subjects, one from Dutch Decals and a much better quality item in terms of colour and printing from Eagle Cals. the plan was in place……until I saw a 2TAF Mitchell on Britmodeller forum that the builder had portrayed with the upper surface stripes removed leaving just traces. I loved the look, and although it was a different SQN we know for a fact that all aircraft had their upper stripes removed by August 1944, although some Mitchells had them reinstated to guard against friendly fire. How to paint traces of D Day stripes though, I considered applying super thin paint, hairspray chipping, micromeshing before deciding on using water soluble Mission Model paints for the stripes. But this is leaping forward many steps. First the basic colours were applied using MRP Neutral grey for the undersides and Mr Color Olive Drab for the upper surfaces. This was then mottled and streaked with the OD tinted with flesh, then tamiya Khaki Drab, and finally Desert yellow in order to build up a multi layered variated Olive Drab colour. Fresh OD was then used for a few select panels to mimic replacement panels.

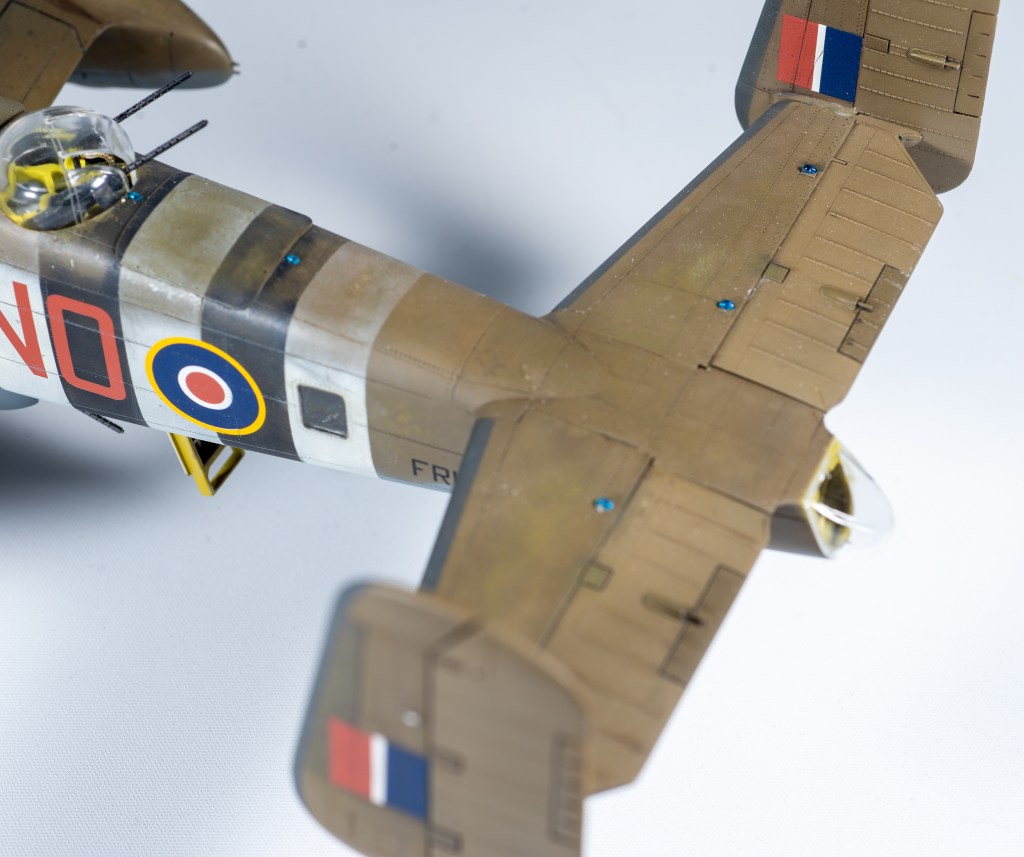
D Day stripes were then masked out and applied with thin coats of MMP thinned with water. Just like in real life the top stripes were then scrubbed off with a stiff brush moistened with water. Not happy with the first attempt which looked too symmetrical from side to side, I resprayed the stripes before, again scrubbing them off, this time aiming for a fa more irregular look. I left some remnants around panel lines and raised detail. This second attempt looked far better. An overall wash using Mig Dark wash was then applied to the upper surfaces with ABt 502 Paynes Grey being used on the lower neutral grey. I found Abts version of Paynes Grey far bluer than other Paynes Greys I have used, nothing alarming just something to be aware of.

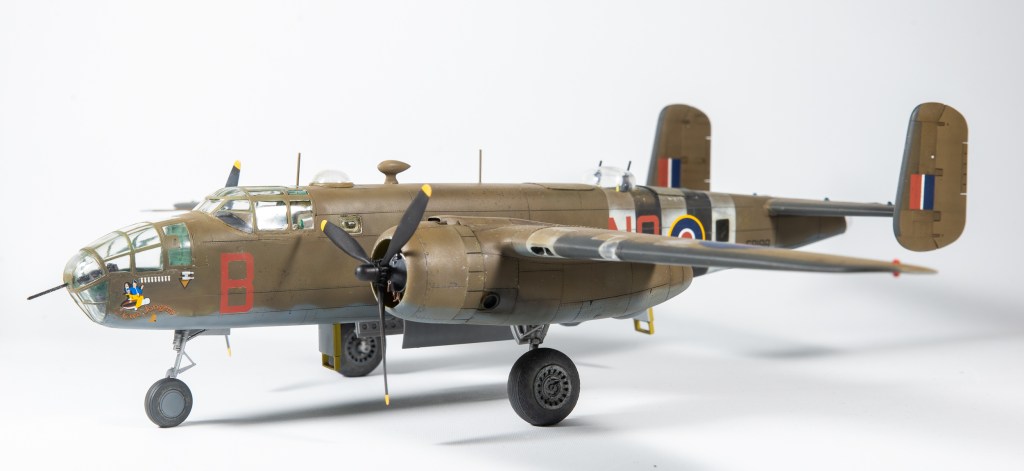
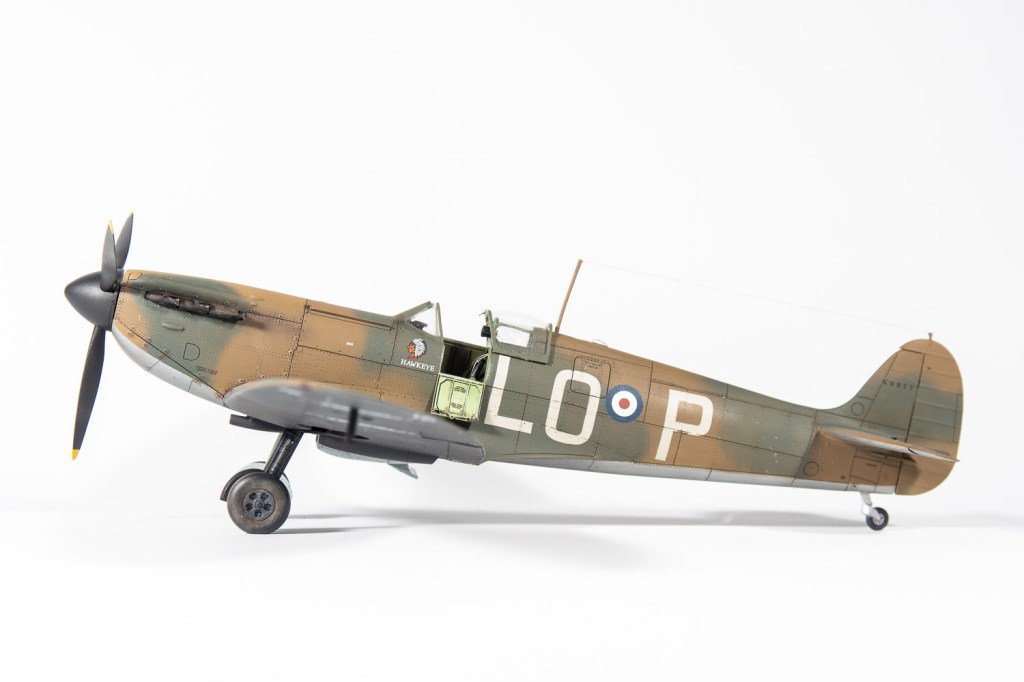
Decals were then applied, the decals, being printed by Microscale , going down fine. Eaglecal providing photos of the actual machine in the instructions. Upon studying these, I realised I had added the flat window instead of the astrodome, and also my chosen machine had the fixed 50 calibre gun in the nose as well as the flex .50. What did I say about studying photos? I need to take my own advice! The spine window came out reasonably easily and was replaced with the astrodome. I decided to leave the nose armament alone, as I could see damage arising with any attempt to remove the nose transparency.

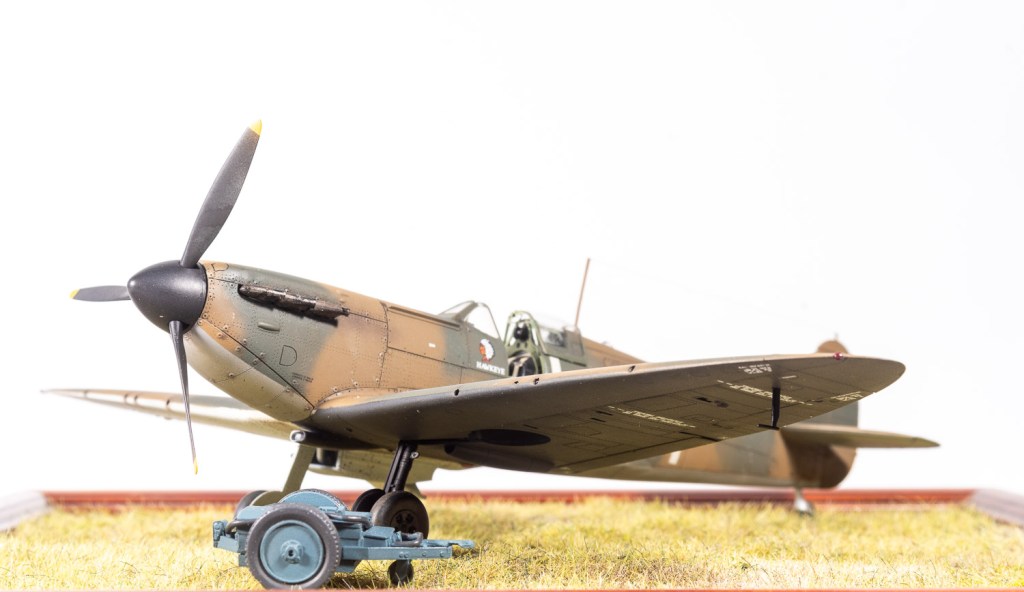
Several thin coats of Dullcote were then applied to get a dead matt finish, before oil leaks were added with several applications of……oil paint! Raw umber mixed with black and starry filth were the colours of choice. One engine had marked breaking to represent a damaged or severely leaking engine.

The transparencies were then unmasked to reveal a stain or crack in one pane of the cockpit. There was no option but to remove it and add the alternative cockpit canopy. As luck would have it, this was the canopy that should have been used in the first place, having the additional framing evident in the photo.

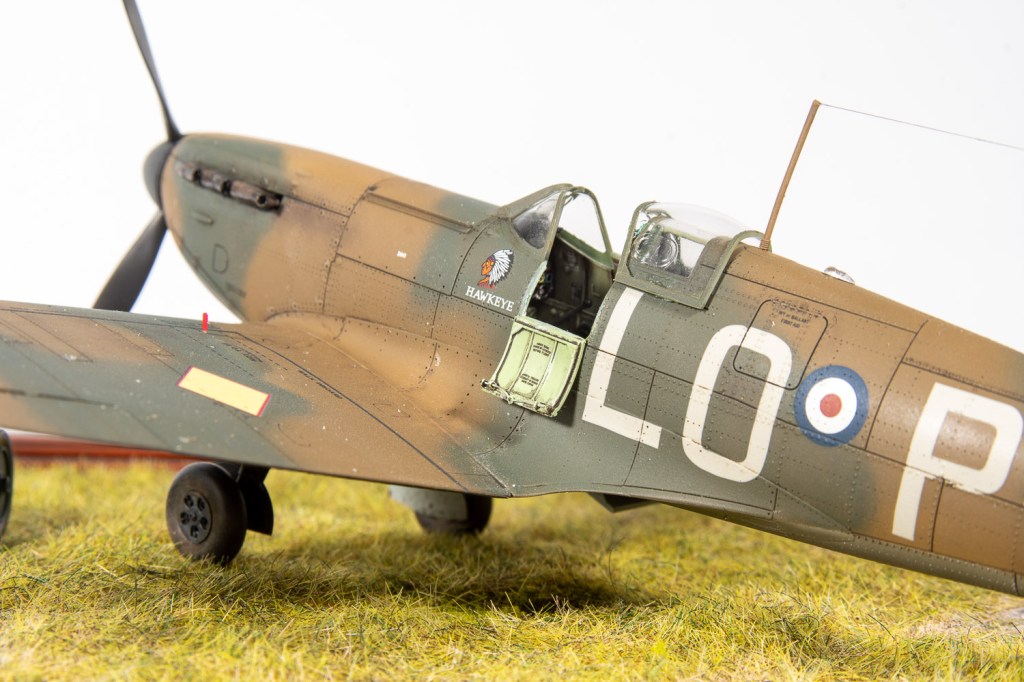
The soft plastic kit aerial posts were replaced with brass wire. The last wall hurdle thrown at me came when I noticed that somehow one of the small dutch orange triangles had superimposed itself over the nose art, I wondered where that triangle had gone!. naturally I managed to tear half the nose art off trying to remove it necessitating ordering a new set of decals from Ultracast in Canada. SIGH!

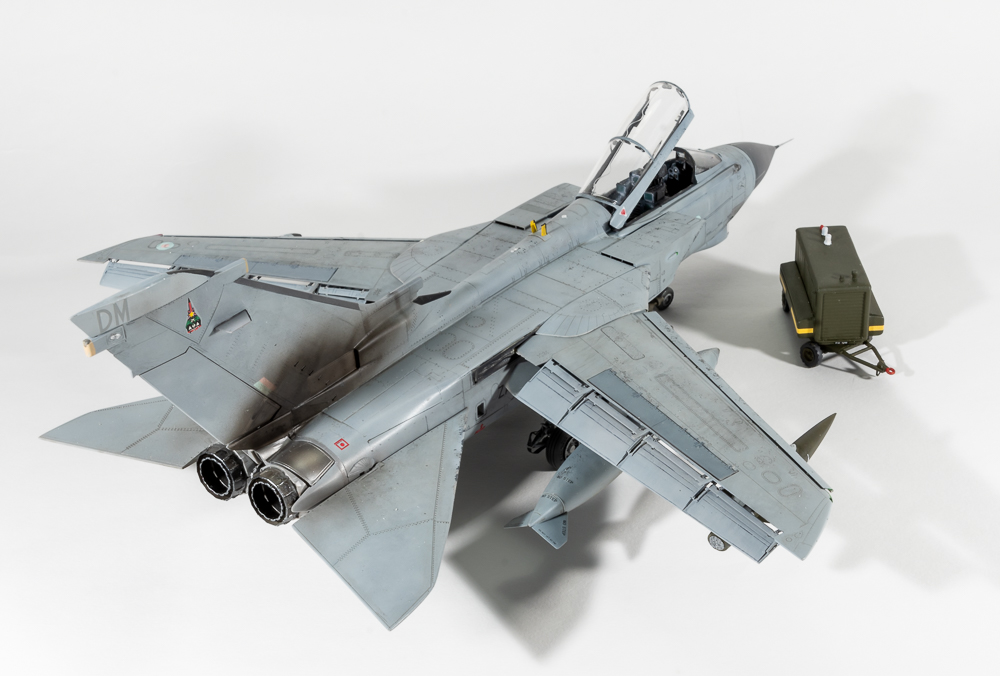
Whilst the Dutch Decals decal set also carried the same nose art, it was nowhere near as sharp as the Eagle cal sheet. This just left the bomb doors, undercarriage doors and wheels to be added, and she was done.

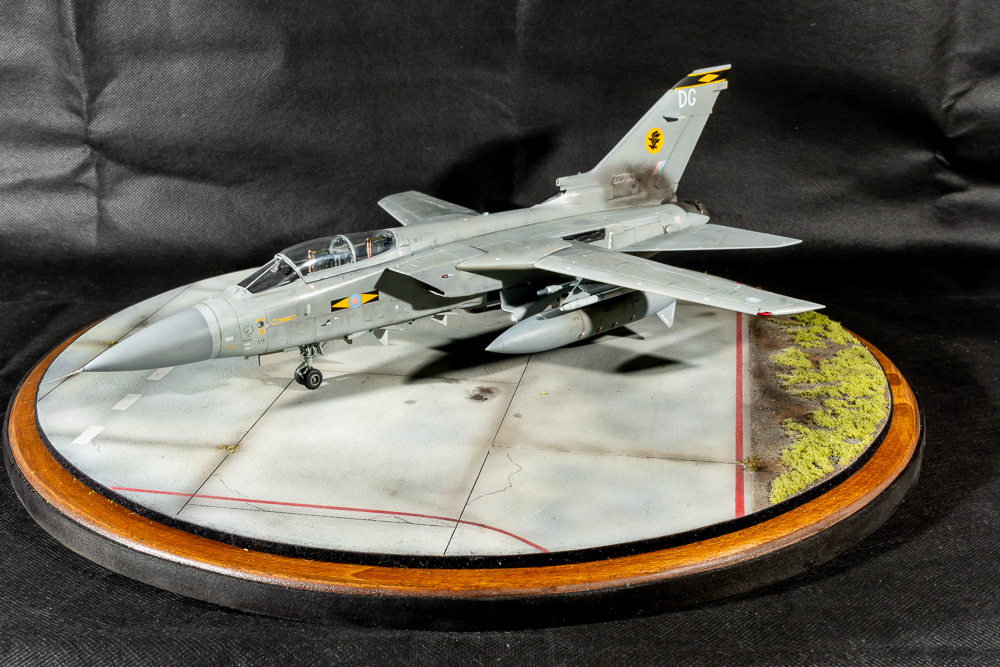
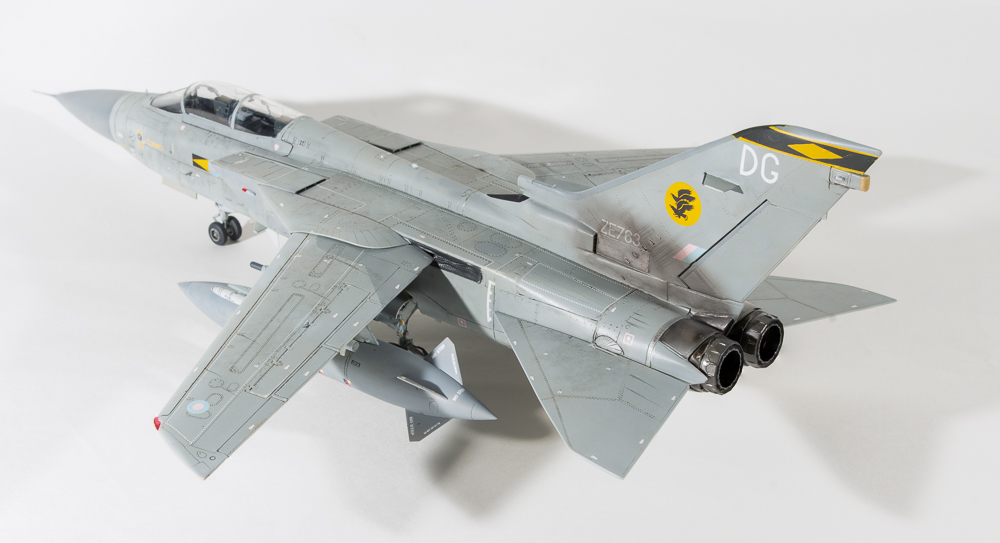
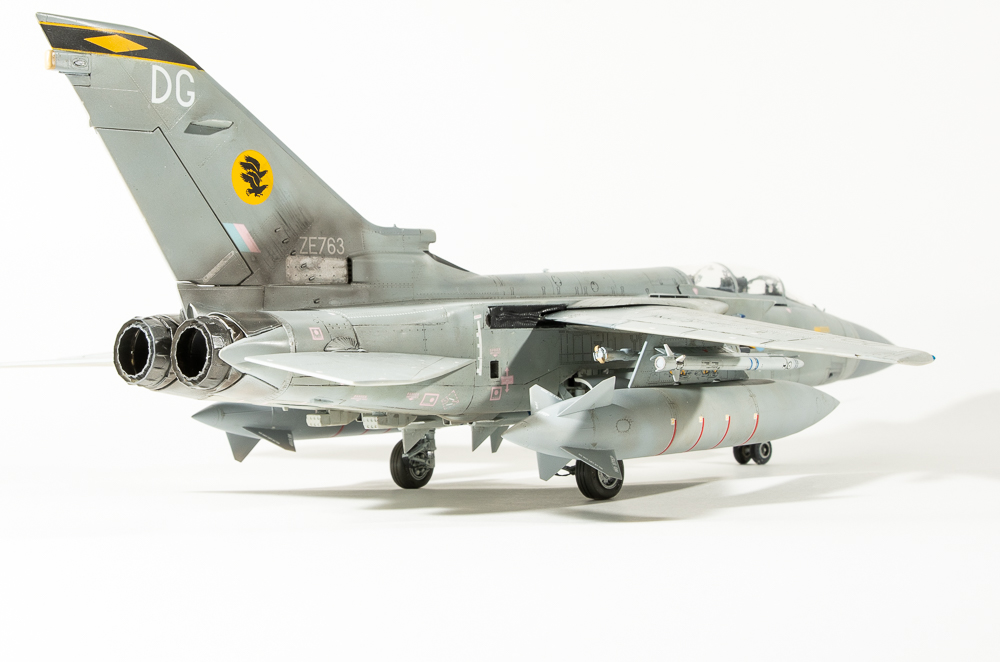
Im pretty happy to finally have a completed Accurate Miniatures R.A.F B-25 in my cabinet, even if the kit was a chore to build. Like my revell tornadoes, the experience of this build led me to sell all other A.M Mitchells in the stash. One is enough!

The A.M kit has not aged well, and is another of those kits that could do with a new modern tooling, although Im not sure who this would come from, perhaps HKM will downscale their 32 scale J model. The only manufacturer I see doing new tool twins these days would be I.C.M and they may well take years getting back on their feet following Russia’s inhumane invasion

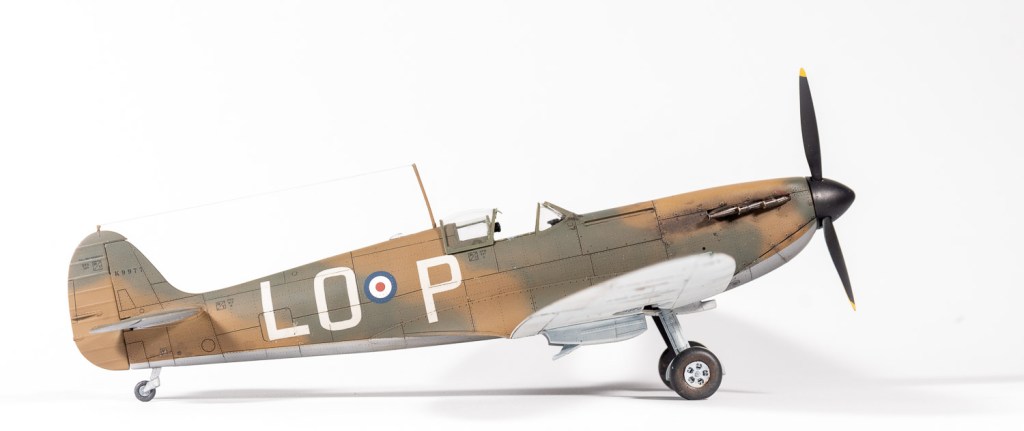
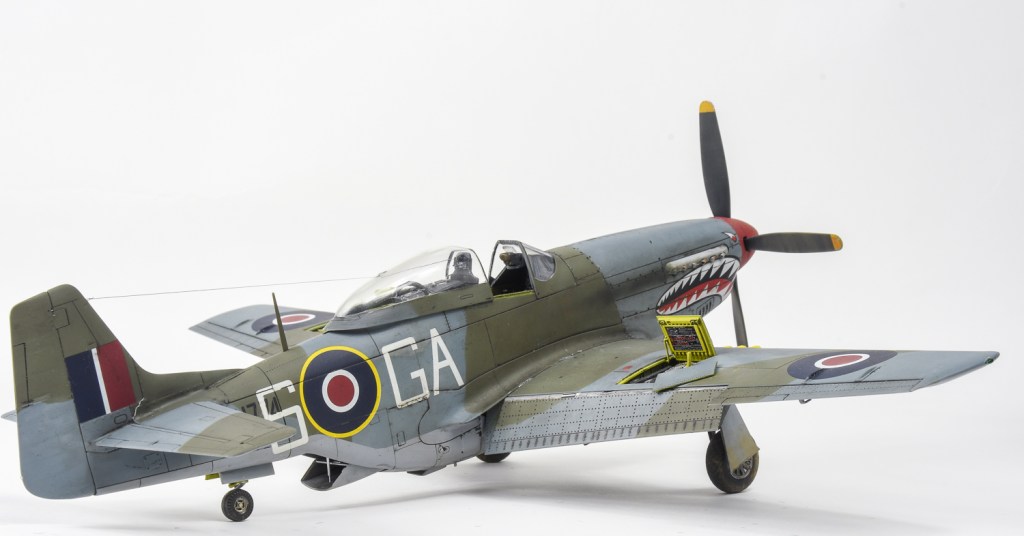
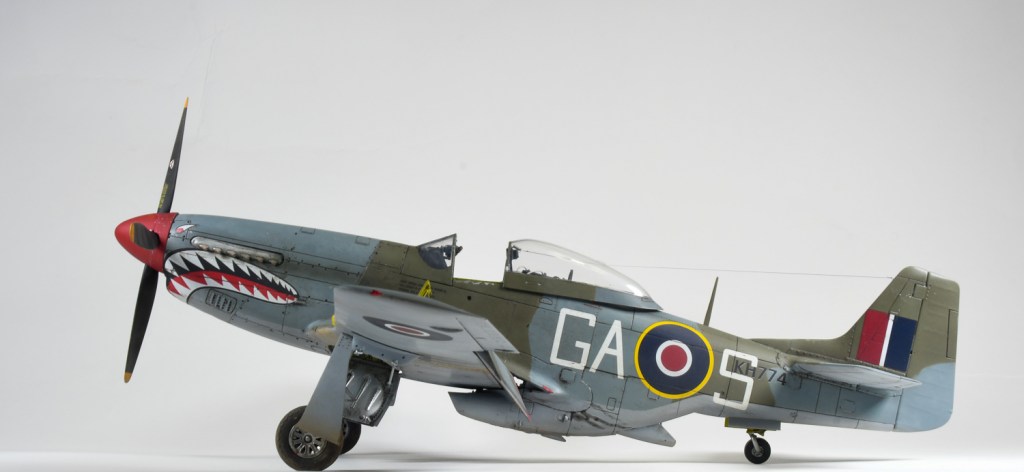
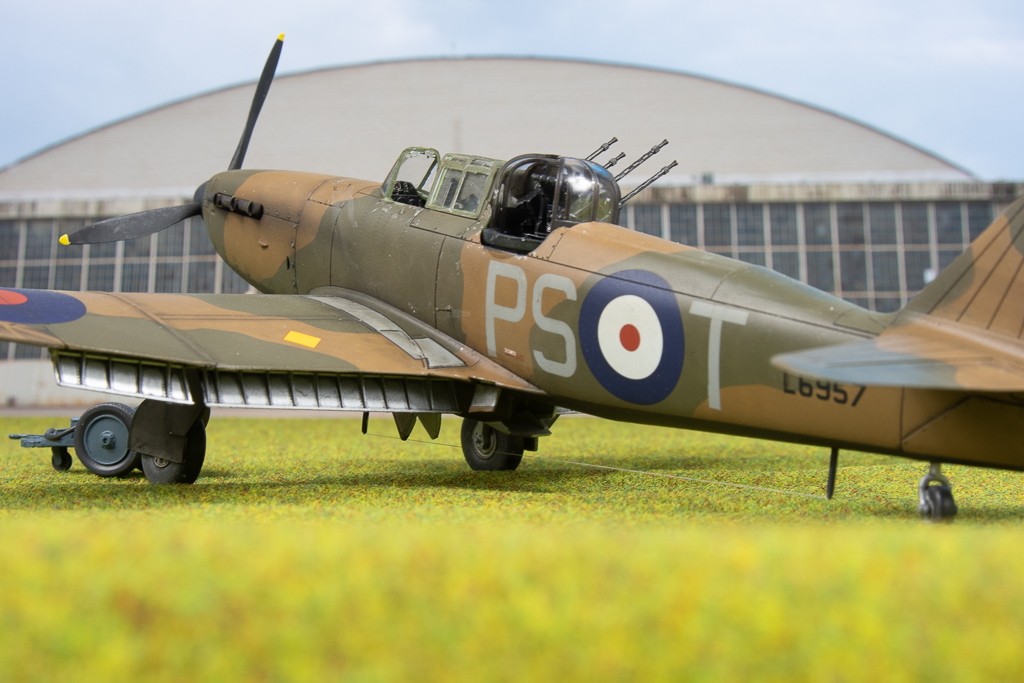
North American B-25 Mitchell II. 320 SQN Royal Air Force.

Belgium 1944

Eduard 1/48 Spitfire Mk1

  • Built: 2022
  • Added to stash: 2021
  • Enhancements: None
  • Decals: Fundekals, Early War Spitfires Part 2

This is my second build of Eduard’s spitfire, and I found the experience as enjoyable as the first.

Upon examination of the parts the first thing the jumps out at you is the extensive surface detail Eduard’s mould makers have lavished on this kit. The empennage is covered in fine raised rivets whilst the wing rivets are recessed.

Careful study of the instructions and sprues reveals that Eduard have included parts to make any spitfire from the first production machines up to mid 1940 machines. There are unarmored and armoured windscreens, various separate armour plates and gunsights plus seats. Useful to understand all these differences was Wingleaders photo archive on the Spitfire Mk1. The Few boxing allows one to build two Spitfires, one with the later armoured fuel tank and one without, although this was not immediately apparent to me. It was only after careful study of the Wingleader book and the Fundekal instructions that I understood the various differences that I was looking at in photos. That Eduard has included all these optional parts shows how thoroughly they researched the aircraft.

Its a shame they did not include the later undercarriage selection lever as that would then allow you to build any spitfire up to the end of the Battle of Britain, although the later selection lever looks easy enough to scratchbuild, or you could just buy the Tamiya Mk 1. My research unearthed the electric undercarriage selector appeared around the 600th or February 1940 build machines. I could not find a definitive answer.

For this build, I deviated from the instructions a bit in that the cockpit sidewalls were added to the fuselage sides before being painted. The floor, complete with stick, rudder pedals and seat was treated as a separate subassembly. As were the various bulkheads, the rear bulkheads having their lightening holes drilled out. This method made it harder to get a paintbrush to all the little detail areas, and for the second build, the instructions were followed to the letter, which resulted in details being easier to reach with the paintbrush. The cockpit colour used for this build was a coat of SMS RAF interior green with the sidewalls washed with Mig Dark Wash.

With the cockpit completed, the rest of the build proceeds quite quickly. Ensure all mating surfaces of the wheel well parts are sanded at the correct angles to lessen gaps between the parts . Eduard, I feel could have made the fit of the sockets that accept the landing gear legs far more positive. Be careful ensuring you locate these carefully into parts xxx . Any misalignment here will affect the sit of the model later.

I had some gaps at the wing roots that I thought I could close up by running tape spanwise from wingtip to wingtip. While this did close up the gaps, it also introduced other problems such as too great a dihedral and led to some alignment issues. I won’t be doing that again!

A smear of filler was needed around the stabilisers, and we were ready for paint. For this model I had decided to use some Mission Models Paint I had previously purchased. Reading up on peoples experience with this paint revealed modellers have a love hate relationship with it, but if modellers of the stature of Mike Rinaldi swear by it, it can’t be that bad, surely ?

Whilst I managed to get the paint down OK, I had great difficulty getting a fine line with the dark green, despite following MMPs mixing ratios and advised spraying pressure. The paint is also a little fragile with it lifting in several spots. A Peter on my FB page suggested thinning it with future with I will try on my next Spitfire build. The undersides were finished in Tamiya lacquers as per my usual practice.

Like MMP , Eduard’s decals also seem to have polarised modellers. For this build, only their stencils were used. Over a gloss coat, they were applied on little pools of Mr Setter, with the excess being wicked away with a cotton bud. Left to set overnight, I found I could peel away the carrier film off some of the larger designs like the trestle markings and gas patch, without tearing the decal.

The code letters and roundels came from the fundekals sheets and performed absolutely flawlessly, even over the raised rivets on the fuselage. The unusually sized roundel appealed to me, and I wanted to represent a Spitfire from The Phony War period during which the R.A.Fs markings were rapidly evolving.

I should have mentioned prior to laying down the camouflage colours, black was airbrushed along the wings, then masked off to portray the wing walk lines.

Final assembly saw the wheels, propeller resin exhausts and aerial pole mounted, the antenna wire from infinity rigging wire, which despite my best efforts, still bent under the elasticity of the infini thread. I’ll replace the kit part with some brass rod on my next build.

Eduard’s spitfire was a very enjoyable build. To my mind though, the kit contains some unnecessary complications, the undercarriage sockets being one. Fit was for the most part good, with a slight smear being needed on the taipan roots, and most reviewers stating the wing root fit also leaves a slight gap. Ima already working on the second kit from the box and have added the Vb dual boxing to the stash.

Supermarine Spitfire Mk 1. Royal Air Force Drem Scotland Jan. 1940

Revell 1/48 Tornado GR4

Completed:2020
Enhancements Used:  
Cockpit: Eduard
Seats: Paragon
Wheels: Brassin
Wheelwells: Eduard
Weapons: Brassin
Pitot: Master Barrel
Wing Seals: Shaun off Britmodeller
                                                                                                  Decals: Model Alliance Op Telic Part 1

The third and final instalment!  I had wanted to build Danger Mouse from the start.  For some reason I thought it was a ADV though, not a GR4, so then had to keep on  building tornadoes until I got to my GR4.  Well that’s my excuse for building 3 Revell Tornadoes.

I had a load of aftermarket I had planned on using on this build.  Some of it got binned as not value adding to the build though.  
Firmly in this camp, I place the phase Resin Hangar seamless intakes.  For a start, I just don’t think they are needed.  Whilst the kit intakes do have a nasty seam, you can really only see the first couple of mm of the kit intake trunking, ands then only by holding the model up at a weird angle and craning your neck to look down the intakes.  If this bothers you, a bit of filler and sanding will eradicate the seam. Secondly, the case resin intakes are moulded as just the intake tunnels without the bulkheads provided as part of the kit trunking.  These bulkheads form the front and back walls of the wheel wells and provide important structural integrity.  As I was going to be using the aires resin wheels this was not a dealbreaker.  What was the dealbreaker was the resin intakes would not fit over the top of the resin wheel wells without removing a big chunk.  This  was after sanding both the roof of the wells and the outer wall of the intake wafer thin, so, the resin intakes got binned and I reverted to the kit intakes.  To be fair to Phase Resin, Mike is probably not expecting you to use his intakes in congestion with resin wheel wells.  That aside, to not cast the integral bulkheads seems strange..  My opinion. Don’t bother with the intakes.  The wheel wells however do add to the kit, beautifully detailed as are all aires sets, these even fit with a minimum of fuss.  What led to them getting junked along with the intakes was after glueing them I found I just could not get the fuselage parts to line up seamlessly as the other kits had, so they got hit with the debonder and binned as well.  Not going too well so far!  The aires wells do add a lot to the kit though, and I’m sure the fit issues were due to something I did.

The rest of the build proceeded as per the other tornado builds.  Again I cut off the wing cogs to fit them at a later stage.  Again this is another thing I would never do were I to build another tornado ( I won’t be!)

Revell would have you assemble the wing flaps as a three piece assembly whereas in real life they are one piece with only the small aerofoil section being a separate piece.  Make sure you fill and sand the join line.  Hopefully the photos explain this a bit better.  Shaun’s resin wing seals are far better representations of the real things rather than the featureless kits items.  He can be contacted through  Britmodeller.com

Photos I found on the net of Danger Mouse and other Operation relic jets showed a fair bit of wear and tear with scuffing and chipping of the ARTF grey paint exposing the underlying dark camouflage grey paint.  To portray this on the model. I first applied a coat of dark sea grey to the leading edge slats, nose, pylons and one of the drop tanks.  Mr Neo masking fluid was then dabbed on with a torn bit of sponge and the model sprayed with a couple of light coats of Scale Modeller’s Supply Barley Grey.  SMS is a home grown  Australian paint manufacturer.  I have been increasingly using his paints, as Im finding them excellent to spray.  You can spray them straight from the bottle, but I add a drop or two of thinner to make them spray even better.  They are a lacquer paint that has proven to be hard wearing and quick drying.  Once this paint had dried I rubbed my finger over the Neo to remove it from the airframe leaving the model looking chipped and scuffed.  The jet was made to further look worn by painting a few panels in either dark sea grey or lightened shades of the barley grey. One of the fuel tanks was painted in the old wrap around scheme, jets being fitted with different coloured tanks being quite common, even today.

I applied a panel wash with Payne’s grey oil paint straight over the SMS paint, with the excess wiped off and no damage to the underlying paint.  The decals were also placed straight over the paint, which dries with a sheen, the model Alliance decals performing well, although the DM code letters were too light and did not stand out enough when compared to photos of the real jet.  As I could not find any dark grey or black letters of the correct size to replace them, so had to resort to painting the fin top a lighter grey.  I replaced the letters with other codes from the same sheet.  Penfold’s catch cry “Crumbs Chief” should also be far pinker than the pale shade on the sheet, maybe it faded!  Op Telic jets do not seem to have been as well photographed as Op Granby jets, well so it seemed to me with good quality photos being hard to source. In particular I wanted to know if these jets wore the full suite of stencils after they were repainted.  In the end I went with just the major ones figuring only those stencils that dealt with rescue or crash procedures would have been re applied.

With this model I decided to really strengthen the pylon to wing attachment by using epoxy glue.  They ain’t coming apart now, although perhaps I should have ensured they were parallel to the centre line first!

With that Danger Mouse was done.  One of my favourite cartoon characters as a child.  There are still a few build and finish faults, but this is my favourite of the three.  I love the pugnacious look of the short nose coupled with the laser sensors.  The Eduard Brassin weapons are also a must have, being better detailed and more accurate than the kit supplied weapons.  Out of the box, you can arm a Operation Granby or Operation Telic jet.  Even the stenciling is provided.

So with three Revell Tornadoes done, what are my thoughts?  Well, let me start by saying I sold my remaining Revell tornado from the stash, as to build more would be just like beating yourself over the head repeatedly using a hammer.  I think you would really have to love Tornadoes to build multiples of the Revell kit.  Marred by soft detail in a lot of places, sink marks, flash, it can be  a troublesome build in inexperienced hands.  Take the time to research other on line builds and the previously linked youtube videos as fit problems can be mitigated if the builder departs from Revells suggested build sequence.  I really cant see anyone else aside from Airfix releasing a newer tooled Tornado, so Im thinking the revell is going to be the go-to in 48 scale for quite some time.  I might just order that new 32 scale Italeri tornado, as the Tornado itch still needs to be scratched with a wrap around GR1.

 Tornado GR4 ZA542 31SQN Royal Air Force. Combat Air Wing Ali Al Salem Op. Telic 2003


Revell 1/48 ADV Torando F3

Enhancements Used
Seats: CMK 
Seatbelts: Eduard steel
Wheels: Eduard
Pitot Tube: master barrels
Decals: Xtradecals Tornado F3 part 1
BOL Rails: Phase Resin Hangar

Construction Notes
 Oh God, what was I thinking, building three of these at the one time?.  In last months gripping episode you will recall that I (rashly) decided to build all three of my tornadoes from the stash at the same time.
​Well the plan didn’t quite start out like that.  This tornado was actually the first started, and the original plan was to just build this one,  however, it was not really turning out as I had pictured in my mind, – a common theme with my builds –  so it got shelved, and my other F3 pulled out of the stash, and started with the intent of being a better build (yeah, right!).  It was at this stage the idea to build all the tornadoes in my stash was born.  In actual fact, I thought I would  only be  building the other ADV  and my GR4.  
It  was only when the other ADV was almost finished, this one was revisited, and the decision made to complete it.

​Being the same kit, most of my notes from the first build stand.  My thought process with finishing this kit was to make it a clean build, as, with three builds now underway, getting  Tornadoed out, was a real possibility!   To this end, no stores were added, apart from the large tanks. Photos of the actual jet showed it sans stores anyway, save for tanks and a RAID pod on one of the BOL rails.

 This time the BOL rails came from Phase Resin hangar.  To better reflect RAF pylons, the sway braces were cut off and the “bulges” on both sides of the pylon had their length shortened.  Close enough for Govt. work as the saying goes.  there are plenty of photos available on the internet to aid as reference in this task.
The wings again had their cogged teeth cut off so that they could be painted separately and added later as part of final assembly.  This time I left I bit more of the “spar” with the result the wings attach far more securely, although they don’t have that classic Tornado anhedral

For this model, I wanted to add FOD covers too.  They were formed by covering the intake firstly with  household aluminium foil.  Kleenex tissue was then laid over the foil and coated in diluted white glue.  The thought process being to then slide the hardened tissue off the foil.  In reality, this didn’t work as the glue had worked too well, and stuck the tissue to the foil!
Once dry, the tissue FOD covers were trimmed to shape, and then painted.  Thin strips of tamiya tape formed the ties underneath the jet, whilst white EZline stood in for the bungee cords stretching back to the intake vent FOD guards which were formed from offcuts of red painted plastic card.  RBF flags came from an old Verlinden sheet.

As the Eduard PE wheel well set was not used on this model, the door retraction struts fitted neatly into their slots without the need to shorten them as was required on the other ADV build.
The kit decals were again used for the instruments, but this time the CMK seats were used, dressed with Eduard “steel” seatbelts which are far easier to use than their normal PE belts, being far more malleable, and less prone to the paint flaking off.

Paints used on this completion were Mr Color, another of my favourite brands, This actually being the first of my tornado builds, it was again plagued by large chunks of paint peeling off when the masking tape was removed.  This being one of the things that contributed to the build being abandoned in the first place, the painting process becoming an endless look of touch ups.
​In an effort to allow the wash to enhance more of the surface detail than the first kit, I applied the wash straight over the lacquer paints without first applying a barrier coat of gloss.  The excess was wiped away without removing any of the underlying paint.  Lacquer paints really are bulletproof!  Shock, Horror, the decals were then applied, still without a gloss coat.  No problems with silvering.  It was only after decalling that  a sealing coat of semi matt was applied.  
The Xtradecal decals behaved flawlessly, although again I used the too thick kit decals for the stencilling.  They stand out way too much on close inspection.  If you are building this kit, I would ditch the kit decals completely and use AM sheets, Xtradecal, also doing a stencilling sheet.

Since these photos were taken, I have  divided the four sky flash missiles from the first build between the two ADVs so each jet carries two skyflash.

So, how’d I go?  Well, in some ways I feel I did a better job on this one than the first ADV, although it still has plenty of flaws.  I still feel I can do better.  Anyway, here are the photos so you can judge for yourself.  Next instalment should be the third and final Revell Tornado.
​Thanks again for looking.

Panavia Tornado ADV. F3 OEU Royal Air Force RAF Waddington. May 2003

Zukei-Mura 1/32 N.A.A P-51K Mustang IV

  • Purchased   2019
  •      Built             2019
  •  Enhancements:  Seatbelts:  HGW 
  •         Paint   MR Paint
  •         Decals   Kit scheme
Build Notes:
The inspiration for this model came from seeing a 48 scale kit completed in these markings on the Britmodeller.com forum. Instantly, I wanted to build it, however, in 32 scale, rather than 48 scale, as I feel these single engine fighters have more presence in this scale.

I knew Zoukei Mura had produced a boxing of their Mustang in these markings, so the kit was duly purchased, and promptly started, as BM were running a “shark mouth” theme Group build. Talk about the planets aligning
​We all start our impulse purchases right after buying them, Right!  Actually this would be one of the very few kits I have started straight after buying it, strangely all the previous one have been Airfix kits being the Walrus and Defiant
​ The build log can be viewed here although I did not finish the kit by the deadline.


​This was my first ZM kit, and I have to say, I thoroughly enjoyed it.  They do not build up like your usual kit.  The design philosophy being the makers want you to build the model similar to how the real aircraft was assembled.  A very Japanese thing.
Many people dont seem to like the complexity of these kits, but like the trumpeter kits, a lot of the innards that will never be seen can be left out helping speed and uncomplicate the build.  Despite the complex breakdown of the kit, it went together remarkably well, most joins falling on panel lines and  being engineered to look like panel lines.  Interestingly the new Eduard Mustang looks like it may have borrowed some of its breakdown from this ZM kit, the wheelwell for one being engineered the same.

I puttied the wings, a task made easier by ZM only having the panel lines present, saving you having to fill hundreds of rivets like you would have if using  the tamiya kit
Assembly proceeded quickly as I had made the decision to have the cowlings closed in order to show off the shark mouth.  Therefore I only assembled the bare bones of the engine, really just the block in actual fact.
the only fit problems encountered were  a bit of a step on one side between the cowling and the fuselage and a gap around the carburettor scoop.  Im guessing this was down to me.  You really do need to ensure all parts are aligned, otherwise it will have a knock on effect, and I think this is where my step on the cowling crept in.  On my next one (Yes, I intend to make another) I think I would save glueing the rear fuselage bulkhead until I added the empennage to further aid correct alignment
Aside from this, I managed to forget to add the landing light.  Never think you can build one of these kits without always consulting the instruction sheet at each stage.  Speaking of the instructions, I reckon they rival Wingnut Wings sheets for clarity and well thought out construction steps and build tips.

My only disappointment with the kit was, the flaps.  Like a lot of other mustang kit, the  flaps had the scalloped cutout to enable them to fit flush against the wing when added in the up position.  Given the attention to detail ZM have shown in other areas of the kit, I thought they could have given you alternative flaps for the down position like tamiya did with their kit.  Did I say only disappointment?  Irritatingly, some of the decal designs had a registration problem, the sharkmouth, serials and walkway red  L stripe all having a thin white drop shadow.  I painted this out with a thin black sharpie on the mouth, but decided to live with the serials on one side after a bit of a failed attempt at correcting the other side.  Subject to say, I can’t see the R.A.F calling me anytime soon for a job painting serial numbers on their aircraft!  The provided wheels are not weighted, and come in halves necessitating the tread to be reinstalled after eradicating the seam.  ZM do offer AM wheels, as do barracuda.  ZM also offer quite a few figures and photo etch sets to complement the model, so their website is worth looking at.  I will be purchasing their PE gun bay set so as to build the gun bay covers with the locking handles extended.  I did purchase some 500lb bombs, so may well arm her up in future as well

Z.M call out U.S colours for the camouflage, which many RAF mustangs were indeed painted in during manufacture, however, this particular machine was painted at an RAF Maintenance Unit.  I surmised that they would have painted her in RAF colours rather than US colours, so went for the standard RAF day fighter colours instead.  If you look at the build log, you can see in one of the posts a very helpful modeller posts the service history of this machine which shows it came from the factory in NMF and was camouflaged in Italy
​I went for a lightly weathered model, adding some light exhaust staining, oil leaks and grubbiness from foot traffic on the wings using oil paint.  Vallejo silver was used for the chipping with mud splatters underneath from pigments.  Testors Dullcote was used to finish off before the aerial line was added with EZ line.  Talk about a frustrating hour trying to thread it through the canopy.  It doesn’t bode well for that WNW Felixstowe in the stash patiently waiting its turn to be built.
​Im happy with my ZM mustang. I have another in the stash to build, on which I will use all the parts, and I also have a tamiya mustang to build.  It will be interesting to compare the two.

North American Mustang IVA  KH774  112 SQN Royal Air Force. Italy. 1945

Revell 1/48 ADV Tornado F3

  • Built 2020
  • Enhancements Used 
  • Seatbelts,  Eduard
  • Wheels   Brassin
  • Wheelbays  Eduard
  • Pitot Tubes and AoA sensors  Master Barrel
  • Weapons  Brassin ASRAAM   Hasegawa Sparrows (skyflash)  BOL rails  F4Dable Models
  • Decals  Xtradecal Tornado F3 Part 1
 Like a lot of modellers, I had heard some horror stories about the fit of the Revell Tornadoes.  The consensus seemed to be whilst they were definitely a step up on what was currently available, the fit left something to be desired.  The kit seems to be one of those that polarise modellers world wide.  The truth is, like the Hasegawa Harrier, the ease of build is directly linked to how you build the tornado.
What inspired this particular build was a mate directing me to a series of youtube videos done by a fellow named Nathan Robinson.
Nathan is a member of the IPMS Tornado SIG and admits to having built six of these!  So if anyone will have the build down pat it should be him.
Deciding to take a leaf out of Jon Bryons book, all three revell tonkas – 2 ADVs and a GR4 – were pulled from  the stash to be built as a batch.
Following Nathans build sequence, I found the build progressed fairly quickly. I still needed filler around the intakes and along the fuselage sides,where it meets the bottom plate, but these were all easy joins to clean up and rescribe.
For the cockpit, the kit decals were used which sat down surprisingly well over the moulded detail and certainly looked busy enough through the closed canopy.  Note Revell call out the wrong rear instrument panel, you need part S214

I deviated from Nathans build my cutting off the cogged part of the wing so I could add them later. To be honest, Im not sure this is the best way as you lose a bit of structural integrity. Ive already so modified all three of my kits, but wish Id left one to compare the two different methods.  Maybe on my eduard Desert Babe kit!

I replaced the rather bland wing seals with some moulded by a fellow called Shaun from Britmodeller.com.  I’m not sure if they are still available as he was doing them when the kits first became available.
The decision was also made on this model to have the flaps up, to better show off the lines of the ADV.  The best way to achieve a flush fit with the wings is to cut the bar on parts B111 &113 so you are left with separate flaps.  These can then be glued  individually to the top wing ensuring they sit  flush with the upper wing.

The undercarriage assembles fairly easily, despite being moulded in two halves. Revell have form here, which means you have a seam to clean up. Part C159 and 168 placement is a little vague. Step 69 shows it the best. On gluing the PE facia to the back wall of the wheelwell, I had an alarm bell go off in my head going, “I wonder if this slot the PE covers is important” Well, Yes, it is as this is where the door retraction strut sits.  Didn’t realise this until I added them, so then had to cut the struts, in fact I replaced them with thin rod. I find this annoying on Eduard’s part. They could have easily made the back facia in two parts to be fitted either side of the slot. Its not the first time Eduard have failed to take into account the fitting of kit parts around their etch, and one of the reasons I find myself using less AM these days unless it is drop fit. Some etch placards and brake lines dress up the legs nicely, but on my other F3 I will use wire and decals instead..

Photos of my chosen jet show it fitted with BOL rails on the inner side of the wing pylon. If like me, you didn’t know what BOL rails are, I can know tell you they are a launch rail with an inbuilt countermeasures pod. They are surprisingly hard to track down as an aftermarket item, considering quite a few jets use them.  A friend offered me his Steel Beach ones, but they looked quite a crude casting. The F4DModels were much better although warped.  Hot water straightened this out.

For the Barley Grey, I used a home grown paint SMS which performed quite well, Its marketed as ready to spray, but I still thinned mine a little. Colour looked good, but I find it strange they do not offer a Light Aircraft Grey in their range to go with the barley grey, so it was back to my go-to paint. Mr Color.
Again on this model, I had problems with the paint and primer peeling off when removing the tape. I have no idea whats causing this. The model was wiped down with tamiya thinner prior to paint, and was primed with Alclad Grey.  The consensus amongst my modelling mates was it could be the primer, which Ive had for a while, so in the bin it went.
The model was gloss coated for decals and in preparation for the wash. These days I apply the wash before the decals, despite this method, the wash failed to pick up a lot of the very fine detail, despite repeated applications, which was annoying in the extreme.
The decalling should have been easy, but again my poor build planning brought things unstuck. Literally!
The decals had all been applied when I realised I had not painted the fintop di electric panel, so as the tape would lay over the decalled fin band I religiously detacked the tamiya tape before laying it over the decal.  Of course, on pulling off the tape, the decal came with it, necessitating me having to  paint the fin band back on.  This in itself needed a lot of touching up as each time I pulled tape off, paint came away too. I really need to get to the bottom of why this is happening.
Surprisingly, my enthusiasm hadn’t waned for the model, so I pressed on, applying a satin sheen, which I then went over with dullcoate. Even with the satin, the model still looked far too glossy.  Annoyingly, all the stencils stood out as too thick as well. I had applied them in little pools of future to stop any silvering. I wont do this on my next one.

This just left final assembly of wheels, aerials, canopy mirrors and nav lights. none of which I managed to lose as is the usual case despite several of them pinging off the tweeezers.
And that was that! One down, two to go
So what do I think of the Revell Tornado? Well I think the main problem is, its Revell!  I have no problems with the breakdown of the kit, but the kit quality is poor indeed, flash, sink marks and ejector pin marks mar the parts, making assembly harder than it should be. These kits, like Airfix, are designed for the mass market, the so called “pocket money brigade” and the tooling shows it. You get what you pay for.
Despite this, if you ever release a new tool Jaguar, Revell, I’d buy it in a heartbeat.
Anything would be better than the horrid kittyhawk kit thats still sitting on my shelf of doom.

Panavia Tornado F3 ADV ZE763 11 SQN Leuchars Royal Air Force 2006

Airfix 1/48 Boulton Paul Defiant Mk1

  • Built: 2019
         Enhancements :  Eduard Interior and exterior details
  •                                    Landing Flaps: Eduard. 
  •                                    Gun barrels; Master Model
  •                                    Wheels; Barracuda Studios 
  •                                    Exhausts: Quickboost    
  •                                    Paint:  Gunze
    ​                                   Decals: Ropasmodels 
Airfix’s 1/48 Defiant, released in 2016, and purchased by myself soon after is what we have now come to expect from Airfix’s new line of kits.   Evocative box art, soft grey plastic, sharply printed decals and well illustrated  clear instructions outlining the different  ways you can complete your defiant, in flight, or wheels down, separate control surfaces, choice of open or closed canopy, this also extends to the turret, which can be modelled with the doors open, and raised or lowered turtledeck  (why are they called turtle decks?)
Neither the now obsolete Classic Airframes or Trumpeter kit offered that.

I decided that wasn’t enough for me though, so added Eduard’s flap set.  My search of defiant photos revealed a few on the ground with flaps cracked open, certainly not fully open as I have depicted, but that’s how I pictured I wanted the completed model to look.
Construction was fairly painless, fit being almost excellent.  I needed to trim the cockpit floor on one side as the wing assembly did not not quite close up snugly underneath the fuselage on one side.  The cowling also needed a bit of clamping, as again on one side I had a bit of a gap underneath the oil tank cover.  I can only surmise I had the floor slightly out of alignment.  The eduard set added the colour printed instrument panel and some side console detail plus the seat straps for pilot and gunner.  I have read some on line reviews bemoaning the simplified cockpit, to me, what you get in the box is fine, especially when dressed with the eduard PE.  The wheel wells also get a helping of PE around their walls which brings them to life.  The model built up quickly, the smallest amount of filler being needed around the tailplanes and the rear underside join of the power wings to the fuselage.  The PE flaps were folded up without difficulty (surprisingly for me) and offered up to the previously cut out kit flaps.  Some shimming was needed to spread the open areas of the rear wing to ensure the rear wall of the brass flap bay sat at the same level as the underside of the wing.  I should have taken my time a bit more here ensuring a better fit, and cutting out the slots for the flap actuators which I completely missed.
The machine gun barrels were cut off and the breeches drilled to take the sublime master Models barrels. I fit these wherever possible as they really add to the look of the model.  It would be icing on the cake if they came pre blackened!  The kit pitot tube was also replaced with Albion Alloys tubing.  Although there is nothing wrong with the kit wheels, being moulded as they are, weighted and with separate hubs, I had a set of Barracuda wheels in the box, so these were duly added.  Waste not, want not. The landing lights were not the best fit, so were fitted at this time, so they could be faired in prior to painting.

The turret popped into place without all the fuss, some other online and magazine builds report, but I was surprised to have trouble pushing the clear dome down onto the base, thinned white glue being required to fill the resultant small gap.

Painting was made easy using a set of camouflage masks from Mal Mayfield.  From the decal sheet, I had decided on an early war scheme with the black and white undersides and A type fuselage roundel to push home the early war use of this aircraft.  The decal manufacturer was new to me, I ended up using the kit roundels and codes and Ropos’  roundels looked a little bright, whilst the codes looked too pale.  The “T” was sourced from an Extradecal Medium Sea Grey RAF Codes sheet, as  With the multitude of decal sheets on the market, these generic sheets are not as probably as handy as they once were, but to me, they are still a must have in my decal bank for this very reason.  The only decals I used from were the serials and these performed fine, being quite thin.  No stencilling was applied to the underside as they would have all been overpainted when the undersides were done. AK panel line wash for brown/green aircraft was used as  a wash on the top surfaces.  Chipping was added using vallejo silver, whilst highly thinned tamely black was used for the exhaust stains.  Emboldened by watching Plasmo use his dremel to  surgically cut parts out, I set forth with my dremel to open up the kit exhausts.  30 seconds later, I was ordering quickboost  exhausts from BNA Modelworld. Rather than displaying the same skill as Plasmo, my exhausts looked like Dexter, the serial killer had gone to work on them.  You will need to cut off one of the locating tabs  in order to fit them into the airfoil slots.  Whilst you are ordering your exhausts, also order a set of landing gear covers, as the kit ones are overly thick and simplified, and do not portray the real ones very well.

Final assembly involved adding the undercarriage which fitted snugly into their respective sockets.  I was expecting a fight with the flaps and their tiny actuators, but was pleasantly surprised how easy they were to place.  In reality the actuators should fir in their respective slots, but I failed to cut out the ones on the bottom wing and clogged the flap ones with a thick coat of future I had applied to also act as a glue.  Therefore my actuators are a butt fit to wing and flap which is not correct for the real machine.
An  aerial line from EZ line  and a bit of sprue and punched plastic disc to represent the extended gunners footstep bought my first build for 2019 to a close. 

Boulton Paul Defiant Mk.1 264 SQN Royal Air Force. Biggin Hill. February 1940

Eduard 1/48 Supermarine Spitfire HFVIII

  • Date Completed:2018
  •   Aftermarket Used:  None, model built completely from box
  •   Paint Used: Xtracolour Medium Sea Grey and PRU Blue

Supermarine Spitfire HF Mk.VIII 32 SQN Foggia. Italy 1944

This model was completed as a review build for The Modelling News, so I will not put a detailed guide here as the article covers the build and finishing in depth.
http://www.themodellingnews.com/2018/08/build-guide-spitfire-mk-hf-viii-in-48th.html
http://www.themodellingnews.com/2018/08/painting-finishing-bruce-tops-off-his.html#more
  Which only leaves me to say, this really was an enjoyable build.  If you have not built one of the Eduard Spitfires, Get On it!!!

Kittyhawk 1/32 P-39 Bell Airacobra Mk1

Year Purchased: 2016
Date Completed: 2017
​Aftermarket used
Eduard 
Cockpit interior set, and exterior set ,exhausts
HGW Seatbelts RAF eraly style Sutton Harness
Mastercaster early style wheels and fishtail exhausts for Mk1
Master Model  .50in and .303 gun barrels with no flash hider
Maketar Masks  RAF and RAAF airacobra for Special Hobby kit

I have always loved the Airacobra in Royal Air Force markings, so when Kittyhawk announced their kit, thoughts turned to modifying it to represent a Mk 1 Airacobra as briefly used by 601 SQN
Research revealed there weren’t too many visible differences between the kit version and the one I wanted to model.  Fishtail exhausts, wheels, armament and a smaller diameter propeller being the main ones.  Mastercaster did wheels and exhausts for a Mk1.  Although made to fit the Special Hobby kit, they were easily adaptable to the KH kit.  Master of Poland supplied the gun barrels for wings and fuselage, the nose cannon being made from brass tubing.  I had planned to have the nose gun bay open, and had even gone as far as to replace the kit 37mm cannon with a 20mm hispano robbed from a HobbyBoss Spitfire, but in the end was not happy that I had portrayed the interior correctly, so reluctantly glued the panels shut.  The aerial mast was scratchbuilt from plastic strip, and the pitot tube came from a Trumpeter P-47
Overall I found the kit a reasonable build, although there were a couple of areas where fit was less than stellar, the wingroots being the main culprit.  This was due to the recess for the inner walls of the wheelbays not being deep enough.  The problem was solved by fitting the wings to the fuselage minus the wheelwell inner walls.  These were fitted after the wings were glued on.  To enable this, you need to cut the tabs off the wheelwell front and rear walls that the inner walls locate onto.  Do this and you will be rewarded with a join that just needs a smear of filler to hide.  It remains one of my favourite builds.

Bell P-39 Airacobra Mk1 601 SQN. Royal Air Force. Duxford 1941

Special Hobby 1/32 Brewster Buffalo Mk1

  • Built: 2016
  • Aftermarket Used: Nil
  • Decals: Montex masks

This one had a period on The Shelf of Doom due to me damaging the windscreen.  Special Hobby kindly came to the rescue and supplied me a new one free of charge.  Exceedingly generous of them seeing as I was the one who cocked it up.  I added a few additions to the cockpit such as a British reflector gunsight and armoured glass screen to reflect the British modifications. All markings are sprayed using Montex masks.  I have since discovered a few colour inaccuracies, the fuselage band should be sky blue and there should be no yellow ring on the underside roundel.  I still like it though.  Its actually a kit that I would like to revisit as I do i have a soft spot for the tubby Buffalo.  This being the third one I have built, well fourth, as I remember building the old tamiya kit as well. 

Brewster Buffalo Mk 1 67 SQN. R.A.F Burma 1941