Completed:2020
Enhancements Used:
Cockpit: Eduard
Seats: Paragon
Wheels: Brassin
Wheelwells: Eduard
Weapons: Brassin
Pitot: Master Barrel
Wing Seals: Shaun off Britmodeller
Decals: Model Alliance Op Telic Part 1
I had a load of aftermarket I had planned on using on this build. Some of it got binned as not value adding to the build though.
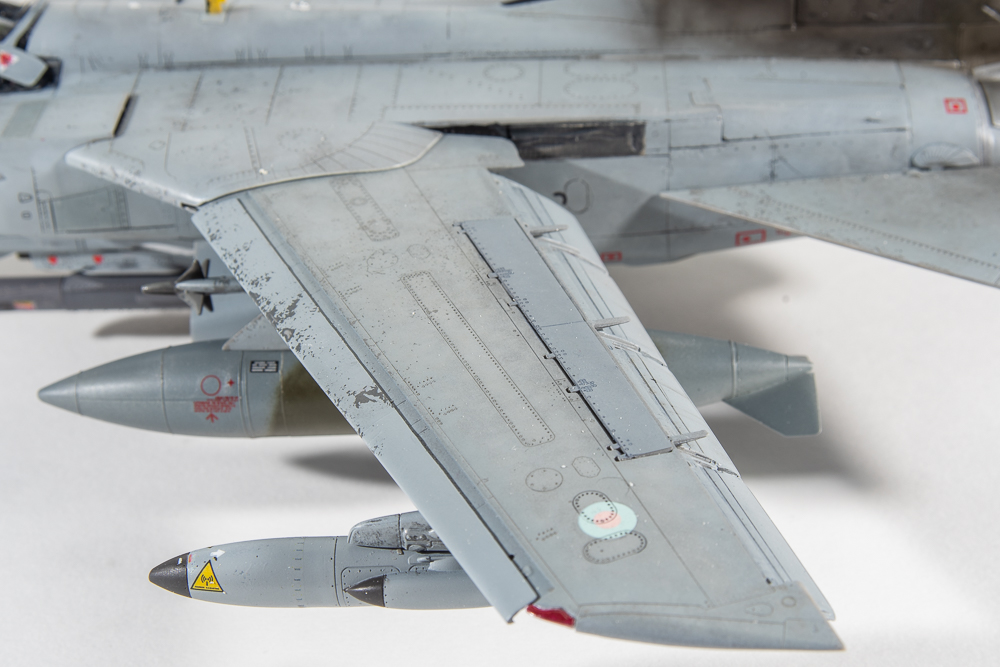
Firmly in this camp, I place the phase Resin Hangar seamless intakes. For a start, I just don’t think they are needed. Whilst the kit intakes do have a nasty seam, you can really only see the first couple of mm of the kit intake trunking, ands then only by holding the model up at a weird angle and craning your neck to look down the intakes. If this bothers you, a bit of filler and sanding will eradicate the seam. Secondly, the case resin intakes are moulded as just the intake tunnels without the bulkheads provided as part of the kit trunking. These bulkheads form the front and back walls of the wheel wells and provide important structural integrity. As I was going to be using the aires resin wheels this was not a dealbreaker. What was the dealbreaker was the resin intakes would not fit over the top of the resin wheel wells without removing a big chunk. This was after sanding both the roof of the wells and the outer wall of the intake wafer thin, so, the resin intakes got binned and I reverted to the kit intakes. To be fair to Phase Resin, Mike is probably not expecting you to use his intakes in congestion with resin wheel wells. That aside, to not cast the integral bulkheads seems strange.. My opinion. Don’t bother with the intakes. The wheel wells however do add to the kit, beautifully detailed as are all aires sets, these even fit with a minimum of fuss. What led to them getting junked along with the intakes was after glueing them I found I just could not get the fuselage parts to line up seamlessly as the other kits had, so they got hit with the debonder and binned as well. Not going too well so far! The aires wells do add a lot to the kit though, and I’m sure the fit issues were due to something I did.
The rest of the build proceeded as per the other tornado builds. Again I cut off the wing cogs to fit them at a later stage. Again this is another thing I would never do were I to build another tornado ( I won’t be!)
Revell would have you assemble the wing flaps as a three piece assembly whereas in real life they are one piece with only the small aerofoil section being a separate piece. Make sure you fill and sand the join line. Hopefully the photos explain this a bit better. Shaun’s resin wing seals are far better representations of the real things rather than the featureless kits items. He can be contacted through Britmodeller.com
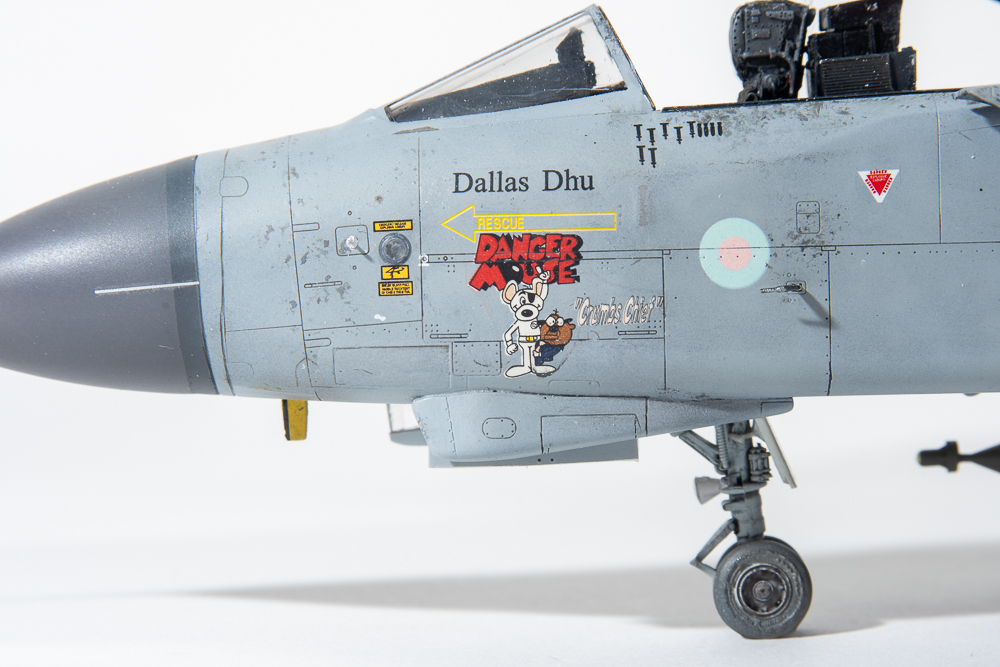
Photos I found on the net of Danger Mouse and other Operation relic jets showed a fair bit of wear and tear with scuffing and chipping of the ARTF grey paint exposing the underlying dark camouflage grey paint. To portray this on the model. I first applied a coat of dark sea grey to the leading edge slats, nose, pylons and one of the drop tanks. Mr Neo masking fluid was then dabbed on with a torn bit of sponge and the model sprayed with a couple of light coats of Scale Modeller’s Supply Barley Grey. SMS is a home grown Australian paint manufacturer. I have been increasingly using his paints, as Im finding them excellent to spray. You can spray them straight from the bottle, but I add a drop or two of thinner to make them spray even better. They are a lacquer paint that has proven to be hard wearing and quick drying. Once this paint had dried I rubbed my finger over the Neo to remove it from the airframe leaving the model looking chipped and scuffed. The jet was made to further look worn by painting a few panels in either dark sea grey or lightened shades of the barley grey. One of the fuel tanks was painted in the old wrap around scheme, jets being fitted with different coloured tanks being quite common, even today.
I applied a panel wash with Payne’s grey oil paint straight over the SMS paint, with the excess wiped off and no damage to the underlying paint. The decals were also placed straight over the paint, which dries with a sheen, the model Alliance decals performing well, although the DM code letters were too light and did not stand out enough when compared to photos of the real jet. As I could not find any dark grey or black letters of the correct size to replace them, so had to resort to painting the fin top a lighter grey. I replaced the letters with other codes from the same sheet. Penfold’s catch cry “Crumbs Chief” should also be far pinker than the pale shade on the sheet, maybe it faded! Op Telic jets do not seem to have been as well photographed as Op Granby jets, well so it seemed to me with good quality photos being hard to source. In particular I wanted to know if these jets wore the full suite of stencils after they were repainted. In the end I went with just the major ones figuring only those stencils that dealt with rescue or crash procedures would have been re applied.
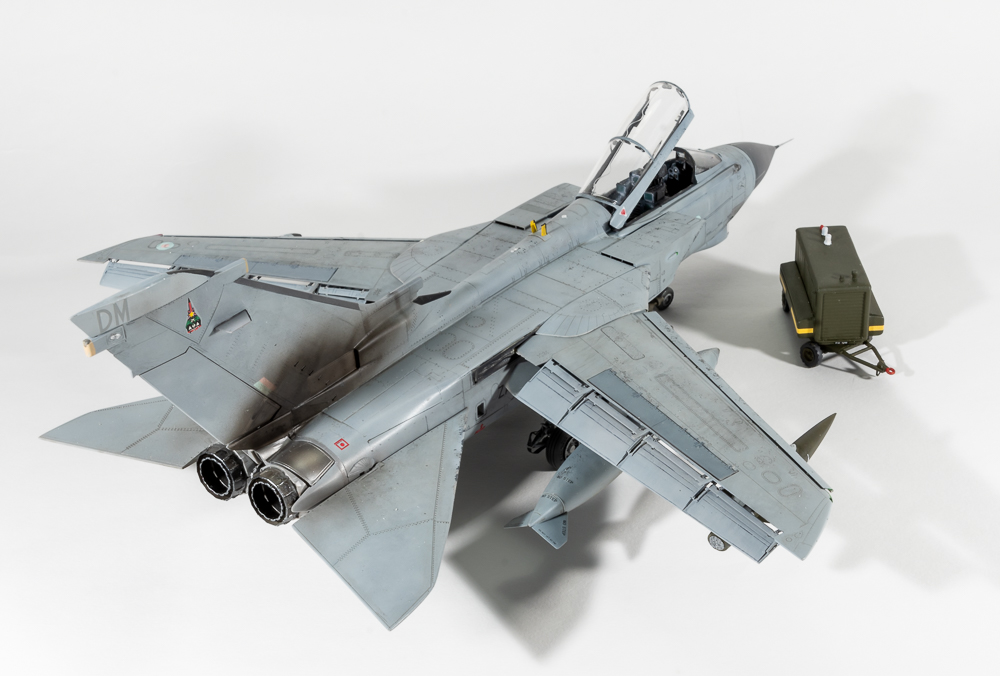
With this model I decided to really strengthen the pylon to wing attachment by using epoxy glue. They ain’t coming apart now, although perhaps I should have ensured they were parallel to the centre line first!
With that Danger Mouse was done. One of my favourite cartoon characters as a child. There are still a few build and finish faults, but this is my favourite of the three. I love the pugnacious look of the short nose coupled with the laser sensors. The Eduard Brassin weapons are also a must have, being better detailed and more accurate than the kit supplied weapons. Out of the box, you can arm a Operation Granby or Operation Telic jet. Even the stenciling is provided.
So with three Revell Tornadoes done, what are my thoughts? Well, let me start by saying I sold my remaining Revell tornado from the stash, as to build more would be just like beating yourself over the head repeatedly using a hammer. I think you would really have to love Tornadoes to build multiples of the Revell kit. Marred by soft detail in a lot of places, sink marks, flash, it can be a troublesome build in inexperienced hands. Take the time to research other on line builds and the previously linked youtube videos as fit problems can be mitigated if the builder departs from Revells suggested build sequence. I really cant see anyone else aside from Airfix releasing a newer tooled Tornado, so Im thinking the revell is going to be the go-to in 48 scale for quite some time. I might just order that new 32 scale Italeri tornado, as the Tornado itch still needs to be scratched with a wrap around GR1.
Tornado GR4 ZA542 31SQN Royal Air Force. Combat Air Wing Ali Al Salem Op. Telic 2003