Revell 1/48 ADV Torando F3

Enhancements Used
Seats: CMK 
Seatbelts: Eduard steel
Wheels: Eduard
Pitot Tube: master barrels
Decals: Xtradecals Tornado F3 part 1
BOL Rails: Phase Resin Hangar

Construction Notes
 Oh God, what was I thinking, building three of these at the one time?.  In last months gripping episode you will recall that I (rashly) decided to build all three of my tornadoes from the stash at the same time.
​Well the plan didn’t quite start out like that.  This tornado was actually the first started, and the original plan was to just build this one,  however, it was not really turning out as I had pictured in my mind, – a common theme with my builds –  so it got shelved, and my other F3 pulled out of the stash, and started with the intent of being a better build (yeah, right!).  It was at this stage the idea to build all the tornadoes in my stash was born.  In actual fact, I thought I would  only be  building the other ADV  and my GR4.  
It  was only when the other ADV was almost finished, this one was revisited, and the decision made to complete it.

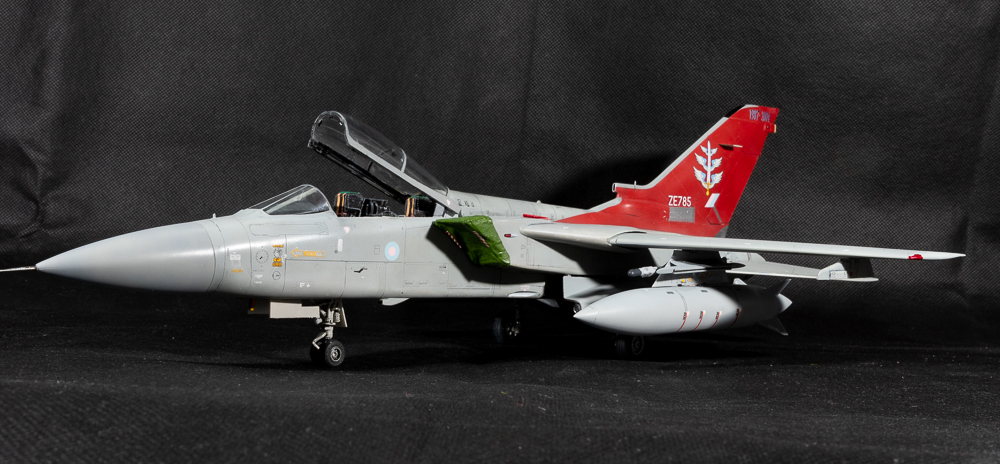
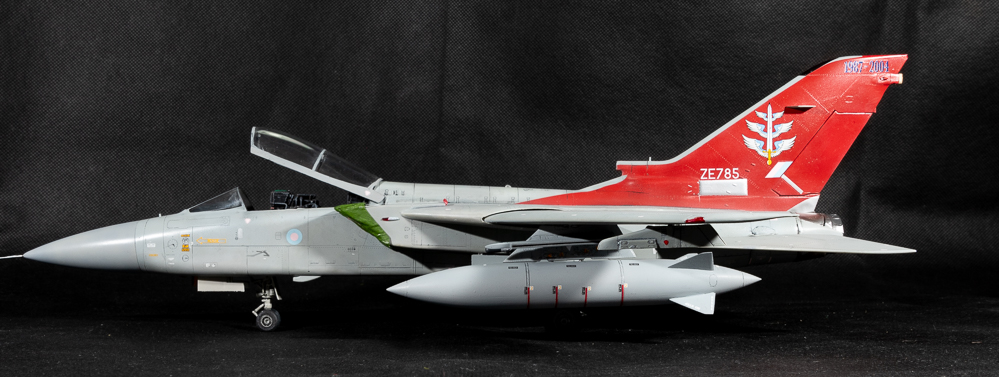
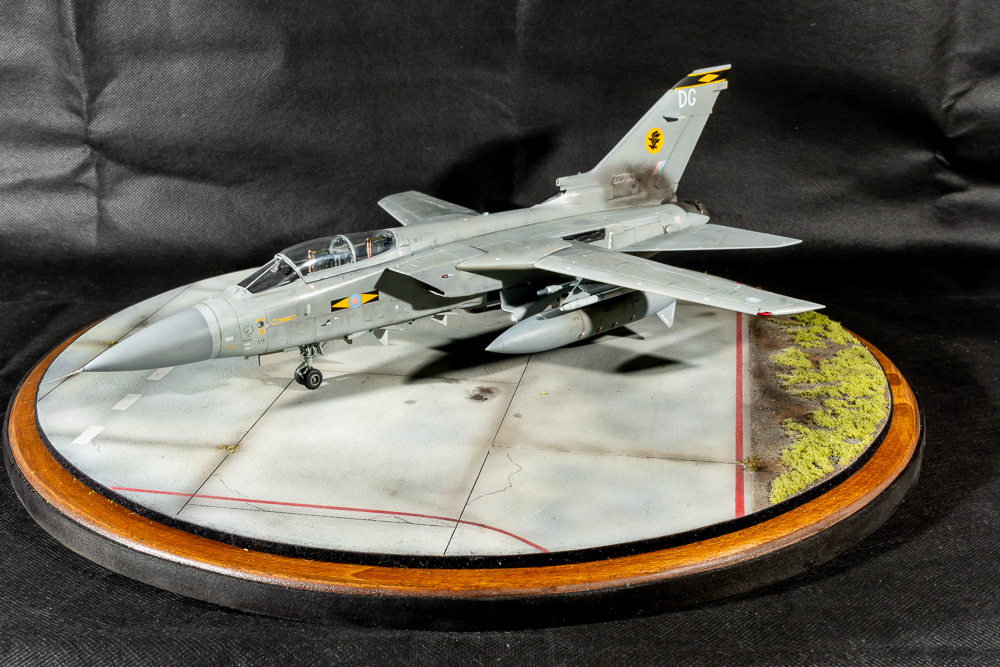
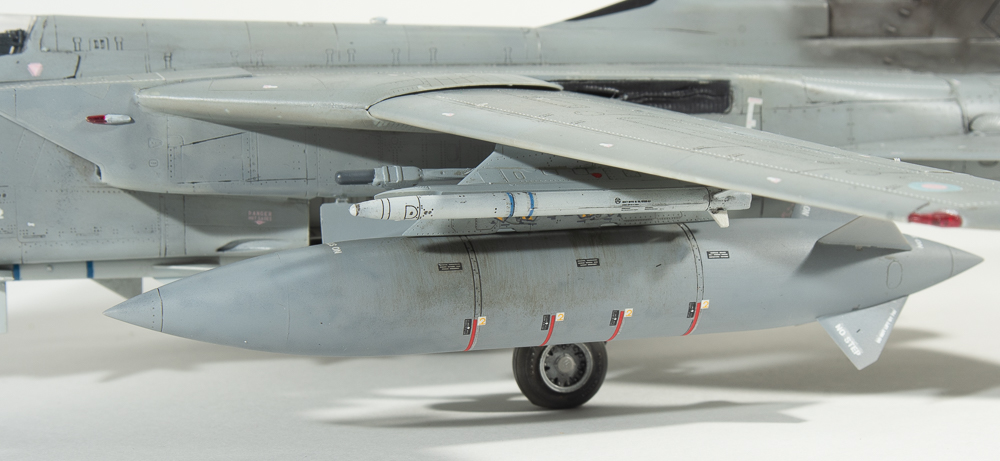
​Being the same kit, most of my notes from the first build stand.  My thought process with finishing this kit was to make it a clean build, as, with three builds now underway, getting  Tornadoed out, was a real possibility!   To this end, no stores were added, apart from the large tanks. Photos of the actual jet showed it sans stores anyway, save for tanks and a RAID pod on one of the BOL rails.

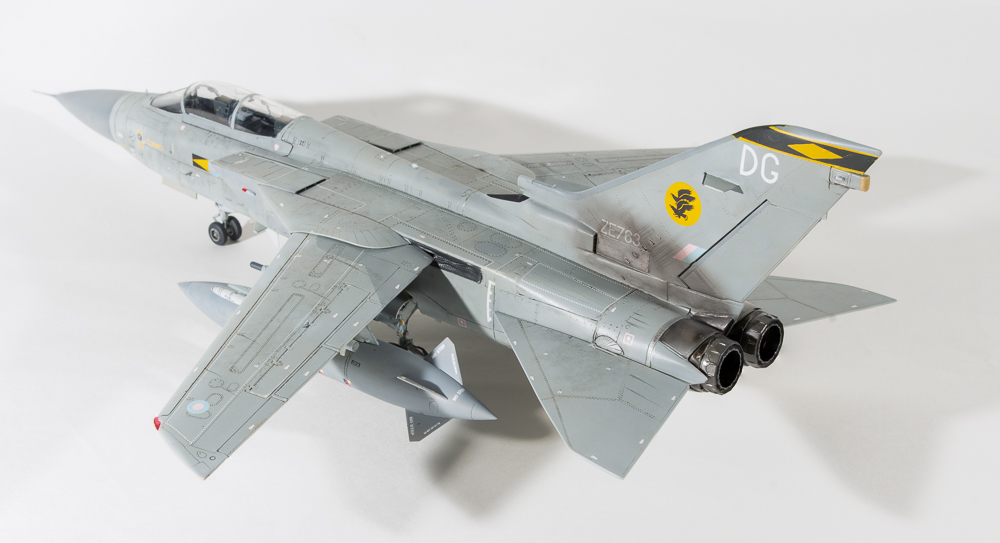
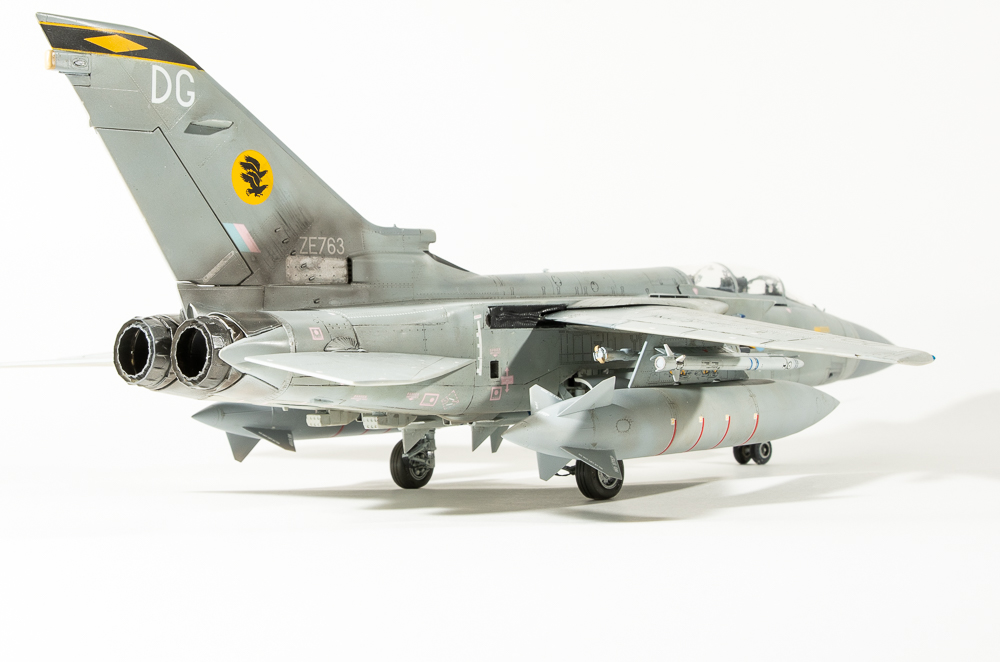
 This time the BOL rails came from Phase Resin hangar.  To better reflect RAF pylons, the sway braces were cut off and the “bulges” on both sides of the pylon had their length shortened.  Close enough for Govt. work as the saying goes.  there are plenty of photos available on the internet to aid as reference in this task.
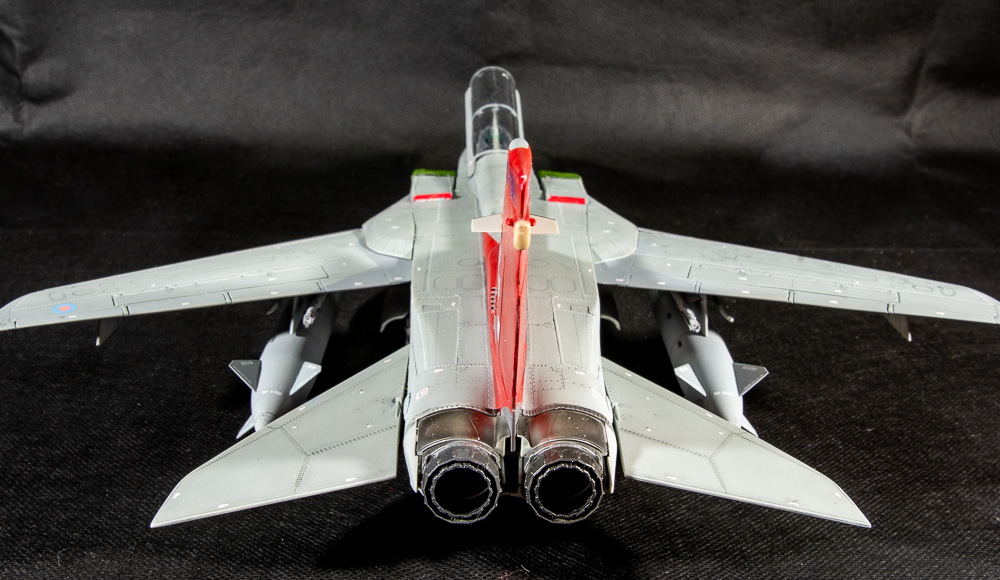
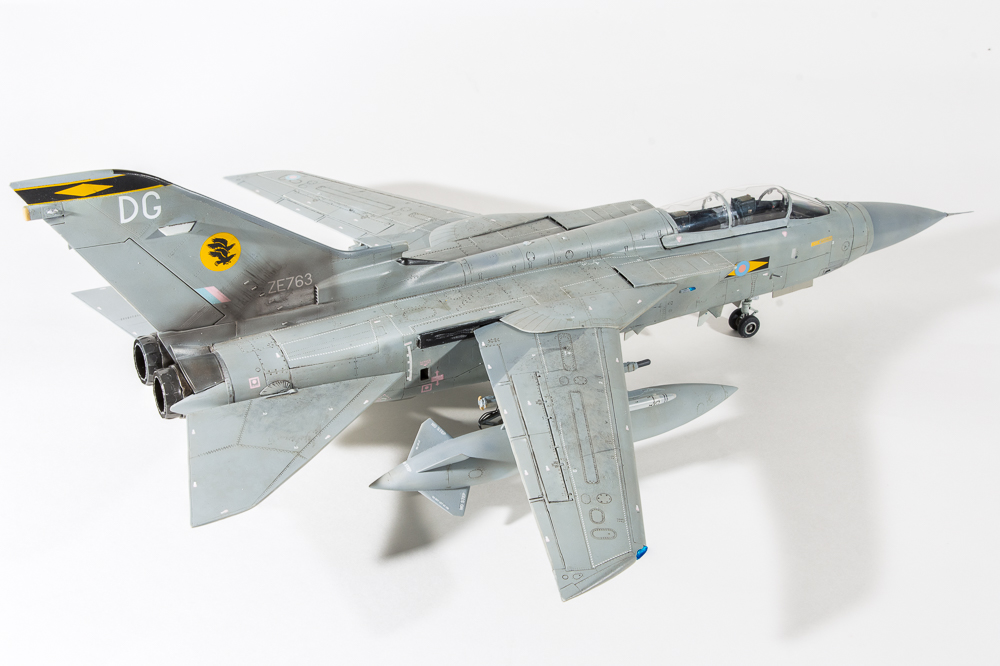
The wings again had their cogged teeth cut off so that they could be painted separately and added later as part of final assembly.  This time I left I bit more of the “spar” with the result the wings attach far more securely, although they don’t have that classic Tornado anhedral

For this model, I wanted to add FOD covers too.  They were formed by covering the intake firstly with  household aluminium foil.  Kleenex tissue was then laid over the foil and coated in diluted white glue.  The thought process being to then slide the hardened tissue off the foil.  In reality, this didn’t work as the glue had worked too well, and stuck the tissue to the foil!
Once dry, the tissue FOD covers were trimmed to shape, and then painted.  Thin strips of tamiya tape formed the ties underneath the jet, whilst white EZline stood in for the bungee cords stretching back to the intake vent FOD guards which were formed from offcuts of red painted plastic card.  RBF flags came from an old Verlinden sheet.

As the Eduard PE wheel well set was not used on this model, the door retraction struts fitted neatly into their slots without the need to shorten them as was required on the other ADV build.
The kit decals were again used for the instruments, but this time the CMK seats were used, dressed with Eduard “steel” seatbelts which are far easier to use than their normal PE belts, being far more malleable, and less prone to the paint flaking off.

Paints used on this completion were Mr Color, another of my favourite brands, This actually being the first of my tornado builds, it was again plagued by large chunks of paint peeling off when the masking tape was removed.  This being one of the things that contributed to the build being abandoned in the first place, the painting process becoming an endless look of touch ups.
​In an effort to allow the wash to enhance more of the surface detail than the first kit, I applied the wash straight over the lacquer paints without first applying a barrier coat of gloss.  The excess was wiped away without removing any of the underlying paint.  Lacquer paints really are bulletproof!  Shock, Horror, the decals were then applied, still without a gloss coat.  No problems with silvering.  It was only after decalling that  a sealing coat of semi matt was applied.  
The Xtradecal decals behaved flawlessly, although again I used the too thick kit decals for the stencilling.  They stand out way too much on close inspection.  If you are building this kit, I would ditch the kit decals completely and use AM sheets, Xtradecal, also doing a stencilling sheet.

Since these photos were taken, I have  divided the four sky flash missiles from the first build between the two ADVs so each jet carries two skyflash.

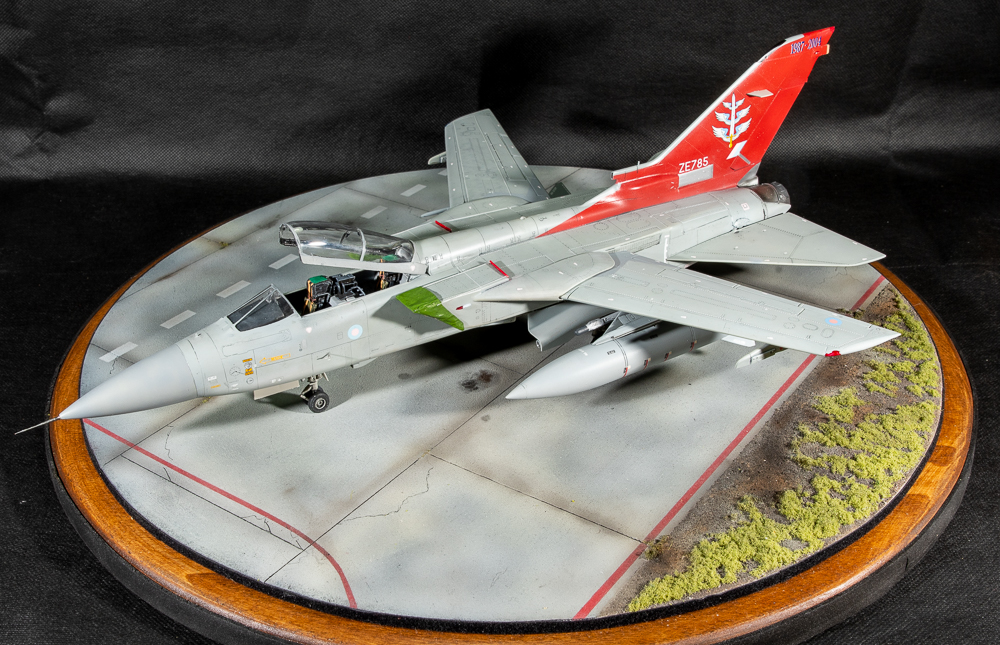
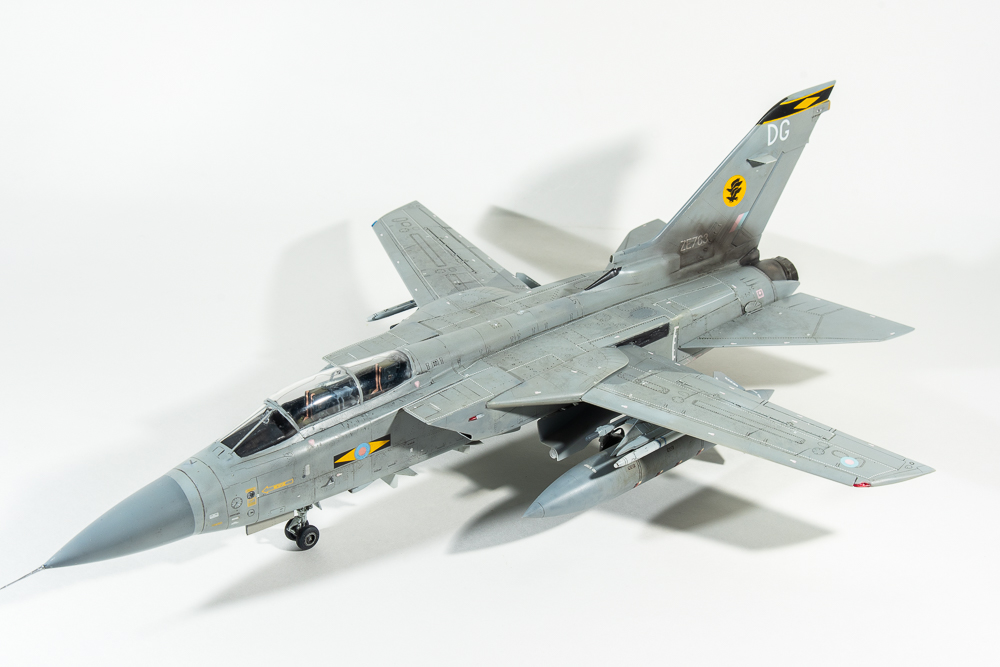
So, how’d I go?  Well, in some ways I feel I did a better job on this one than the first ADV, although it still has plenty of flaws.  I still feel I can do better.  Anyway, here are the photos so you can judge for yourself.  Next instalment should be the third and final Revell Tornado.
​Thanks again for looking.

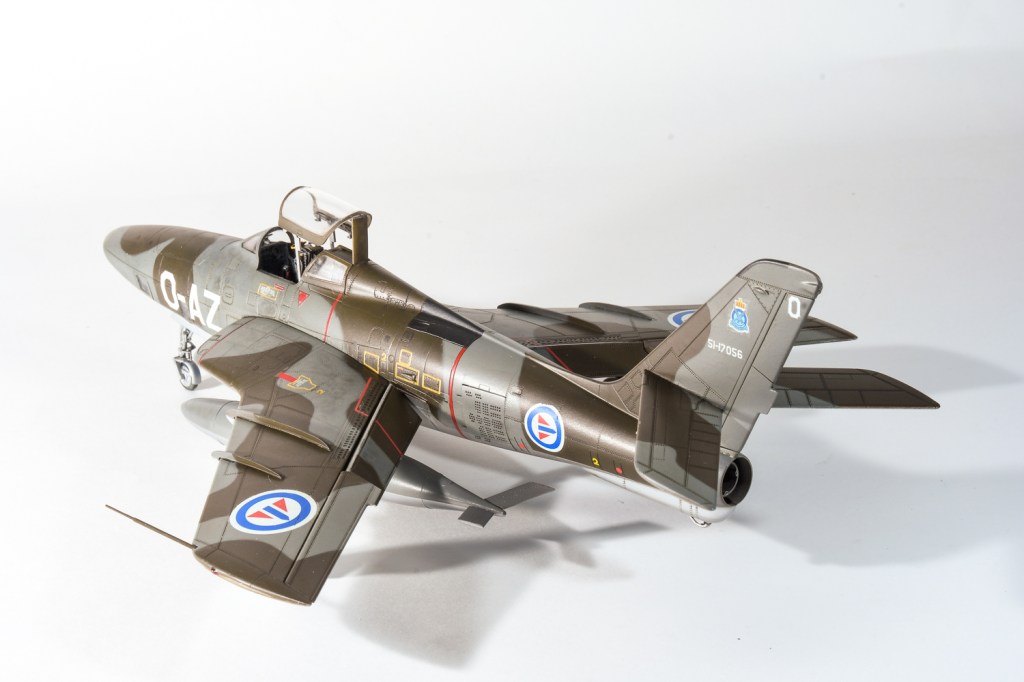
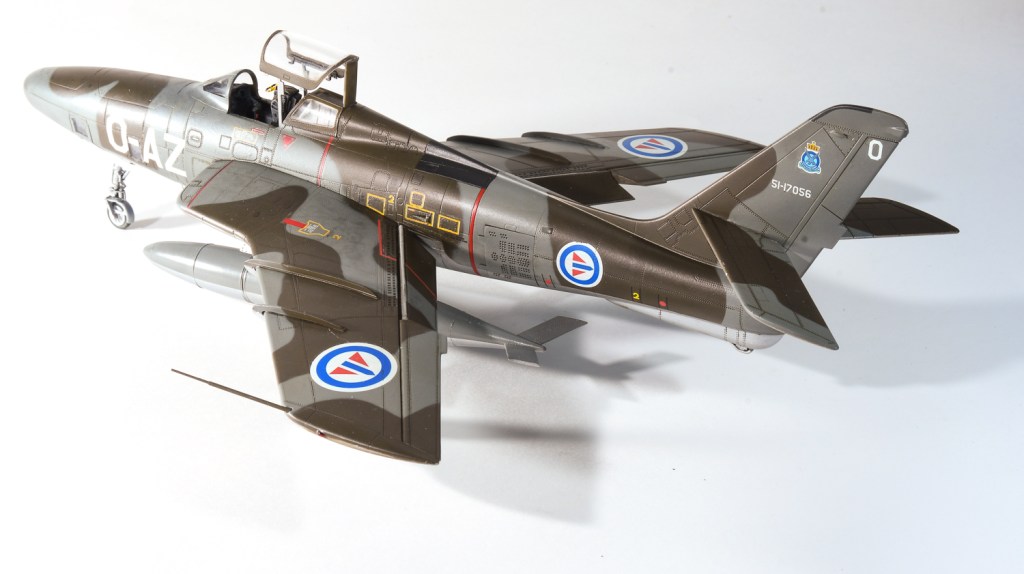
Panavia Tornado ADV. F3 OEU Royal Air Force RAF Waddington. May 2003

AFV Club 1/35 M60A2

  • Purchased:  2020
    Built:             2020
    Enhancements:  Tracks: AFV Club                              
                                  MG Barrel:    Master barrel                          Headlights: SKP Model                                               
    Antenna bases: Voyager  ​
The AFV Club (AFVC) M60 was one of those kits I didn’t realise I needed until it was offered to me by a friend!  Thanks Norm.
 I’ve always loved these cold war tanks, the M60A2 having a  rather uniquely shaped turret which added to the appeal.
 Reviews on line painted a rather good picture of AFV Club’s kit too, although its not a kit I’ve seen built often.

The AFV Club kit is moulded in an olive drab plastic, the many sprues filling the box to the brim.  An aluminium main gun barrel, PE mesh and detail parts, string tow cables,  clear parts for the periscopes also round out the package.  Tracks are of the rubber band variety, the main gun and machine gun dust covers are  provided in a vinyl type material.  The armour version of an Eduard Profipack kit, although this seems to be a standard of all AFV Club kits.

Once construction is commenced though, you realise a lot of the parts are not needed as they apply to other variants of the M60 family.  Although AFVC also offer a late type M60A2, I imagine you could also build one from this boxing as they include the later type wheels and air intakes.  You might  need different tracks.

The build seemed to go on for ever, mainly due to having to clean up a faint mould seam on all parts, which started to become tedious, especially on the small parts and certainly took away some of the enjoyment.
I ended up breaking some of the turret basket rails whilst doing this so  replaced  the broken parts with brass and plastic rod.  I not sure I got it all square though.
A Master Details brass barrel replaced the plastic M85 barrel provided by AFVC, and I replaced the kit provided tow cables with some copper ones I found in my spares box, and she was  ready for painting.


TanModel 1/48 RF-84F ThunderFlash

Built: 2019
Enhancements: CMK MB ejection seat 
Paint: AK Real Colours
Decals: OOB

My second attempt at Tanmodels Thunderflash was borne out of my dissatisfaction at my first attempt, and I have to say, Im not really happy with the second attempt either

This example was built from the first issue of the kit, but using the second release decal sheet, as it is far superior to the initial issue in quality, anyway, although I do think the first sheet had better options. Confused yet?

This first release of the kit had very pebbled plastic, so a NMF finish was out, I decided.

;In any case, I wanted to complete a camouflaged jet so as showcase the aircrafts service life and different operators.

Assembly on this one was streamlined by keeping the nose camera covers closed.You still have to build the camera bodies, which still constitute a finicky assembly due to their near scale racks.

The rest of the jet assembled a little easier than my first attempt as well.

This time, the intakes and wings assembling without any fit issues. Aside from this, all the weak points of the other build were still encountered, the disappearing panel line and rivet detail around the bottom of the fuselage, that required rescribing, the very weak attachment points for the nose landing gear doors and the sloppy fit of the tailplanes.

The model was painted using the RAL shades by AK Real Colours, my first time using these paints.  I thought they sprayed OK, but a few modelling friends have raved about their performance, so maybe I need to revisit them. The camouflage pattern was laid out using blu tac sausages.

A gloss coat was then applied and recalling commenced. The decals on this revised sheet, as stated before are a big improvement over the first sheet, being both in register and a little thinner. Im not sure about the Norwegian roundels though as they look a bit pale when compared to photos on the web.

AKs panel line wash for grey green aircraft was then brushed on and the excess removed after an hour before a final semi matt coat was sprayed all over.

The masking from the canopy was removed and the CMK seat added as these jets, in fact, all the NATO jets – apart from the French ones – were fitted with a Martin Baker seat.

The CMK seat has excellent detail and was a drop fit.

Finally the undercarriage was added, the nose leg still being a less than sound fit and the drop tanks added, although I have failed to push one of them home against the pylon with the result the nose of it droops, and it is out of line with the other one. During the build I managed to lose one of the airbrakes (I seem to lose a part every build) 

An email to Tanmodel resulted in them sending me a replacement part without charge which was very kind of TanModel, seeing as it was my fault.

So, my second TanModel ThunderFlash and the last one I can see myself doing. 

The result, again is a model that Im far from happy with. I have seen some very nicely done examples on the net, so it can be made up into a lovely looking model. As can any kit really!

Again, my lack of satisfaction with the project and how it was progressing led me to rush it towards the finish line. In fact I sold this one off in 2021.


Republic RF-84F Royal Norwegian Air Force 717 SQN. Rygge Air Base. Norway 1956

Go back

Your message has been sent

Warning
Warning
Warning
Warning.

TanModels 1/48 RF-84 Thunderflash

  • Completed:        May 2019
  • Enhancements: Seatbelts ExtraTech
  • Wheelwells, CMK
  • Camera access Doors- CMK
  • Control Surfaces CMK 

After the Trumpeter Thunderbolt, I was looking for something of a quicker build, so when my random stash pick system yielded the tanmodels Thundeflash, I was initially happy as I had been thinking about building this for a while. That initial enthusiasm quickly dissipated during the early stages of construction. Ejector pins marred the interior surfaces, the plastic parts had a pebbly texture that would require lots of polishing if I wanted to do a NMF and the surface detail almost disappeared on the underside of one fuselage half, meaning a rescribe would be in order. Coupled with this, assembling the brackets that hold the cameras proved fiddly with small in scale parts that had minimal glueing area. It fell apart on me a couple of times.  It would have gone back in the box if it were not for the reason I am trying to reduce the number of half built models on my stalled list, not add to them!  So construction carried on. The cockpit reminds me of the old monogram kits with nice relief on the side consoles that responded very well to dry brushing, same with the instrument panel. The seat had some generic US Seat belts added, painted, and was seat aside after a wash of Mig Products Dark Wash.

The kit has the option to cut out the camera access doors, and seeing as TanModels had gone to the trouble of including all the cameras, I thought I should show them off. The doors are demarcated by cut lines on the inside surfaces.  These lines are a little wide, so care is needed in cutting them out.  I used repeated scalpel passes, until they came away.  Separate doors are in the kit, but I decided to use nicer detailed ones from CMK that show the insulation on their interior surfaces. The cameras, save the nose one were left out until final assembly. Suddenly I was up to closing the fuselage halves! They fit together without problem I’m pleased to say, and a scribing tool and riveting tool was used to reinstate and deepen the underside surface detail using dymo tape as a guide. This actually went a lot better than I thought, given rescribing isn’t one of my better skills.  It wasn’t until this stage that I actually started enjoying the build! Dry fits had shown a very nice tight fit of the wing assemblies that slide into recessed areas on the fuselage without any need for filler, however with the intakes added, the fit was nowhere near as nice. I ended up dissembling the wing intake trunking and splitter plates (thanks Tamiya Super Thin Glue) and reassembled the splitter plates and trunking to the wings one piece at a time, constantly checking the fit of the wings to the fuselage.  This worked and led to the initial nice tight fit that the first dry fits had shown. I have no idea what the problem was, but can only guess the splitter plates when added to the assembled fuselage trunking caused the interference. It has to be said the internal trunking does not really fit together seamlessly. Ensure when done, that you sand the openings flush so that there are no steps that will cause the splitter plates to sit proud. Prior to gluing the wing halves together the CMK wheelwells were glued in place.  I found the plastic around the wheel bay opening needed to be thinned slightly.  I used a dremel. If its one measuring tool I have of my increasing skill, it’s the dremel. In years gone by this would have resulted in carnage and unusable wings. These days I can manage quite surgical cuts and thinning.  The CMK nose wheel was also used which is just a direct replacement for the kit part, but with greater detail. I also used CMK ailerons and flaps as I had them in the box for some reason, but there is no discernible difference in detail that I can see. I now had a complete airframe with filler only being used on the underside centre seam and a tiny bit around the windscreen panel.  Overall I found the fit excellent and my initial bad thoughts about the kit had disappeared.  Before any primer could be applied though, that pebbly texture had to go.

Republic RF-84F Thunderflash
27300 ER 4/33  Armee de l’Air RAF Akrotiri. Cyprus 1956

Revell 1/48 ADV Tornado F3

  • Built 2020
  • Enhancements Used 
  • Seatbelts,  Eduard
  • Wheels   Brassin
  • Wheelbays  Eduard
  • Pitot Tubes and AoA sensors  Master Barrel
  • Weapons  Brassin ASRAAM   Hasegawa Sparrows (skyflash)  BOL rails  F4Dable Models
  • Decals  Xtradecal Tornado F3 Part 1
 Like a lot of modellers, I had heard some horror stories about the fit of the Revell Tornadoes.  The consensus seemed to be whilst they were definitely a step up on what was currently available, the fit left something to be desired.  The kit seems to be one of those that polarise modellers world wide.  The truth is, like the Hasegawa Harrier, the ease of build is directly linked to how you build the tornado.
What inspired this particular build was a mate directing me to a series of youtube videos done by a fellow named Nathan Robinson.
Nathan is a member of the IPMS Tornado SIG and admits to having built six of these!  So if anyone will have the build down pat it should be him.
Deciding to take a leaf out of Jon Bryons book, all three revell tonkas – 2 ADVs and a GR4 – were pulled from  the stash to be built as a batch.
Following Nathans build sequence, I found the build progressed fairly quickly. I still needed filler around the intakes and along the fuselage sides,where it meets the bottom plate, but these were all easy joins to clean up and rescribe.
For the cockpit, the kit decals were used which sat down surprisingly well over the moulded detail and certainly looked busy enough through the closed canopy.  Note Revell call out the wrong rear instrument panel, you need part S214

I deviated from Nathans build my cutting off the cogged part of the wing so I could add them later. To be honest, Im not sure this is the best way as you lose a bit of structural integrity. Ive already so modified all three of my kits, but wish Id left one to compare the two different methods.  Maybe on my eduard Desert Babe kit!

I replaced the rather bland wing seals with some moulded by a fellow called Shaun from Britmodeller.com.  I’m not sure if they are still available as he was doing them when the kits first became available.
The decision was also made on this model to have the flaps up, to better show off the lines of the ADV.  The best way to achieve a flush fit with the wings is to cut the bar on parts B111 &113 so you are left with separate flaps.  These can then be glued  individually to the top wing ensuring they sit  flush with the upper wing.

The undercarriage assembles fairly easily, despite being moulded in two halves. Revell have form here, which means you have a seam to clean up. Part C159 and 168 placement is a little vague. Step 69 shows it the best. On gluing the PE facia to the back wall of the wheelwell, I had an alarm bell go off in my head going, “I wonder if this slot the PE covers is important” Well, Yes, it is as this is where the door retraction strut sits.  Didn’t realise this until I added them, so then had to cut the struts, in fact I replaced them with thin rod. I find this annoying on Eduard’s part. They could have easily made the back facia in two parts to be fitted either side of the slot. Its not the first time Eduard have failed to take into account the fitting of kit parts around their etch, and one of the reasons I find myself using less AM these days unless it is drop fit. Some etch placards and brake lines dress up the legs nicely, but on my other F3 I will use wire and decals instead..

Photos of my chosen jet show it fitted with BOL rails on the inner side of the wing pylon. If like me, you didn’t know what BOL rails are, I can know tell you they are a launch rail with an inbuilt countermeasures pod. They are surprisingly hard to track down as an aftermarket item, considering quite a few jets use them.  A friend offered me his Steel Beach ones, but they looked quite a crude casting. The F4DModels were much better although warped.  Hot water straightened this out.

For the Barley Grey, I used a home grown paint SMS which performed quite well, Its marketed as ready to spray, but I still thinned mine a little. Colour looked good, but I find it strange they do not offer a Light Aircraft Grey in their range to go with the barley grey, so it was back to my go-to paint. Mr Color.
Again on this model, I had problems with the paint and primer peeling off when removing the tape. I have no idea whats causing this. The model was wiped down with tamiya thinner prior to paint, and was primed with Alclad Grey.  The consensus amongst my modelling mates was it could be the primer, which Ive had for a while, so in the bin it went.
The model was gloss coated for decals and in preparation for the wash. These days I apply the wash before the decals, despite this method, the wash failed to pick up a lot of the very fine detail, despite repeated applications, which was annoying in the extreme.
The decalling should have been easy, but again my poor build planning brought things unstuck. Literally!
The decals had all been applied when I realised I had not painted the fintop di electric panel, so as the tape would lay over the decalled fin band I religiously detacked the tamiya tape before laying it over the decal.  Of course, on pulling off the tape, the decal came with it, necessitating me having to  paint the fin band back on.  This in itself needed a lot of touching up as each time I pulled tape off, paint came away too. I really need to get to the bottom of why this is happening.
Surprisingly, my enthusiasm hadn’t waned for the model, so I pressed on, applying a satin sheen, which I then went over with dullcoate. Even with the satin, the model still looked far too glossy.  Annoyingly, all the stencils stood out as too thick as well. I had applied them in little pools of future to stop any silvering. I wont do this on my next one.

This just left final assembly of wheels, aerials, canopy mirrors and nav lights. none of which I managed to lose as is the usual case despite several of them pinging off the tweeezers.
And that was that! One down, two to go
So what do I think of the Revell Tornado? Well I think the main problem is, its Revell!  I have no problems with the breakdown of the kit, but the kit quality is poor indeed, flash, sink marks and ejector pin marks mar the parts, making assembly harder than it should be. These kits, like Airfix, are designed for the mass market, the so called “pocket money brigade” and the tooling shows it. You get what you pay for.
Despite this, if you ever release a new tool Jaguar, Revell, I’d buy it in a heartbeat.
Anything would be better than the horrid kittyhawk kit thats still sitting on my shelf of doom.

Panavia Tornado F3 ADV ZE763 11 SQN Leuchars Royal Air Force 2006

Airfix 1/48 Hawker Hunter F6

  • Built: 2019
  • Aftermarket Used: Eduard P.E Flap set . Eduard dedicated cockpit set
  • Decals: Xtradecal

Ive previously mentioned I’m loving Airfix’s new releases. The Hunter was a monty for them to put out in 48 scale, but I feel they have rushed this kit a little. It is decidedly lacking the detail of some of their other releases such as the Walrus and Blenheim. Lacking in both cockpit and surface detail, the flap bays are also strangely devoid of detail despite Airfix offering them as separate parts, so the lack of moulded ribs and stringers is mystifying can be displayed down. Airfix have also missed a door actuator off the front nose wheel leg, as only one is provided.

The model builds quickly and easily. I cant remember too many issues. ( for some reason, I failed to write this up after completing the kit, so this is being written up about two years after building the kit) The blue tac I used to hold the canopies to an old paintbrush handle whilst spraying them left a stain that could not be removed, even using Mr Thinner, which normally removes everything else. A reaction to the blu tac is the only thing that comes to mind that would have caused the stain as it would not polish out or wipe off using the afore mentioned Mr Thinner. This forced me to cut apart the closed canopy as the model would be displayed with open canopy.

The hunter had many interesting schemes, airfix though provide options for three simply camouflaged machines, albeit, from two different Air Forces. A more interesting scheme was found on an Xtradecals sheet which had been in the decal bank for some years, looking for an excuse to be used.

Gunze Shine Red stood in for a very passable R.A.F. Signal Red. Gunze was also used for the Light Aircraft Grey with M.R.P Light Arctic Grey which is an off white being used for the white. It looks white out of the bottle, but when compared to the white of the roundels one can definitely see its a very pleasant grey. Its defiantly a masking intensive scheme, but certainly is eye catching.

And thats the Airfix Hunter, a decent, but not outstanding kit. I am perplexed though why Airfix has not followed it up with the F.G.A.9

Hawker Hunter F6