- Purchased: 2013
- Completed: 2024
- Enhancements: Completely out of box
- Decals: Custom cut masks
Introduction
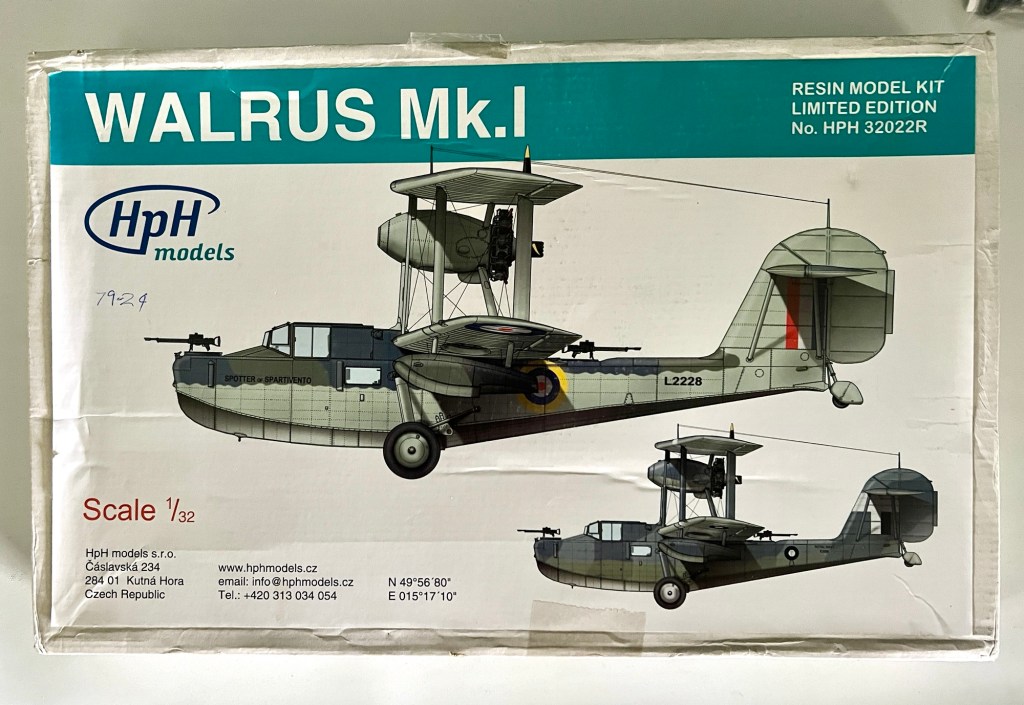
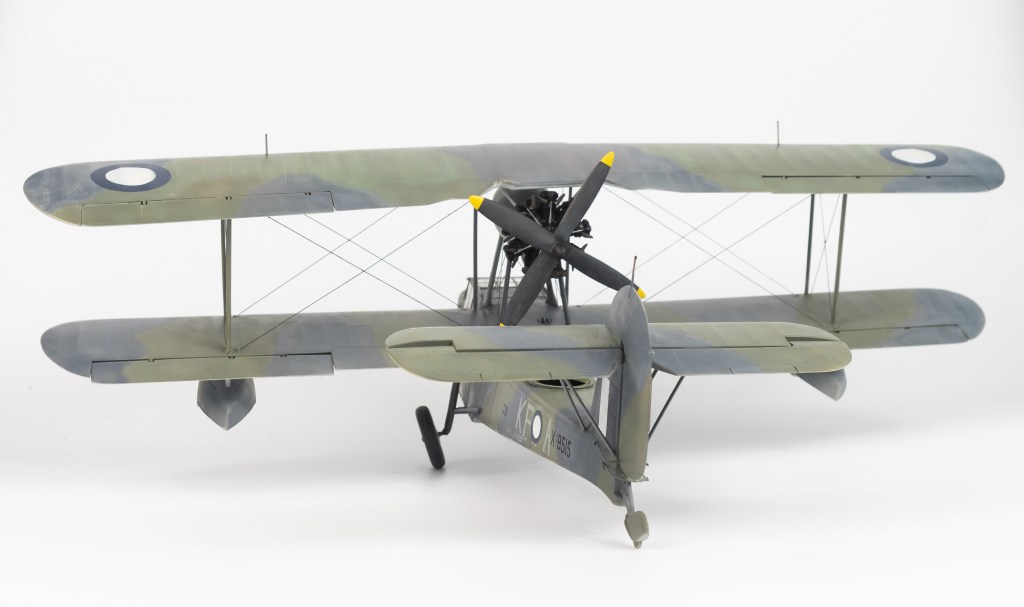
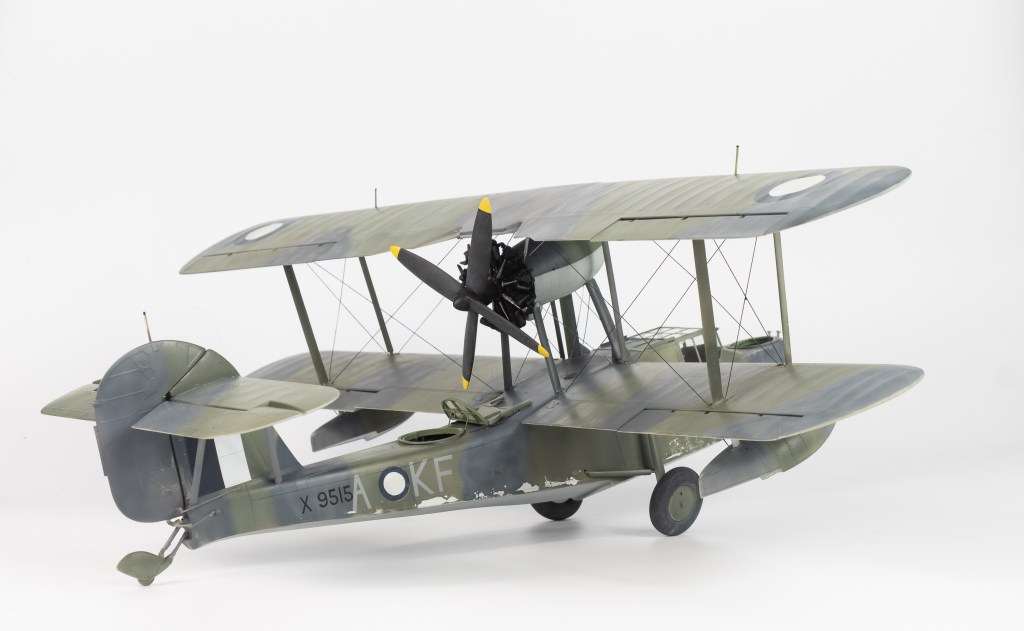
When this kit was first announced by HpH, I was immediately on board as the Walrus is a favourite of mine. The only kits in my preferred scale of 48 were the awful SMER and slightly less awful Classic Airframes kits, the superb Airfix kit still being 3 years away. A 32 scale Walrus sounded very epic. It was also very expensive!
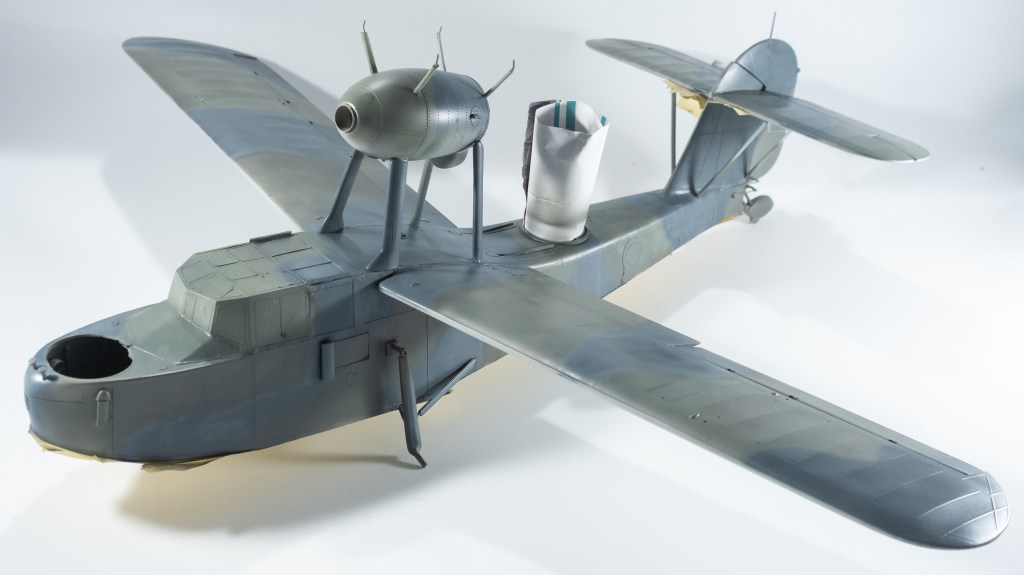
I was somewhat dismayed upon arrival of the kit to see the small resin parts had been cast attached to a sheet of resin. Separating the parts was going to require quite a bit of sanding!
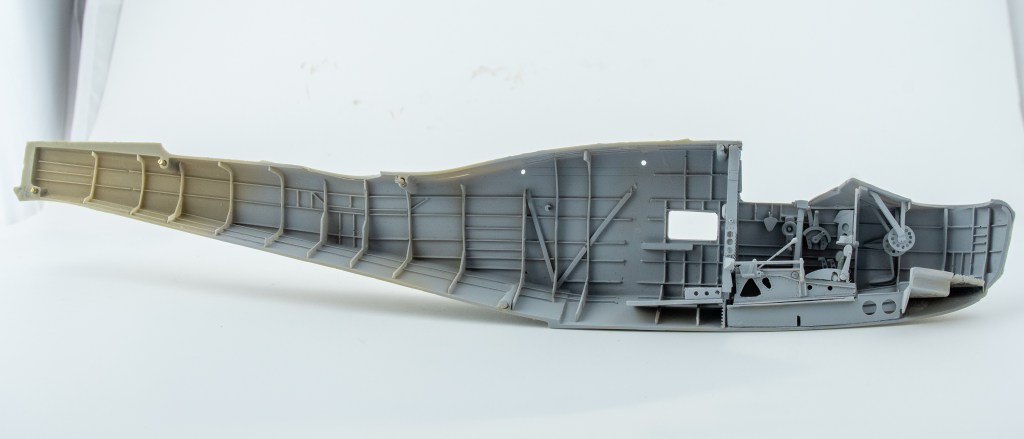
Aside from that, the main airframe parts looked to have been cast very cleanly and with excellent detail, the fuselage being fully riveted and the flying surfaces being cast in solid pieces with rib detail that mimicked the sturdy construction of the real thing. The bow section had been marred by the rough removal of the casting block at the factory leaving a ragged gap when both fuselage halves were dry fitted together. Instructions were on a CD which I printed out, so as to make them more accessible on the bench. It is handy though to keep the CD handy as you can zoom in on the parts to help identification. Whilst the parts are numbered in the instructions, the actual parts aren’t. Numbers on casting blocks would have helped greatly in assembly. This would have to be one of the most complete kits on the market, with decals , photo etch, masks and even HGW fabric seatbelts all included in the box.
Construction
The first order of business was to straighten the two fuselage halves. Although I had taped them together many years ago to preserve their shape, they had still developed a few warps. These were straightened by the simple expedient of dunking the fuselage halves into boiling water until they naturally returned to their original state.
Construction was able to be commenced straight away, thanks to me having removed most of the resin parts from their backing a few years ago during downtime at work
Much sanding was involved, the parts either being hand held or taped to a small piece of aluminium angle whilst sanded against a sheet of wet and dry taped to a flat surface. My recollection at the time was a few parts got damaged but looking at my work now, far less than I remembered. Yay for me!
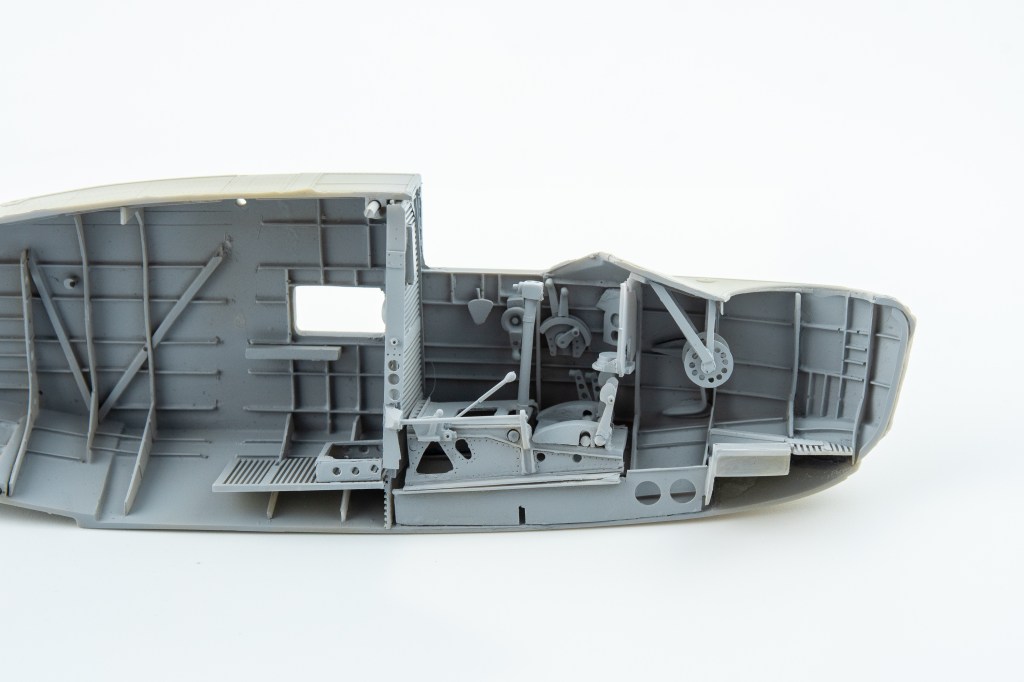
The interior is VERY complete, with a full cockpit, radio operators and navigators station included. The only thing missing was the run of control lines along the fuselage, which of course could be added by the modeller. The bell cranks leading off the control column and rudder bar are provided though, ready for you to connect the lines to.
Id suggest adding the side windows first whilst you still have good access . If the resin flash from the window openings is carefully removed, the resin windows should be a push fit once the window opening corners are squared off
To keep the build momentum going an early decision was made to only build the visible items. So into the spares box went the radios, the operators seat, and a few other bits and bobs that would never be seen. The roof trellis was replaced by a piece of plastic card that formed a tab to help align both fuselage halves.
There are side windows which you can see flashes of the navigator’s table through, but that’s about it. Given this, adding the radio sets, and all the other mid fuselage fittings seemed pointless as they would be invisible on the finished model.
So, only the parts around the gunners openings were added, such as spare drum magazines, ribs and floor sections.
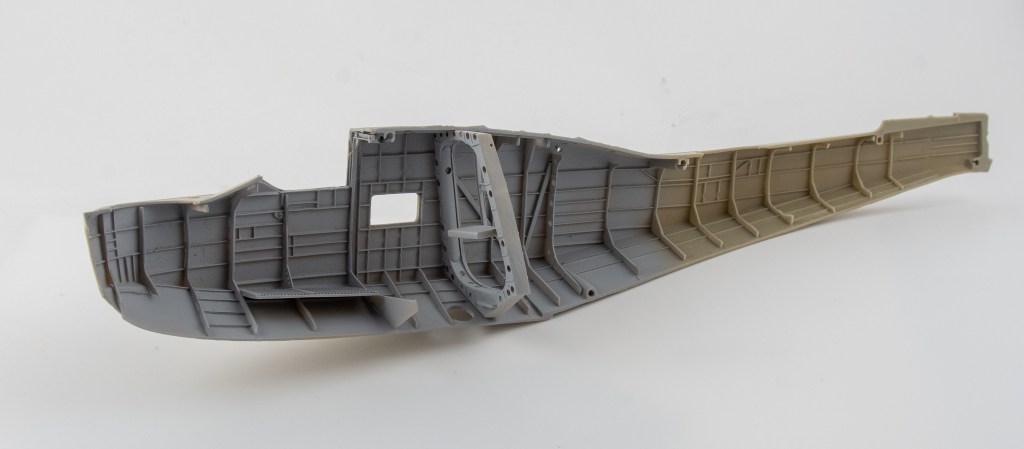
Constant dry fits of the fuselage halves ensure they would mate without any of the ribs fouling. There was a bit of filing required, and snipping of various ribs needed throughout this process. All in all, though, everything went fairly well, with the various components locating nicely, apart from the floor which required new slots cut for the ribs to fit into. Tedious but easily achieved by holding the floor up to the ribs, the new positions for slots marked and then cut in.
To help matters, ensure you add the side windows early before any of the other parts and that you glue all the bulkheads to the same side. I didn’t do either of these things and it complicated assembly a little bit. Ensure you get the snuggest fit you can with the main bulkhead against the interior wall. Mine also needed sanding a fair bit to reduce its width.
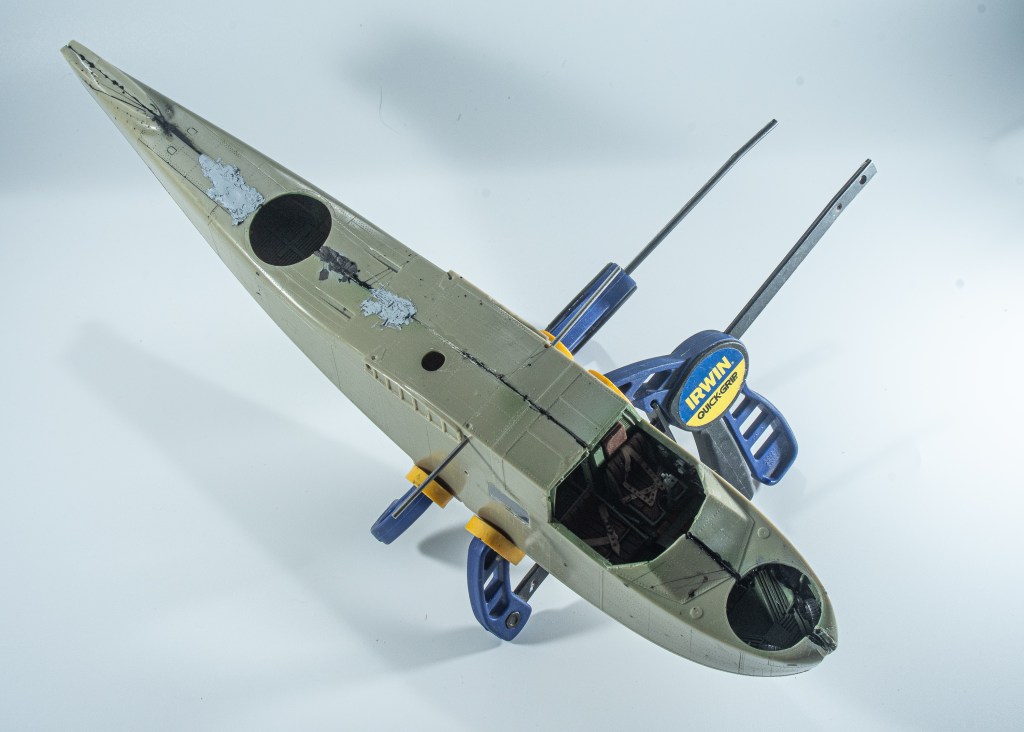
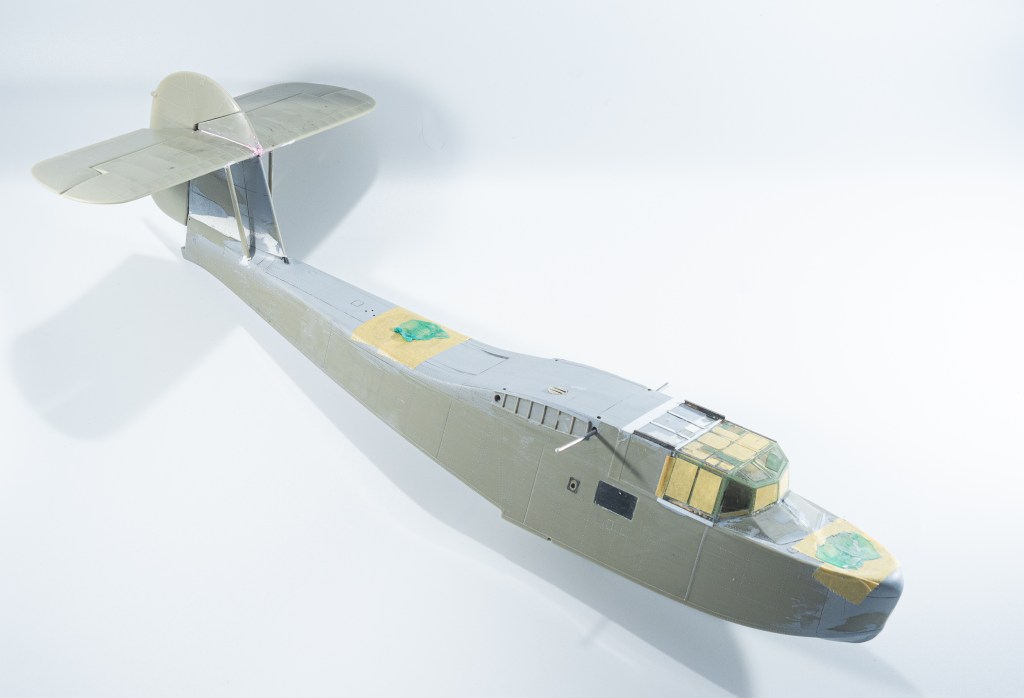
Once this was in place, 2mm holes were drilled through the depressions HpH had thoughtfully added. K&S stainless steel rod was used. Lines were marked out on the wings to ensure the holes were drilled perpendicular to the fuselage. With as much of the interior as I wanted installed and painted , the fuselage halves were now joined. It was not the best join, with several steps in the keel and one behind the canopy. These were fixed by cracking the join and reglueing the area, one area at a time. This worked quite well with all of the steps being eradicated.
The entire seam required filling with super glue and repeated rounds of sanding and priming to remove all trace of the seam. The main area being the top of the fuselage between the rear gunners area and the cockpit. The area immediately behind the cockpit required its raised detail reinstating with plastic strip as my judicious sanding had eliminated it. The aforementioned tab of thick plastic card under the roof join ensuring that seam didn’t crack open with all the required sanding.
A spot primer coat of Mr Surfacer was then applied and the rivets reinstated with a Rosie Riveter riveting tool.


Although the holes for the wing spar were drilled where HPH indicated. Looking at the model in plan view revealed the wire was not exactly at 90 degrees to the fuselage centre line. Redrilling it would have caused a loss of the structural integrity I was hoping for, so it was left as is, my thinking being the matching hole in the wing could be drilled at an angle to compensate.
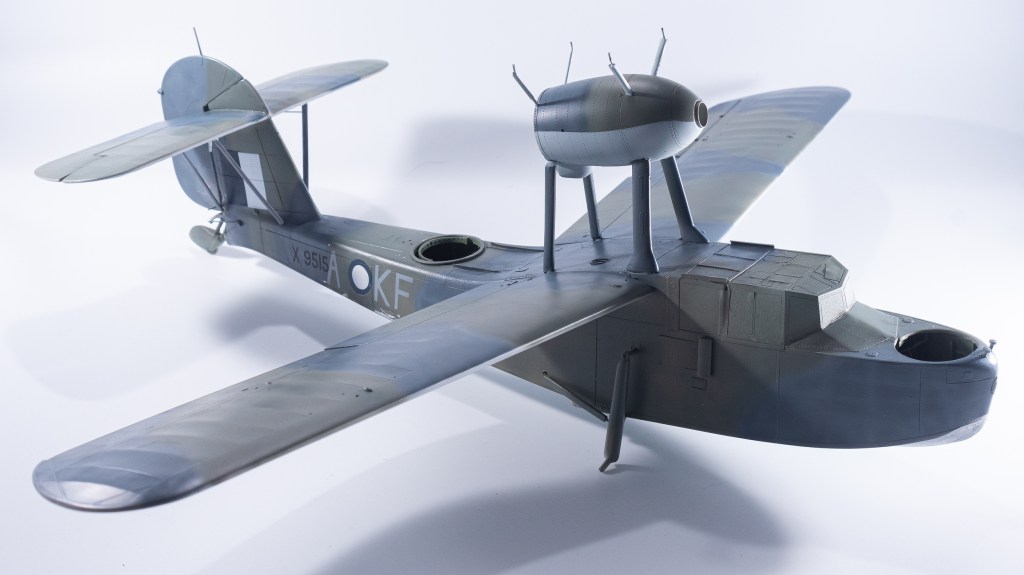
Next on the list was the fitting of the engine nacelle. HpH providing a helpful jig to aid in its alignment
HpH provide dimples for where the strut location holes need to be drilled, however no advice as to what angles the holes should be drilled at. It is left up to the modeller to determine by studying the walkaround photos included in the instructions.
To me, this is one of the areas where HpH could really improve the modellers experience in building their kits. Yes, I know HpH market to the advanced modeller, but this does not absolve HpH from providing detailed instructions to assist in making their kits an enjoyable build. This is a key part of the build. The nacelle provides the base to which the top wing centre section is attached. Getting the struts at the correct angle here is imperative to getting the geometry of the aeroplane correct. Given you are joining a centre section which needs to be square to an offset nacelle, strut placement and angle is critical. No assistance in the form of diagrams, pre drilled holes is offered by HpH though, the photos in the instructions being less than helpful.
Its these kinds of things that don’t make building the kit as enjoyable experience as say for example, a Fisher Models kit. Anyway, the nacelle was fitted. 4 of the 8 struts needed fairing in to the nacelle with Milliput as they were a little short. I was concerned my nacelle was not forward enough, a point that was reinforced later when fitting the propeller as it fouled the wing trailing edge. Oh well!
The next step was to fit the rather large tail unit. The tail fin is a separate part and when test fitted, had quite a large step on one side requiring building up the side of the fin with milliput. Rivets and panel lines were then reinstated . On top of the vertical fin sits the tailplane. In the kit they come as right and left halves, one of mine had a casting flaw that left a mark which would have been incredibly hard to sand away without destroying the rib detail. All the tailplane parts need to be pinned to each other to ensure maximum strength. There was no real difficulty in this stage, just ensure everything is square. Mine looked square, that is until I got the wings on!
There are two bracing struts each side. Dimples for drilling are there on the fuselage, but not the stabilisers. Consequentially, my struts were fitted to the tailplane one rib too close Of course they had been soundly glued and faired in before this was realised. I didn’t pick this up until comparing the model yo photographs of the actual aircraft.So they were painstakingly unglued, holes redrilled and the struts relocated one rib further out. I was starting to not enjoy the Walrus.
Wings were added next, again not as neat a fit as the dry fits suggested. This was purely down to my imprecise drilling, rather than the kit, as dry fits had shown a step and gap free join several times. The upper wing is quite a heavy sizeable assembly when the outer wings are glued to the centre section. 2 part epoxy was chosen for its added strength. Adding the upper wings to the struts took several goes to ensure everything was straight. My top wing has got a slight twist in it due to the top nacelle struts being out of line, thus causing the wing centre section to not be square to the longitudinal axis.
Rather than continue with a blow by blow account detailing all my errors, below is my suggested assembly sequence for anyone else attempting this model.
- Ensure all contents of kit match the photo of kit parts
- Drill holes for spars in wings and fuselage. Test fit often. Ensure all holes line up and are perpendicular to fuselage centre line. Do not add upper wings to centre section yet.
- Add the main bulkhead which will have the wire spar pass through it and drill this.
- Assemble fuselage adding as much of the interior as you desire, bearing in mind much of it will be invisible. Ensure canopy will fit.
- Pass wire spars through before closing fuselage. It’s a lot easier than afterwards!
- Build and add tail unit ensuring everything is square.
- Build up engine nacelle as complete unit with lower struts, ensuring by repeated dry fit it will be able to be added later. Use supplied jig to ensure it will be sitting in correct place with struts angled accordingly. Drill holes for the nacelle rigging.
- Ensure lower wings are a good fit. Do not attach them yet.
- Use the lower wings as a jig to assemble the outer floats but do not attach them at this time. Drill all holes for rigging.
- Add the upper nacelle struts to the upper wing centre section, ensuring all your struts are at the correct angle to ensure the centre section remains square to the fuselage centre line. This is vital in ensuring your model will have correct geometry. It will also take lots of trial and error , remember that nacelle is offset, but the centre section needs to remain square. The instructions don’t really illustrate the position of the struts at all well, You want the angled bits of wire plugging into the upper wing. Glue the struts to the nacelle, but not the centre section at this stage
- Disassemble the model into subassemblies of fuselage, nacelle and centre section
- Add canopy. You will be annoyed to find the supplied masks are all undersized!
- You can now paint the fuselage and nacelle and wings and I would go as far as even decaling.
- Glue nacelle to fuselage and add rigging.
- Add floats to wings, rig the floats then add wings to fuselage.
- Add outer wings to centre section, glue struts in place and into wings.
- The tailwheel/sea rudder should be added last to save breakage, mine must have snapped about 3 times despite having a steel wire core.
Ah, the benefits of hindsight. I’m sure my build would have gone a lot easier if it had been tackled this way.
By the stage of adding the upper wings I was completely over the model, in fact a couple of times I simply just did not want to sit at the bench.
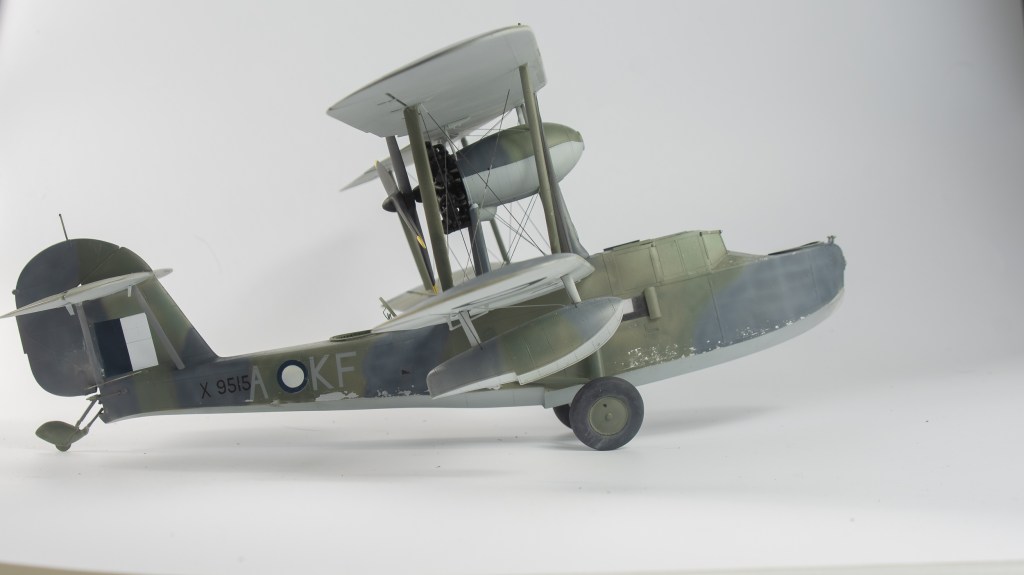
The decision was made to finish the kit to the bare minimum standard. My initial vision was a battered weatherbeaten aircraft, but at this stage, simply did not have the strength to invest any more time than was needed to get a basic paintjob on the model. For the above reason my model’s weathering is limited to some chipping along the hull using the hairspray technique. It was left at that. The weathering may get revisited at some stage, but probably not.
Paints used were MRP for the top surfaces and white Ensign enamel for the underside Sky Blue. Enamels are not my paint of choice these days, but this sprayed beautifully, but boy did it pong!
Anyone that says lacquers smell worse than enamels are kidding themselves. HpH threw in one last annoyance with their provided canopy masks all being undersized, necessitating new masks being cut from Tamiya tape. I was by now thoroughly over this model and just wanted it off the bench.
Masks for the markings were cut after scanning the decal sheet for the Airfix 1/48 scale kit.


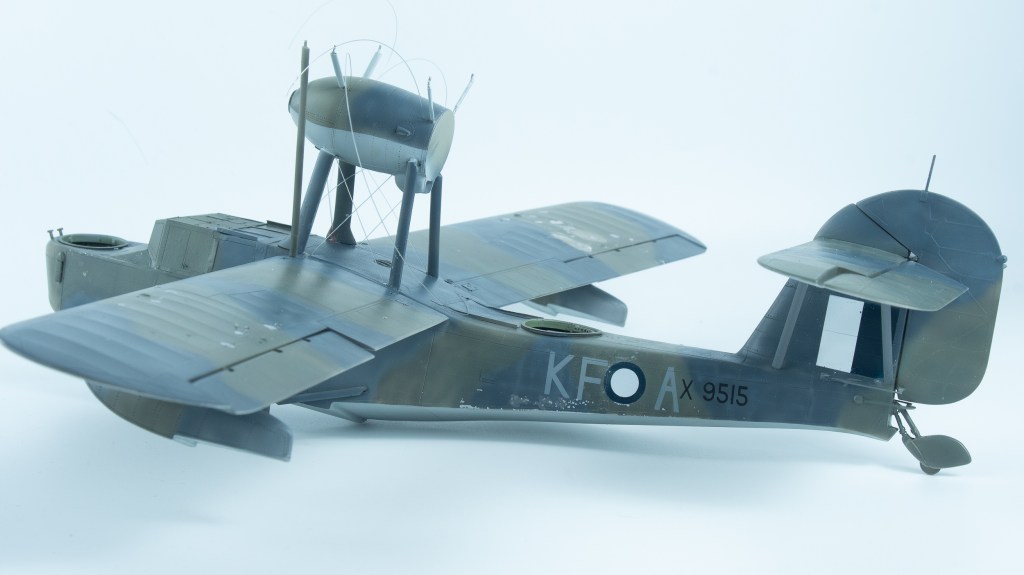
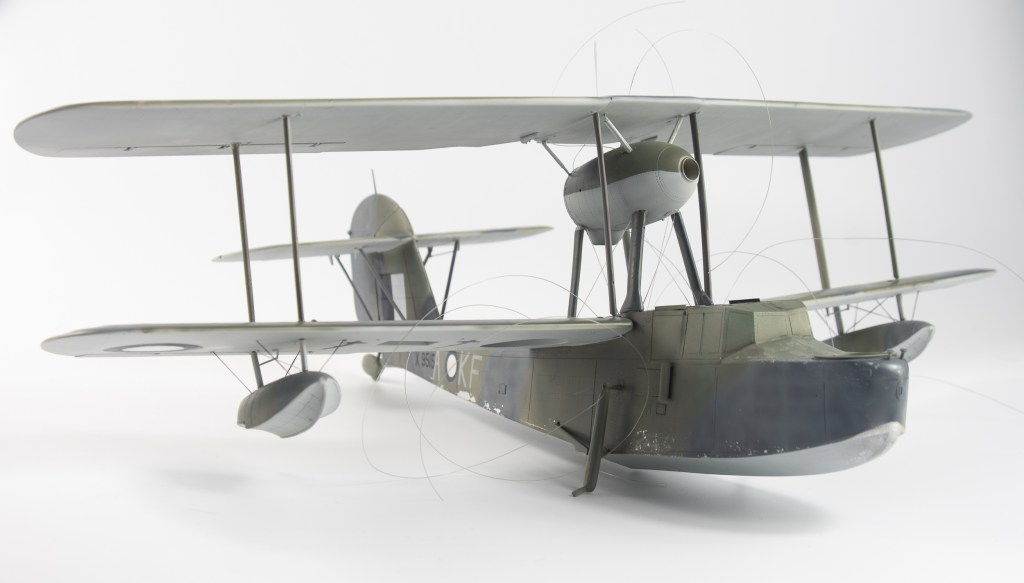
Rigging was fishing line. Holes were drilled right through the upper wing so that the line could be pulled taut, the holes then being filled. It would have been better to drill right through the bottom wing, but this is the kind of model you simply just don’t turn upside down if you can avoid it. It weighs a ton, turning it upside down would be just inviting disaster.
With the rigging done, all that awaited was the wheels being added. This was accomplished without incident, and with that, the Walrus was done.
Conclusion
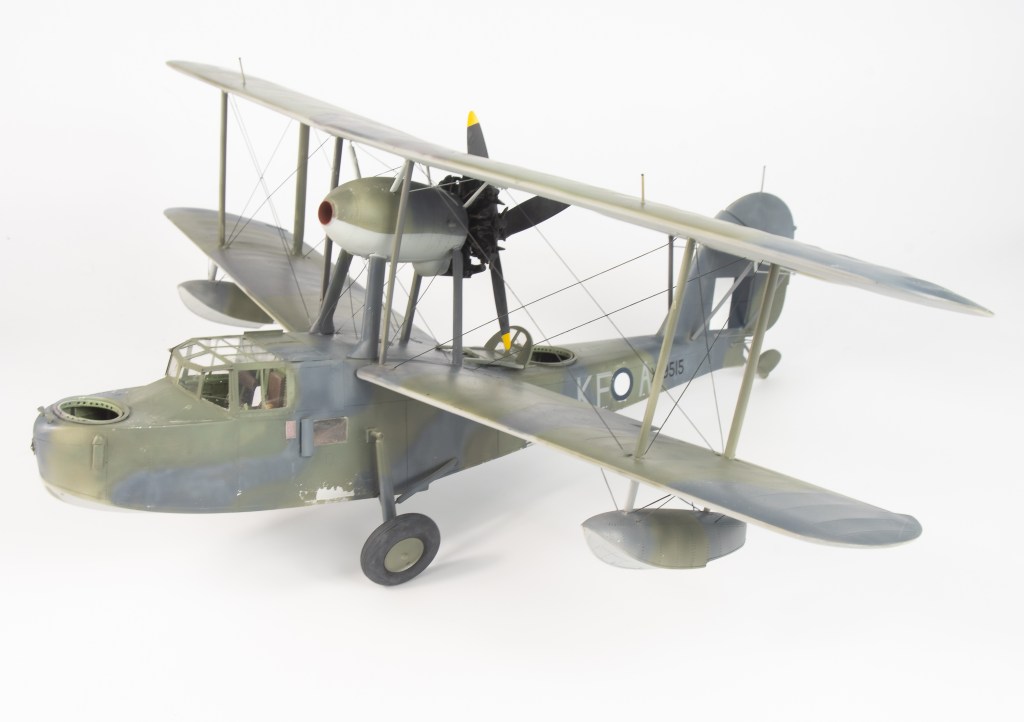
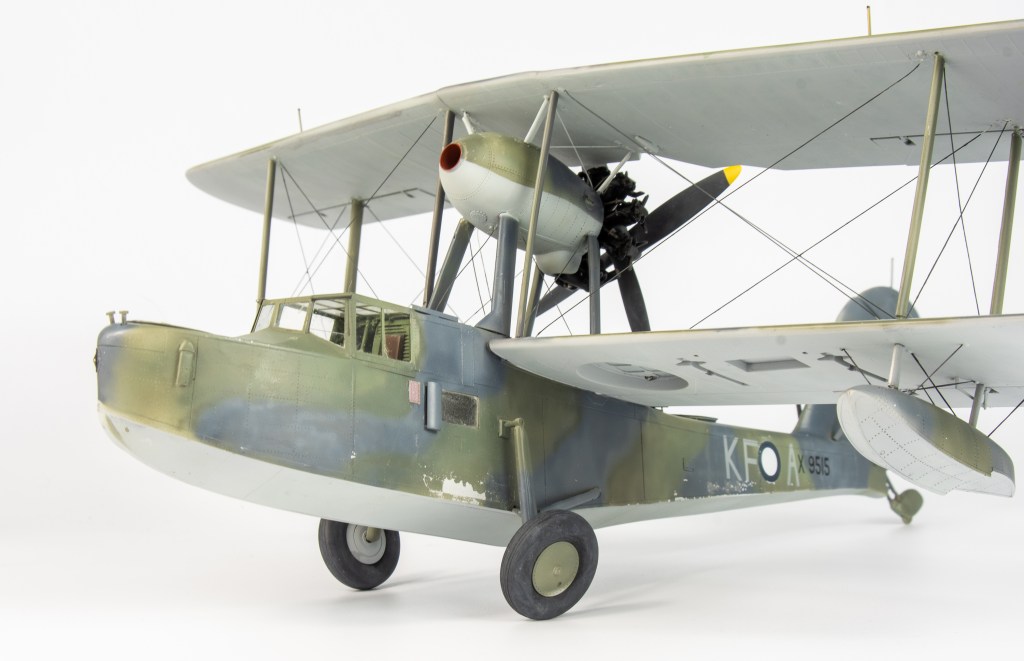
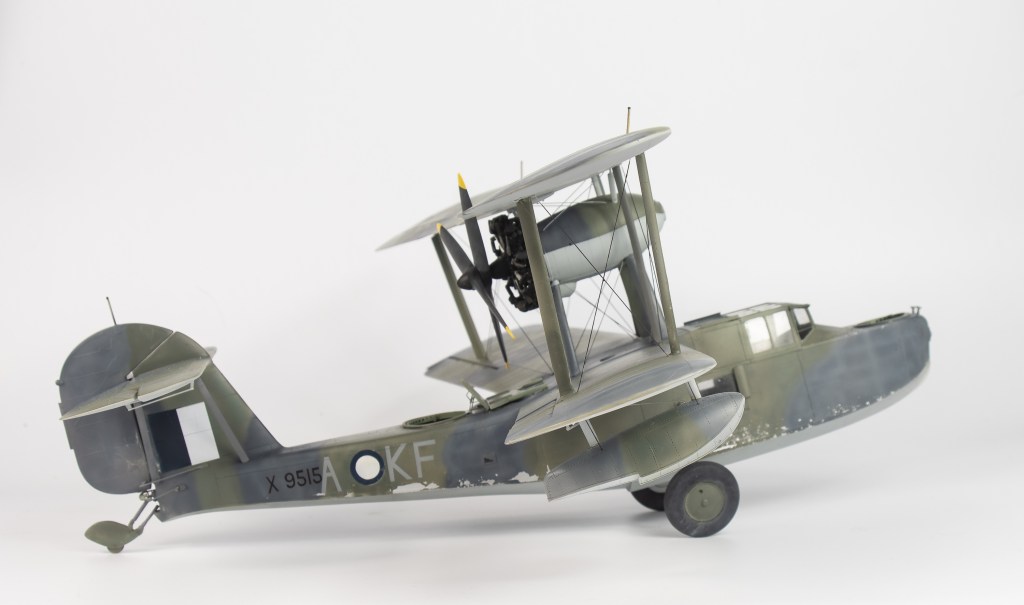
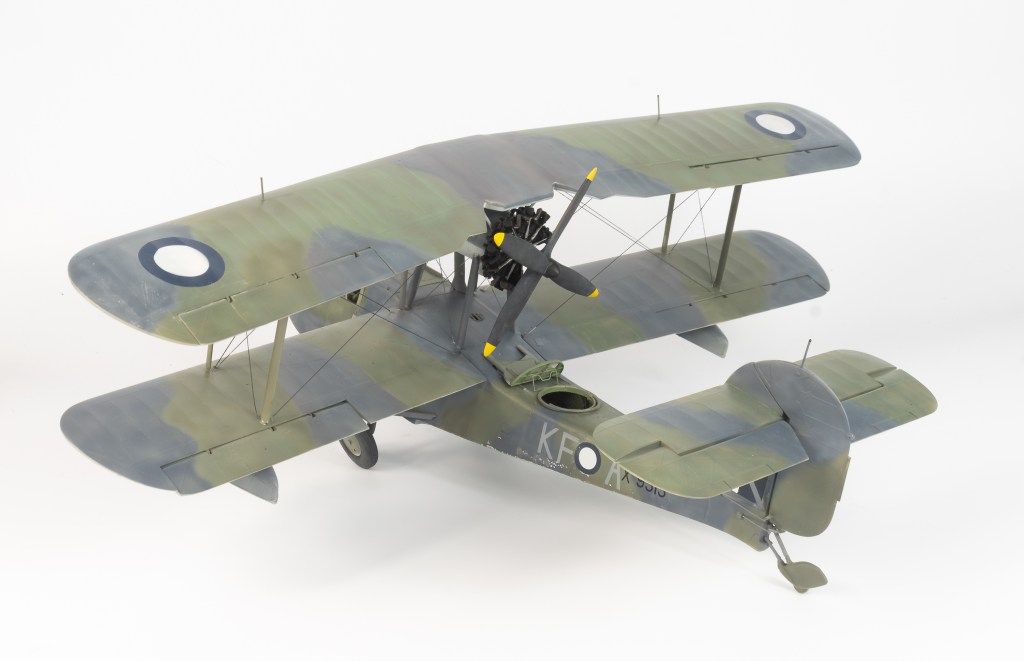
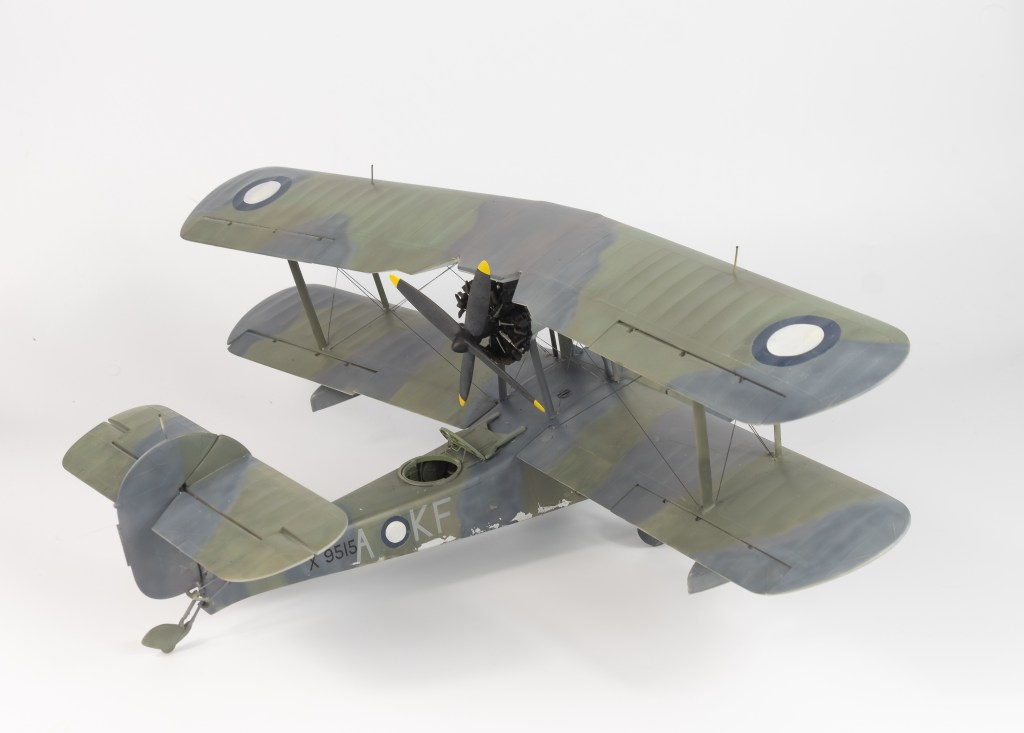
I have very mixed feelings about the finished model. It is nowhere near my best work. In the haste to get it off the bench, several compromises were made, especially in regard to the finish. Parts such as bomb racks and the machine guns were left off, although photos do show this machine with no gun armament. Despite this, the finished model is a beast, it captures the nature of the Walrus like no other scale can, and looks very impressive in the cabinet. I love it. HpH have made an excellent kit, although some details like landing light and wingtip lights are missing. The model certainly is not fun to build.
Strangely it has not lessened my desire to build the 2 other HpH kits in my stash, these being the Hornet and the Helldiver. What it was responsible for though, was me deciding to sell just about all of my bigger 32 scale kits. hese big, complex builds in my stash, so onto the For Sale pile they went, and I feel a lot better for it. Most of them have already been replaced with the same subjects in 48 scale. My cabinet thanks me.
Now for a lie-down and a Tamiya kit!
Supermarine Walrus MkI 5 Communications Flight. Royal Australian Air Force. New Guinea 1943


Leave a comment