Kinetic 1/48 E-2C Hawkeye 2000

  • Purchased: 2018
  • Completed:2021
  • Enhancements:
  • Wheels  Royale Resin
  • Decals: Authentic Decals
The hawkeye was quite a bold release for the then relatively new Kinetic.  Although I have never seen a built example grace the competition tables here in Australia, there are quite a few builds featured on line.  Perhaps a better indicator of what people are building.  In any case, I hope Kinetics courage in releasing it has been rewarded by good sales.
Being one of Kinetics earlier kits, there are a few sink marks evident on wings, the crew door and the rotordome pylons, easily fixed, as they are quite shallow.
Panel lines are somewhat heavy and ejector pins mar the wheelwells.  Options out of the kit allow the modeller to fold the wings, drop the flaps or model the crew door open
Interior detail is fine for what can be seen and full intake trunking is included for the engine intakes.  Upon its release, the kit seems to have met with good reviews, some commentators remarking that the 4 bladed propellers would need some minor reshaping to better reflect the full sized blades.  All reviewers experienced a nasty step between the upper nacelle and the wing interface. otherwise the kit was found to be well fitting


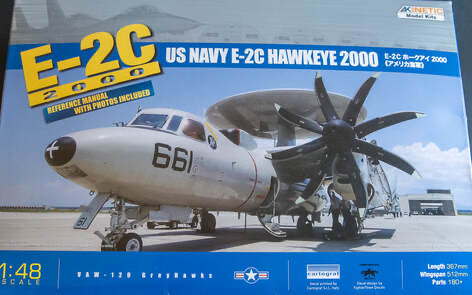
Kinetic followed up their original boxing with this later boxing that includes parts for upgraded satellite antenna fits, engine cowlings with stiffeners and the 8 bladed propellers.  The four bladed props are still included.  Both boxing s are let down by the very plain markings offered.  Surprising, given the schemes this aircraft has worn and the fact the decals were designed by Fightertown.  Italeri have also reboxed the kit with a far more colourful aircraft sporting markings from “Liberty Belles”


Build Notes
Assembly
2020 was to be the year I built anything from my stash  that saw service with the United States Navy.  It didn’t work out too well!.  Pandemic aside, the start of 2020 turned out to be a modelling disaster that saw about 4 kits started and promptly consigned to the bin before finally managing to complete one.  The Hawkeye was the fifth kit started and was shaping up well, until I discovered the canopy had been short shot.  Kinetic though were very receptive when I requested a replacement, although the part did not reach me until quite some months later due to global airmail almost shutting down.


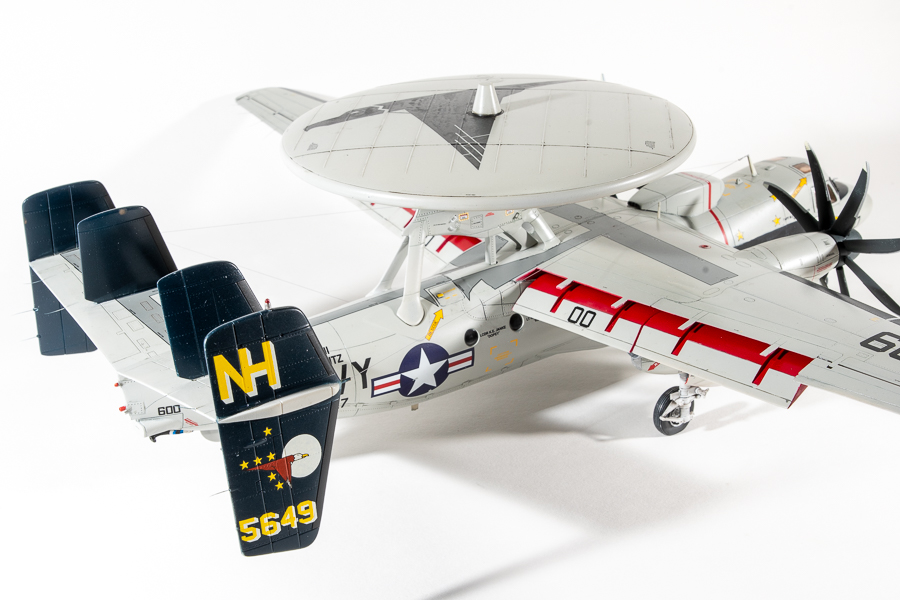
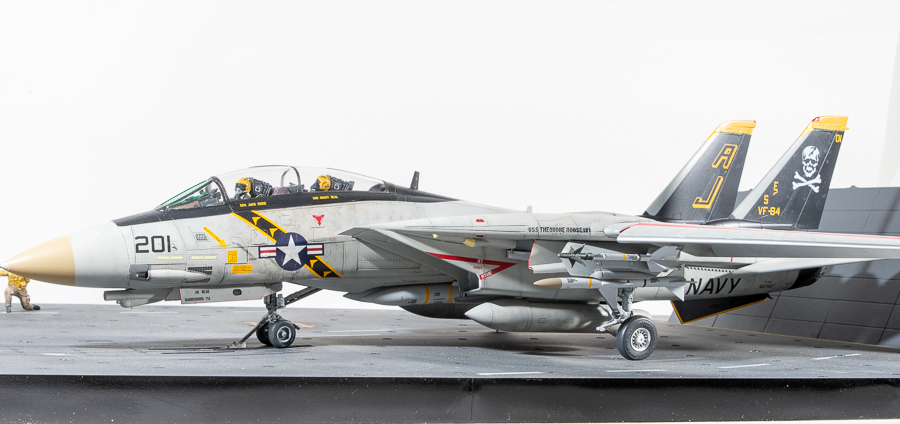
I had decided early on to build the model with wings extended as to me, wings that fold along the fuselage hide too much of the aircraft. In the Hawkeys case it would also take away from the greyhound look of the aircraft.  Kinetic offer decent spars that go some way towards ensuring the spread wings form a solid join and align with the fixed centre section.  Fit is good, but not exceptional.  I was left with gaps top and bottom that needed filling and rescribing.  Greater care and some fettling on my part would have probably reduced these, as dry fits without the spars revealed tight joints
Sink marks across the wing top surface were dealt with by application of Mr Surfacer 500.  Rather than slather on putty, the nacelle step was dealt with by careful sanding of the nacelle mating surfaces where they met the wing undersides, taking care to maintain the contours.  Serial dry fits were carried out until the step had been eliminated.  The then very minor gaps were filled with Apoxie Sculpt, the excess being removed with a damp finger.  The overscale static discharge wicks were cut off, to be replaced with toothbrush bristles.  Being the lazy Modeller I am, the ejector pins in the wheelwells were ignored.

As a result of having to wait for the canopy, the kit was built up in sub–assemblies, being the wing, comprising the nacelles, the rotordome and supporting pylons, and finally the fuselage, being I did not want to contend with possibly having to fair a badly fitting canopy into a large and unwieldy model.  I carried this method right through to painting and decalling.  Dry fits had shown the wing to fuselage fit could be easily dealt with, when the time came, and this method would also allow unfettered access to the inside faces of the nacelles and the fuselage sides that would otherwise  be underneath the wing.
Fuselage assembly was unremarkable, an average fitting belly panel required some use of Mr surfacer, and  a large amount of lead sheeting was epoxied in behind the cockpit bulkhead with lead shot filling the gaps either side of the nose wheel well to ensure the aircraft sat on all three undercarriage legs.  Fitting the clear nose cone left a step on one side.  The low side of the step was built up with apoxie sculpt and sanded to shape.

Paint and decals

Whilst still in its sub assemblies, the model was painted using Mr Color light gull grey with the tail fins in SMS Insignia Blue.  Black de icer boots were sprayed tamiya rubber black after some very time consuming masking.  The portions of the flaps hidden by the wings and the flap wells got a  coat of Mr Color Flat Red
Not a single chip of paint peeled up on the removal of the tape, unlike most of my Tornado builds.  Looks like that old Alcad grey primer was the culprit!
The cockpit tinting was done using a 50:50 mix of tamiya Metallic brown and smoke, overcoated with several layers of future.
Unless you want to build the very boring kit option, aftermarket decal sheets are a must, even then options are few, with the decal manufacturers seeming to offer nothing post 2008.  This machine has worn some very colourful markings which have not at all been mirrored by the very uninspired decal sheets out there, save for the Fightertown Liberty belles sheet.


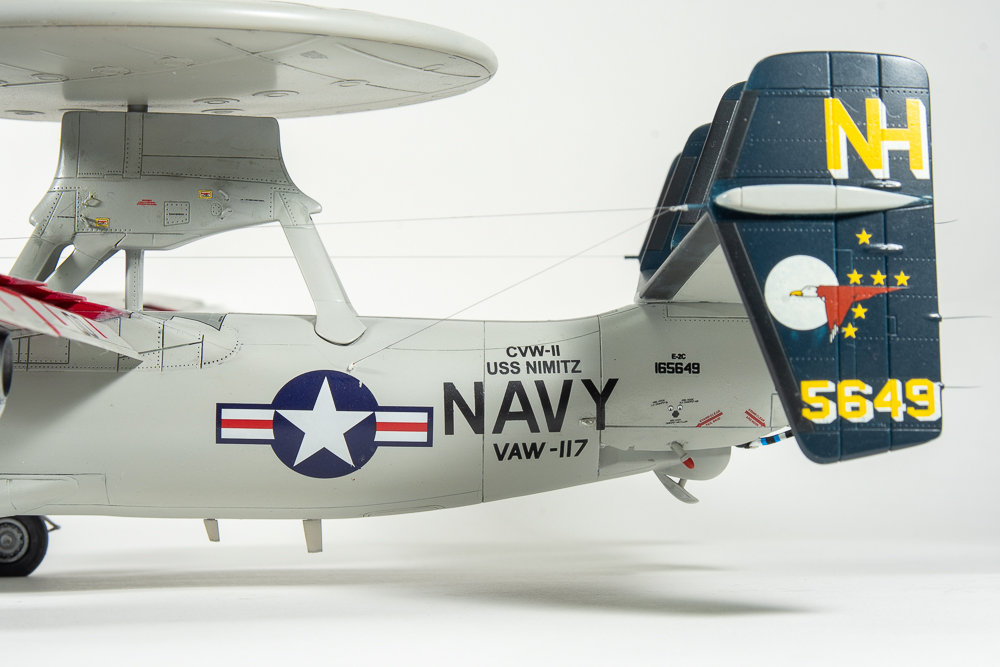
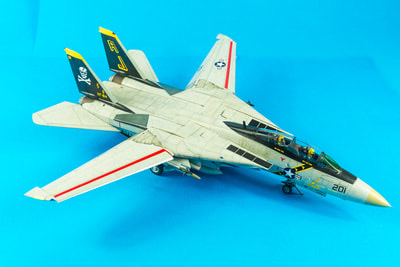
I chose a decal sheet by the-to me- unknown manufacturer, Authentic Decals that included a scheme with a large hawk on the side, and ticked my boxes of having coloured fins and a artwork on the rotordome top surfaces
My concerns about the Authentic decals not performing or breaking apart in the water were unfounded.  Turns out they are printed by Bergemot.  (EDIT, It seems this sheet is also offered under the Bingo Decals brand, I’m not sure which came first, or if one is a knock off of the other, or printed with permission)
They performed flawlessly and reacted very well to the Micro decal solutions settling down into even the rivets with only two applications.  This is more than I can say for the kit decals which had been printed by cartograf. They took multiple applications of setting solution before sinking into the detail, and only after resorting to using Daco strong solution.  All walkway decals and fuselage national insignia were left off until the wing had been mated to the fuselage.  However this then exposed the fact the Authentic Decals NAVY titles were far too big, when compared to photos of the real machine and how the NAVY titles sat in relation to the national markings.  The kit NAVY titles were the correct size, but it was too late as even removing the oversize titles would still leave the ship and squadron designations in the wrong spot in relation to the NAVY titles. There was no choice but to just suck it up, and move on.  I decided to do a clean build as photos I had of the real aircraft showed it very clean indeed, like fresh paint clean, plus I was getting to the stage where I wanted it off the bench

Final details were added and EZ line used for the antenna lines.  Like  all modern aircraft , the model was starting to get hard to pick up, the more you added to it.  Royal Resin wheels replaced the rather bland, and in any case far too weighted kit wheels.  All those pesky red lines on the wheelwell doors were applied with a fine tipped gundam marker, and she was done, ready to almost take up half a shelf in my cabinet.

SO! The two questions I ask myself after each build

HOW DID I GO? 
Well, not bad. I think its an incremental improvement over my Tornado builds.  I’m still marring my finish with stupid mistakes, which are only too apparent to the camera lens, damn you macro camera!!Thers some silly construction and finish mistakes as a result of just not taking my time but, overall,  I’m  pretty happy with it, and just love the look of the finished model. It just looks so busy with the aerial wires, the multi bladed props, deployed flaps and that large Hawk

WOULD I BUILD ANOTHER?
Not another Hawkeye, but if I found the Greyhound at a reasonable price, then possibly!
Thanks for looking in.  See you after the next build
Bruce

                                                                                    Grumman E-2C Hawkeye 2000  VAW-117 Wallbangers  United States Navy  

U.S.S. Nimitz  Pacific Ocean  2009

Eduard 1/48 F-14A Tomcat

Date added to stash: 2016
  Date Completed: 2018
  Aftermarket used:
some parts from Eduard Detail set 
  Paint: Mr Color Light Gull Grey
  Decals:  Furball Sundowner Anthology

I started this at the same time as lthe other Tomcat I was building for a friend.  At the time, it seemed like a good way to build a kit from my stash as well.  In hindsight, if I had not started this one, I would have sold it, because its position has been ably taken by the Tamiya kit, and building the two HobbyBoss kits was a real grind.  Not that there was anything wrong with the kit, but it was just one HB Tomcat too many. (Although this boxing was done by Eduard, it is the HobbyBoss kit, so I will refer to the kit as HobbyBoss)
The previous article covers the build in detail, although I would add my take home lesson from building Tomcats is mask the intake camouflage demarcation before you add them to the jet I didnt on either build and it was a hell of a job to add them later!
I had high hopes for this build wanting to build it with all panels open.  In the end the build just started annoying me as there ws other stuff I wanted to build and I chose to rush  a lot of things.  Im not really happy with it, but HB Tomcats are a long complicated, involved build as are many modern jets, so to do two in a year is not bad.  I have  three tamiya Tomcats in the stash and look forward to tackling those at a later date.  Just not for a while, as Im all Tomcatted out. 
I also think Miss Molly was the wrong jet to pick, as all those open panels do not allow you to see that nose art in its entirety.  Live and Learn, hey.
And wheres that sensor gone from under Miss Molly’s hand on the starboard side?  I definetly  added it LOL
For those who don’t know, Miss Molly was named for Molly Snead, a nurse to Senator Carl  Vinson, yep, the Senator the carrier is named after.
 I visited  the USS Carl Vinson at Fremantle Western Australia in 1994, so like to model aircraft from her.

Grumman F-14A Tomcat VF-111 “Sundowners”  U.S Navy U.S.S Carl Vinson  1989

Hobby Boss 1/48 F-14A Tomcat

  • Date Completed: July2018
  • Aftermarket Used: Quickboost Pilots
  • Paint: Gunze Mr Color 
  • Decals: Kit supplied  for airframe, missile stripes from Fightertown Tomcat Data sheet           
This build was borne out of a work colleague’s request for me to build the kit for him.  As I also had the kit in my stash, I thought I would build the two of them alongside each other.  As often happens with my double builds, this one sped ahead and was completed whilst mine sat on the bench falling further and further behind.
The Eduard boxing contains the Hobby Boss plastic, brassin resin burner cans,chin pod, wheels and a PE sheet specific to this kit with a large decal sheet done by Furball Aero Designs
The HB Tomcat is a nice kit, there a few accuracy issues, most noticeably, the bottom edges of the intake openings are not parallel to the top edges as they should be, but this is only noticeable from head on.  Rivets punctuate the flying surfaces which should be smooth, but apart from that, its  a detail packed kit,  allowing you options to open the gun bay, avionics panel, display the radar and extend the wing control surfaces. 


It assembles well and does not really deserve all the wailing and teeth gnashing it gets on the internet.  I put it above the Hasegawa offering, but it has been pushed into the shade a bit with  the release of the tamiya kit.

Jeff had requested his model be finished in Jolly Roger markings as if just about to launch, so I used the compressed nose leg,  extended the wings and dropped the flaps and leading edge slats.  Naturally, all the access hatches were glued in the closed position.

  Of course this meant I also had to crew the jet, so used the aerobonus crew .  Although Aerobonus should be applauded for the idea of releasing seated pilots, I really wish that they would include alternative helmeted heads with visors down and masks in place.  As it is,  their entire range of seated pilots have visors up and masks dangling which means they can not be used for in flight models, which I imagine is what most people want them for.

I sourced correctly helmeted heads, as well as a gloved hand that grips the throttle from an Academy Phantom.  As the canopy would be closed on this particular jet, I didn’t bother using the PE consoles and panels, rather relying on the entirely adequate kit parts.  The canvas coverings over the instrument panel glare shields were beefed up with milliput draped over the kit parts, and then painted a dark leather colour, which according to the DACO book, is the shade the original black covers fade to.
The HB kit includes the short lived glove vanes, (they were wired shut in A models, puttied over in B models and left out altogether in Ds, I believe) requiring you to open up  flashed over slots in the wing gloves. Stupidly, I didn’t, thinking I could just scribe the vanes in later, This would have worked if I was halfway good at scribing, as it was, it just created more problems for me.  My tip. Open up the slots and use the kit vanes as even shut, the openings  are quite prominent on the real jet.

For some reason I had a gap when fitting the bottom plate, not sure why as dry fits had shown a good fit.  Fitting the phoenix pallets hid most of it and a plastic card shim covered the rest.  The forward fuselage fitted to the rear with no gaps or steps as did the tailfins.  I had read about fit problems when glueing the gun bay  and avionics panels in the closed position, but being patient and gluing a side at a time will reward you with reasonable fit, still, I needed a small smear of Mr Surfacer around the ladder door.

Apart from this, the kit assembled quickly.  I left the brass burner rings out after successfully bending one up, only to then  drop the pliers on it.
The WIP shots on the front page outline my painting steps in achieving a bit of tonal variation to the Light Gull Grey

Moving onto the decals, I didn’t apply any of the stencils. as photos of the actual jet showed very few.  The decal instructions call out the red turbine warning stripes to be placed along the jet nacelles whereas they should go around them.  That said, I forgot to add the stripes above the NAVY titles. I was disappointed the yellow border of the VF84 sash showed through the US star, I didn’t want to lay another start and bar over the top so left it as was.  For the other side I cut away the yellow border where from where the star and bar would overlay it.

 The Fightertown data sheet, whilst being quite comprehensive, does not include enough stripes for a full suite of phoenix, so I could only add the stripes which would remain the most visible, and with the stores fitted, the canopy was the only part left to fit.  The fit to the windscreen is not to my liking as there is a step and small gap as you can see, but at the rest of causing cracks to the canopy from forcing it, I decided to leave this too as it was.
The Jolly Rogers scheme is most attractive and I can understand why a lot of modellers choose it to adorn their Tomcats

F-14A Tomcat VF-84 “Jolly Rogers”  U.S.S Theodore Roosevelt  U.S Navy  1989