Kinetic 1/48 Bae Sea Harrier FA2

Built: 2021
Added to Stash: 2014
Enhancements:
Cockpit: Eduard PE Interior
Wheels:  Reskit
Jet Nozzles: ​Aires
Practice Bomb Carrier: Flightpath

This year, I have had friends randomly picking kits for me to build.  This FA2 was a follow on build to the Kinetic FRS1 that was the actual kit picked out for me.  Like my tornado builds, I decided in addition to the FRS1, I would also tackle the other Kinetic Harriers in the stash.  And like the Tornado, if I had not have started both sea harriers at the same time, I would have sold the FA2 after completing the FRS1.  Its not a difficult kit, but its not the most enjoyable either.  The third Kinetic Harrier I started was their new AV-8A, and it was obvious from the fit of the intakes, Kinetic have retooled these parts and the fuselage halves.

Construction Notes
The intakes were built up on each fuselage side prior to assembling the fuselage halves, rather than after as the instructions would have you.  The advantage to this is a a slightly better fit although I found the rear cockpit bulkhead pushed the nose wheels halves out a bit.  My solution to this was widening the location channel to ease the fit of the bulkhead..
There is also an atrocious joint where the wing undersides join the fuselage, despite me adding a spreader to widen the fuselage a little.  
Making matters worse, is it is very difficult to get any sort of sanding stick in there to clean the joint up, even custom made ones.  On all kits, I just put up with it.

Whilst we are on the wings, if you do not want a step between the separate control surfaces and the rear of the wing, the thickness of the wing interior needs to be substantially reduced before you cement the wing halves together.  If left as the kit comes the flaps and ailerons are a lot thinner in cross section than the rear of the wing. Supposedly the wing pylons need to be moved 4mm back, but I didn’t bother with this.

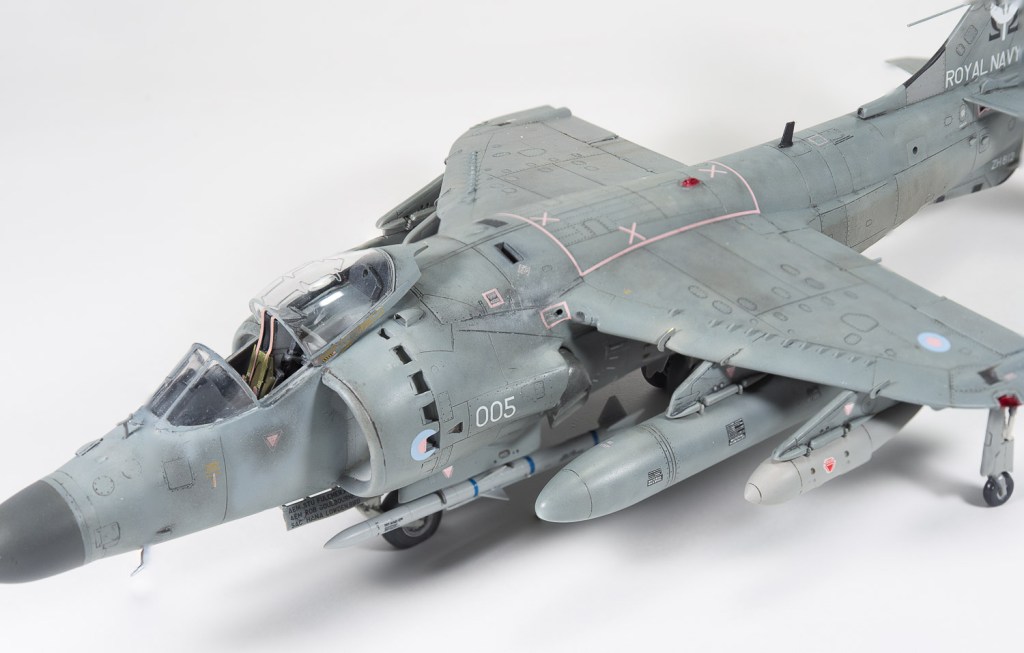
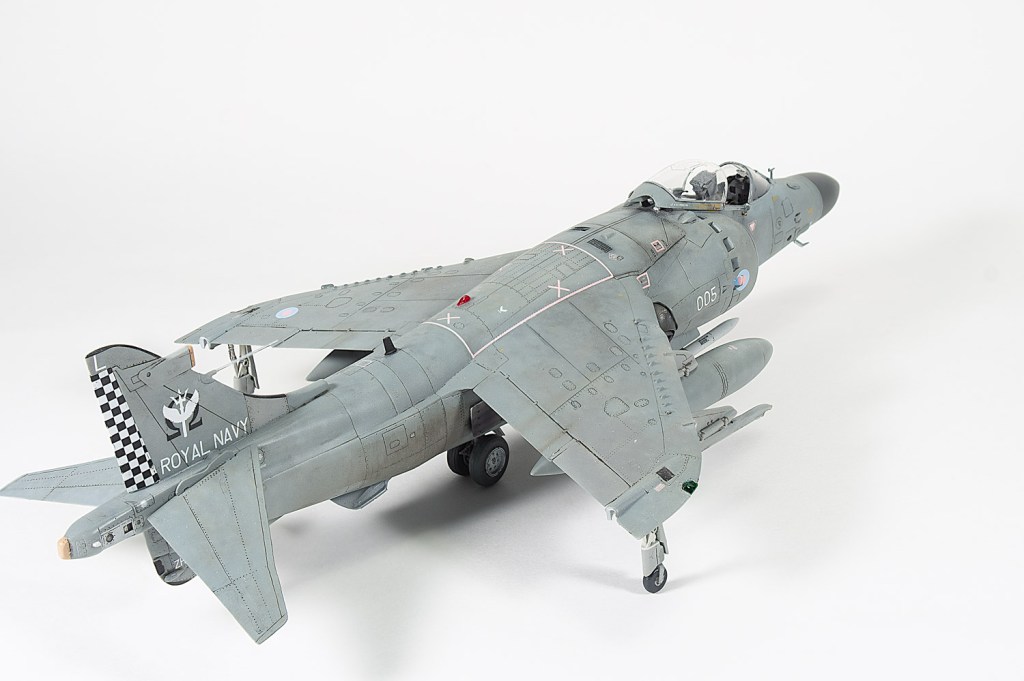
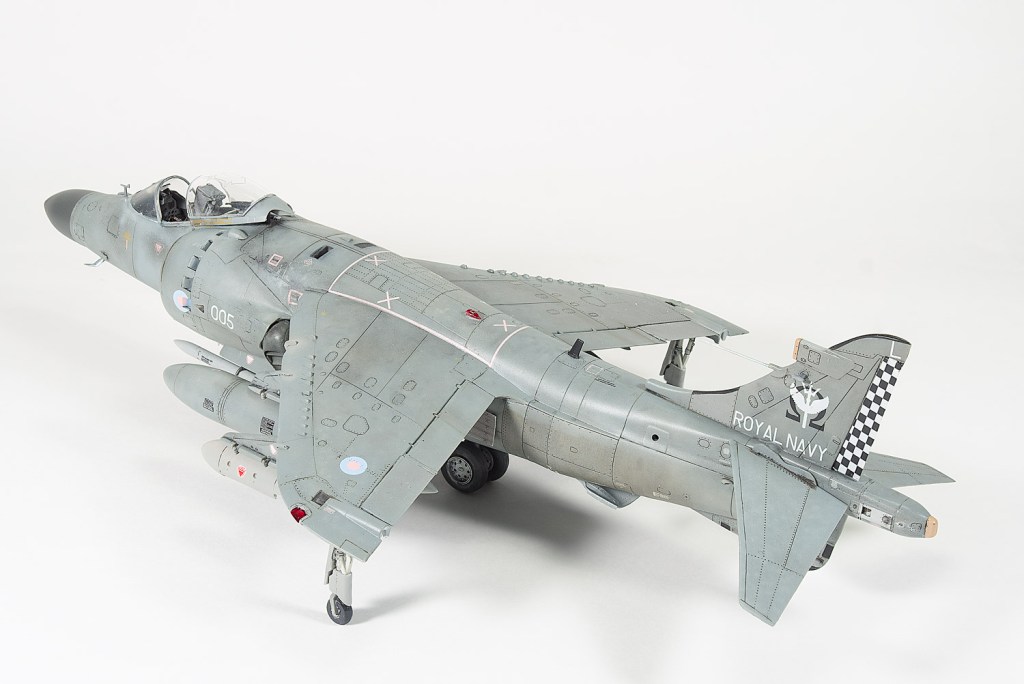
Panel line detail on kinetics SHARS are a little inconsistent, so the scriber was run along most of the main panel lines to deepen them.  A thin coat of Mr Color Medium Sea Grey was then applied.  Over the top of this I marbled on various greys, both lighter and darker than the MSG, before another thin blending coat of lightened MSG was sprayed.  A couple of panels were then masked off and painted with MRP MSG to give the look of replaced panels.  The fuselage extension was also painted in untainted Medium Sea Grey straight from the jar, as this showed as a different shade even on heavily weathered jets.  Then began the time consuming process of masking off and painting all those RWRs, doppler panels, dielectric panels and rubbing strips on the leading edge of the fin.  Jets are definitely more work than WW2 aircraft!

The under fuselage pylons and AMRAAMS were decided on to make the jet a little different from other models of the FA2.  Several reference photos were consulted to get the placement of the pylons correct as Kinetic do not give you any guidance in the instructions.  Despite the photos, I got some feedback when I posted the model on Britmodeller, the AMRAAMs were still tool forward by a couple of mm.  I can live with that

The decal sheets in these SHAR kits are nothing short of comprehensive, probably amongst the best you can find in a kit.  From the FA2 sheet, you can make just about every FA2 in service, in either hi viz or subdued schemes, as Kinetic provide you all squadron insignia, and all serial numbers by way of separate numbers you then combine to make your desired serial.  All stencilling is provided in both pink, red and black depending on which scheme you finish your jet in.
The sheet is printed by cartography, and they performed excellently sinking into all the recessed detail with the aid of Micro set and Micro Sol.

It was then that disaster struck.  I foolishly glued the windscreen on with Tamiya extra thin. I must have had the windscreen touching the instrument coaming one one side as the glue wicked straight up the inside of the windscreen.  AAAAGGGGHHH!  I managed to get the windscreen off, and polished the glue mark out, but the damage had been done as this kind of thing is hard to come back from.  The model no longer matched my vision of it in my head and I found I was just wanting to get it off the bench so that I could concentrate on making a better job of the others. Hence, the rather sloppy touch up paint around the reattached windscreen.

​ This is the problem I always have when building multiple kits in parallel.  I won’t be doing it again.  My new found apathy for the model only increased when I found the canopy would not sit flush when in the closed position.  The simple workaround to this was to just place it in the open position. A couple of the antennas had broken off with my handling of the model, and I didn’t replace them as by this stage I was over the kit. Annoyingly Kinetic want you too drill out all the location points for the antennas, which are moulded with a little tab on the underside, so your hole has then to be cut into a rectangular shaped hole.  I daresay, Kinetic have done this rather than provide holes so any antenna fit can be catered for, but really Kinetic, you could have provided flashed over slots to make this job easier. To top the model off, it then rocked ever so slightly once placed on its gear, despite me fitting the main gear last to ensure it would sit on all five wheels.  Thats it.  It will be going to the back of the cabinet.  Im hoping my other two will turn out better as Im using a bit more patience in their construction.  Meanwhile, Im not rating the Kinetic kit as an enjoyable build.

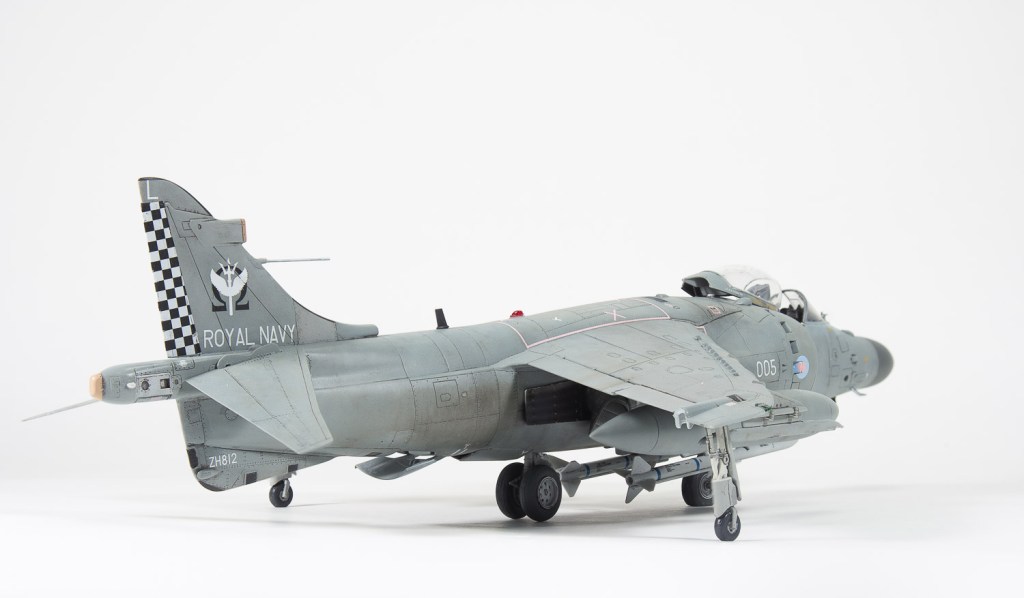
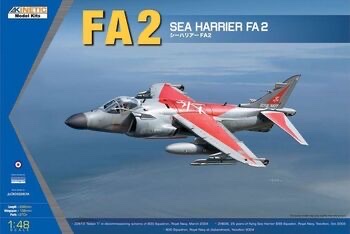
BAE Sea Harrier FA2 ZH812 801 SQNFleet Air Arm.  Yeovilton. U.K 2006

Kinetic 1/48 E-2C Hawkeye 2000

  • Purchased: 2018
  • Completed:2021
  • Enhancements:
  • Wheels  Royale Resin
  • Decals: Authentic Decals
The hawkeye was quite a bold release for the then relatively new Kinetic.  Although I have never seen a built example grace the competition tables here in Australia, there are quite a few builds featured on line.  Perhaps a better indicator of what people are building.  In any case, I hope Kinetics courage in releasing it has been rewarded by good sales.
Being one of Kinetics earlier kits, there are a few sink marks evident on wings, the crew door and the rotordome pylons, easily fixed, as they are quite shallow.
Panel lines are somewhat heavy and ejector pins mar the wheelwells.  Options out of the kit allow the modeller to fold the wings, drop the flaps or model the crew door open
Interior detail is fine for what can be seen and full intake trunking is included for the engine intakes.  Upon its release, the kit seems to have met with good reviews, some commentators remarking that the 4 bladed propellers would need some minor reshaping to better reflect the full sized blades.  All reviewers experienced a nasty step between the upper nacelle and the wing interface. otherwise the kit was found to be well fitting


Kinetic followed up their original boxing with this later boxing that includes parts for upgraded satellite antenna fits, engine cowlings with stiffeners and the 8 bladed propellers.  The four bladed props are still included.  Both boxing s are let down by the very plain markings offered.  Surprising, given the schemes this aircraft has worn and the fact the decals were designed by Fightertown.  Italeri have also reboxed the kit with a far more colourful aircraft sporting markings from “Liberty Belles”


Build Notes
Assembly
2020 was to be the year I built anything from my stash  that saw service with the United States Navy.  It didn’t work out too well!.  Pandemic aside, the start of 2020 turned out to be a modelling disaster that saw about 4 kits started and promptly consigned to the bin before finally managing to complete one.  The Hawkeye was the fifth kit started and was shaping up well, until I discovered the canopy had been short shot.  Kinetic though were very receptive when I requested a replacement, although the part did not reach me until quite some months later due to global airmail almost shutting down.


I had decided early on to build the model with wings extended as to me, wings that fold along the fuselage hide too much of the aircraft. In the Hawkeys case it would also take away from the greyhound look of the aircraft.  Kinetic offer decent spars that go some way towards ensuring the spread wings form a solid join and align with the fixed centre section.  Fit is good, but not exceptional.  I was left with gaps top and bottom that needed filling and rescribing.  Greater care and some fettling on my part would have probably reduced these, as dry fits without the spars revealed tight joints
Sink marks across the wing top surface were dealt with by application of Mr Surfacer 500.  Rather than slather on putty, the nacelle step was dealt with by careful sanding of the nacelle mating surfaces where they met the wing undersides, taking care to maintain the contours.  Serial dry fits were carried out until the step had been eliminated.  The then very minor gaps were filled with Apoxie Sculpt, the excess being removed with a damp finger.  The overscale static discharge wicks were cut off, to be replaced with toothbrush bristles.  Being the lazy Modeller I am, the ejector pins in the wheelwells were ignored.

As a result of having to wait for the canopy, the kit was built up in sub–assemblies, being the wing, comprising the nacelles, the rotordome and supporting pylons, and finally the fuselage, being I did not want to contend with possibly having to fair a badly fitting canopy into a large and unwieldy model.  I carried this method right through to painting and decalling.  Dry fits had shown the wing to fuselage fit could be easily dealt with, when the time came, and this method would also allow unfettered access to the inside faces of the nacelles and the fuselage sides that would otherwise  be underneath the wing.
Fuselage assembly was unremarkable, an average fitting belly panel required some use of Mr surfacer, and  a large amount of lead sheeting was epoxied in behind the cockpit bulkhead with lead shot filling the gaps either side of the nose wheel well to ensure the aircraft sat on all three undercarriage legs.  Fitting the clear nose cone left a step on one side.  The low side of the step was built up with apoxie sculpt and sanded to shape.

Paint and decals

Whilst still in its sub assemblies, the model was painted using Mr Color light gull grey with the tail fins in SMS Insignia Blue.  Black de icer boots were sprayed tamiya rubber black after some very time consuming masking.  The portions of the flaps hidden by the wings and the flap wells got a  coat of Mr Color Flat Red
Not a single chip of paint peeled up on the removal of the tape, unlike most of my Tornado builds.  Looks like that old Alcad grey primer was the culprit!
The cockpit tinting was done using a 50:50 mix of tamiya Metallic brown and smoke, overcoated with several layers of future.
Unless you want to build the very boring kit option, aftermarket decal sheets are a must, even then options are few, with the decal manufacturers seeming to offer nothing post 2008.  This machine has worn some very colourful markings which have not at all been mirrored by the very uninspired decal sheets out there, save for the Fightertown Liberty belles sheet.


I chose a decal sheet by the-to me- unknown manufacturer, Authentic Decals that included a scheme with a large hawk on the side, and ticked my boxes of having coloured fins and a artwork on the rotordome top surfaces
My concerns about the Authentic decals not performing or breaking apart in the water were unfounded.  Turns out they are printed by Bergemot.  (EDIT, It seems this sheet is also offered under the Bingo Decals brand, I’m not sure which came first, or if one is a knock off of the other, or printed with permission)
They performed flawlessly and reacted very well to the Micro decal solutions settling down into even the rivets with only two applications.  This is more than I can say for the kit decals which had been printed by cartograf. They took multiple applications of setting solution before sinking into the detail, and only after resorting to using Daco strong solution.  All walkway decals and fuselage national insignia were left off until the wing had been mated to the fuselage.  However this then exposed the fact the Authentic Decals NAVY titles were far too big, when compared to photos of the real machine and how the NAVY titles sat in relation to the national markings.  The kit NAVY titles were the correct size, but it was too late as even removing the oversize titles would still leave the ship and squadron designations in the wrong spot in relation to the NAVY titles. There was no choice but to just suck it up, and move on.  I decided to do a clean build as photos I had of the real aircraft showed it very clean indeed, like fresh paint clean, plus I was getting to the stage where I wanted it off the bench

Final details were added and EZ line used for the antenna lines.  Like  all modern aircraft , the model was starting to get hard to pick up, the more you added to it.  Royal Resin wheels replaced the rather bland, and in any case far too weighted kit wheels.  All those pesky red lines on the wheelwell doors were applied with a fine tipped gundam marker, and she was done, ready to almost take up half a shelf in my cabinet.

SO! The two questions I ask myself after each build

HOW DID I GO? 
Well, not bad. I think its an incremental improvement over my Tornado builds.  I’m still marring my finish with stupid mistakes, which are only too apparent to the camera lens, damn you macro camera!!Thers some silly construction and finish mistakes as a result of just not taking my time but, overall,  I’m  pretty happy with it, and just love the look of the finished model. It just looks so busy with the aerial wires, the multi bladed props, deployed flaps and that large Hawk

WOULD I BUILD ANOTHER?
Not another Hawkeye, but if I found the Greyhound at a reasonable price, then possibly!
Thanks for looking in.  See you after the next build
Bruce

                                                                                    Grumman E-2C Hawkeye 2000  VAW-117 Wallbangers  United States Navy  

U.S.S. Nimitz  Pacific Ocean  2009

Kinetic 1/48 C.A.C Mirage IIIO

  • Date Completed;  December 2017
  • Aftermarket Used: Eduard interior set, Seat-Pavla MB4, Pitot tube- master barrel. Stores-PJ productions PM3 bomb rack, Hasegawa bombs, Wheels-Resin art
  • Decals: Caracal Mirages over Australia

The Mirage holds a favourite place in the hearts of many Australian Aircraft modellers, so there was much rejoicing when Kinetic announced they were releasing this kit.  Although in my opinion,  it renders the Heller and Italeri kits obsolete, moulding is a little soft and the fit is not the best. 
There is still room for the definitive kit out there. 
Two of my friends and I decided to build this kit as a challenge build to get judged at a show.  the winner gets to pick the next subject.  At least I finished this one, the last build – the Kittyhawk Jaguar- is still languishing in its box with broken u/c.  In a fit of insanity, I decided to build all three kinetic mirages in my stash.  two single seaters and a trainer, the trainer still needing to be finished as I’m a little “miraged out” at the moment.  The kit goes together quickly enough, but there are several traps  awaiting the unwary, and the moulding is quite poor for a kit released in 2015, mine having many sink marks and a lot of flash. OOB, the nose gear also has a little bit of an exaggerated backward rake.
With the two Caracal sheets, you can pretty much make any mirage in the RAAF fleet, wearing any of the many schemes it wore during its service life
 I found though, the caracal tail bands needed trimming for a better fit, and the blue in the roundels and fin flash is too vivid. 
Ronin Graphics also do a couple of very comprehensive sheets, that also allow you to build a few of the commemorative schemes.
In fact there  is a fair bit of AM around for this kit
And the winner of the challenge build?  Well, all three of us never managed to get to the show!

C.A.C Mirage IIIO(A) 3 SQN. Butterworth. Malaya. R.A.A F