- Built: 2018
Aftermarket Used: Cockpit:Eduard Interior. Wheelwells, Eduard PE. Wheels-Barracuda. Seat Belts-HGW.
Decals: Home made masks
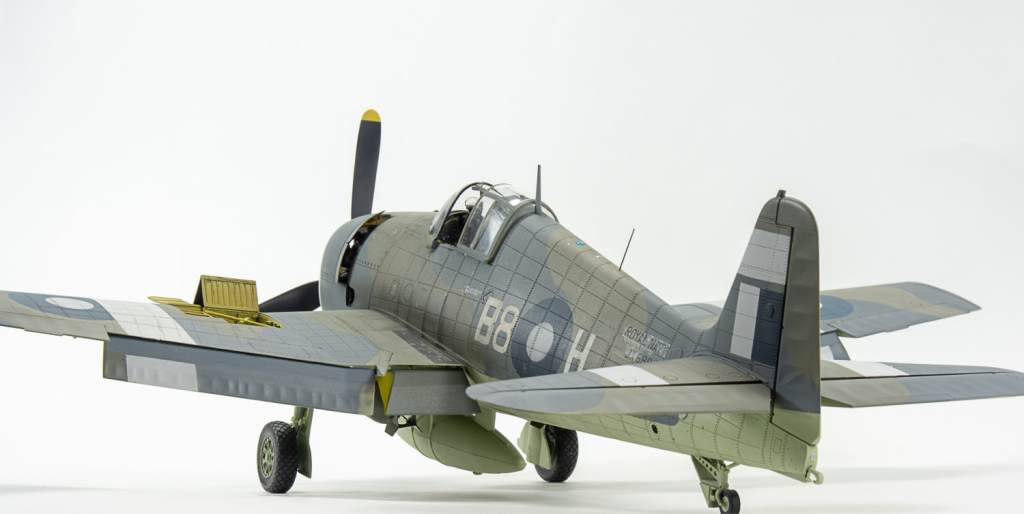
The Eduard interior set was used for the cockpit, the pre painted etch certainly giving that busy look to the consoles and circuit breakers that painting just cannot achieve. The Trumpeter hellcat suffers from a few inaccuracies, the main one being the cockpit is far too wide and the rear fuselage does not capture the flat sides of the real machine. This did not bother me greatly with my first hellcat, but with this one, I cant unsee it.
In an effort to reduce the oval sides, I sanded flat the curved sides of the interior bulkheads, and when glueing the fuselage halves together, pushed in the fuselage sides aft of the cockpit. If it made any difference, it was minimal. The engine accessories, bearers and oil tank were all left out, as was the radio equipment as none of it will be seen, the engine itself pushed into the firewall, so the bearers are not required to be assembled.
Fit of the major parts was pretty good as it usually is with most trumpeter kits, even the wing halves mating nicely in the extended position, although I managed to introduce a slight step between the port wing sections.
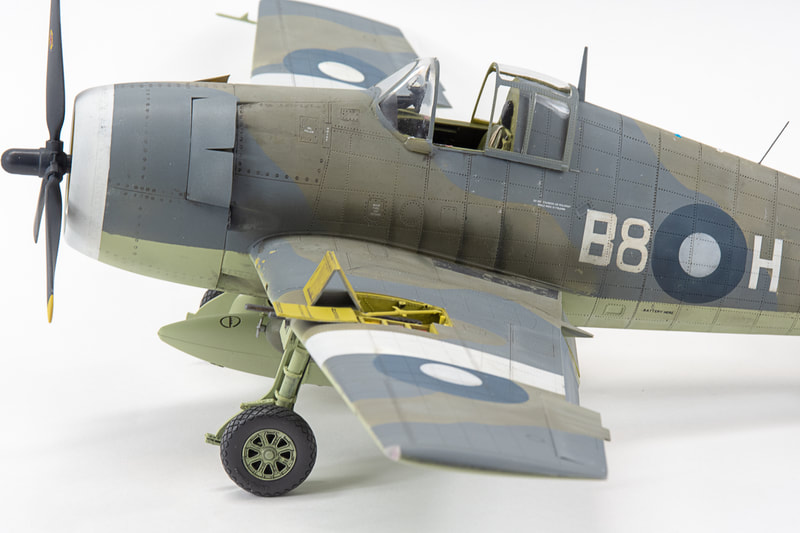
Prior to this, the moulded wheel well ribs had been shaved off so that the eduard parts could be used. These being fairly easy to place and superior to the shallow kit detail.
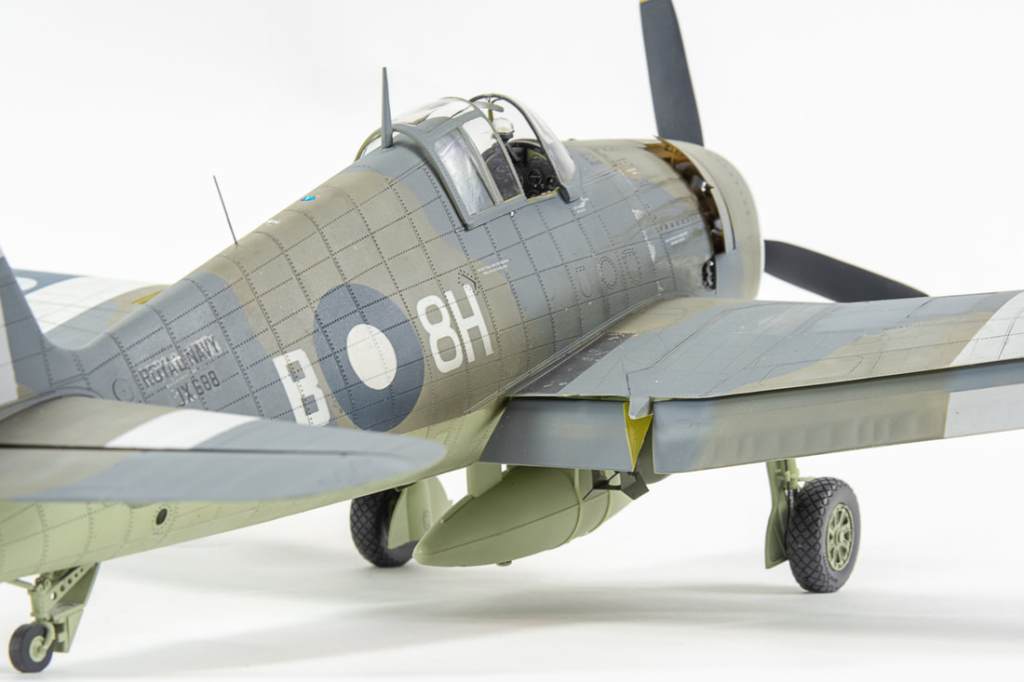
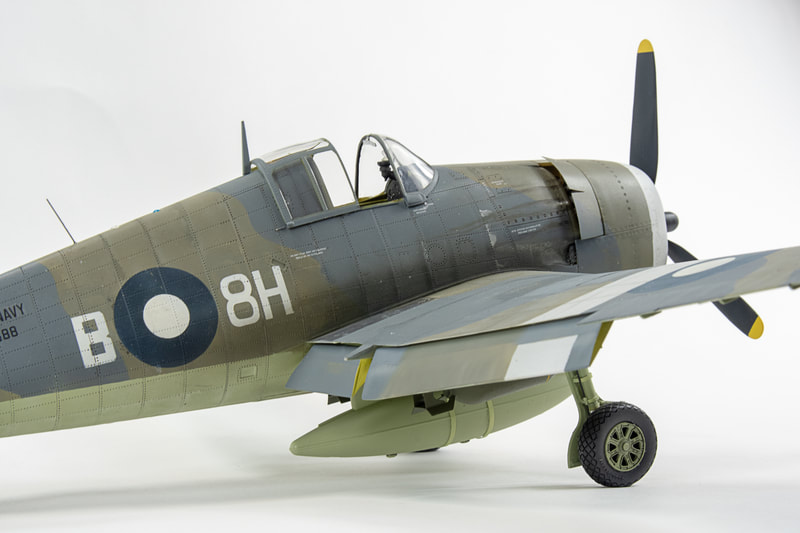
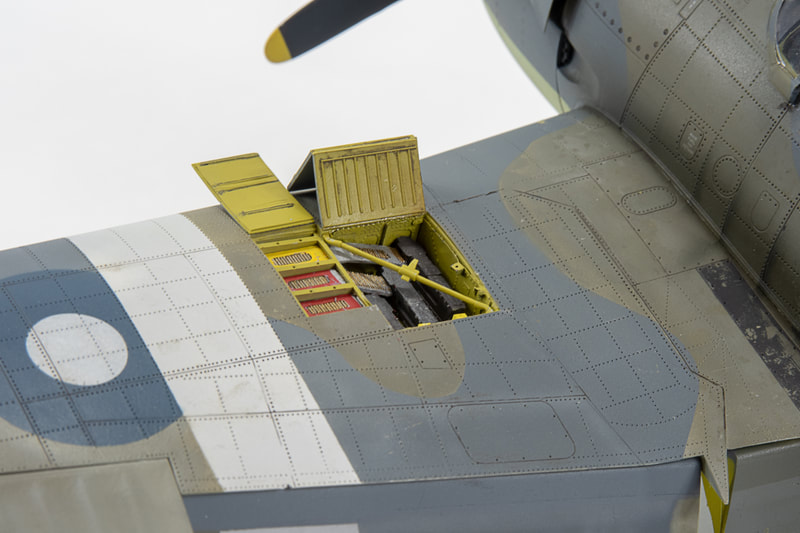
The completed wing sub assembly nestled in nicely to the fuselage, with again just a smear of Mr Surfacer. Eduard provide a PE panel that skins the panel adjacent to this seam so that you don not lose any detail through sanding. Painting the scheme was made easier by using LF Models camouflage mask but I’m jumping ahead! As my chosen aircraft was a Hellcat MkII, or F6F-5, and the kit represents a late -3, a few changes had to be made. The windscreen in particular needed some frames sanding off. The clarity was restored with various grades of micromesh, and Eduards canopy mask set for the trumpeter -5 used to save me masking some tricky curves. A rear view mirror was furnished from then plastic card and added to the interior of the screen. FAA Hellcats also had a round external mirror mounted to the top of the windscreen and this has still to be added to the completed model. The camouflage was started by first spraying the white areas before masking these off so the sky undersurfaces and dark slate grey, and extra dark sea grey uppers could be painted. Extracolour paints were used for this, the final model I will be using enamels on as I finally made the decision to abandon them in favour of acrylics and lacquers. For the roundels, a friend cut them from an upscaled and scanned aeromaster sheet for FAA Hellcats. This is the second time I have got a friend to cut masks for me, and I’m wondering whether I should just buy a cutter myself although the learning curve with the software scares me. Trumpeter also left the supporting straps off the drop tank although they have included the holes in the fuselage underside for them. I fashioned them from thein strips of plastic card glued to rod which then was pushed into the holes. Bombs were from the kit, although the tailfins were from the Eduard sheet. Stippled on Mr Surfacer represented the cast iron bodies before they were painted olive drab with a yellow ring denoting HE. Around this point my interest in the model started to wane. I had had to repaint the roundels a couple of times and touch up various parts of the airframe paintwork caused by clumsy handling and poor masking. The serials which were decals had also silvered.
The model was not reflecting the vision I had started with, and I was keen just to get it finished and off the bench. I decided to scrimp a lot of the weathering and shading I had planned instead opting for a simple wash and some oil streaks using AK Dark wash. This is something I really need to beat next year, so that I see each model through to completion with a consistent level of skill and patience. Roy Sutherland’s superb resin wheels were painted and glued to the previously assembled undercarriage legs, which had had wire brake lines added.
Finally exhaust streaks were added with highly thinned Tamiya NATO black, although I don’t think they are nearly pronounced enough before the whole model was hit with Testors Dullcote, and that signalled the end of 2018 for me modelling wise. Shame about those silvered decals, and Ive just noticed the prop is off centre too!
Grumman Hellcat MkII. 896 SQN. Royal Navy Fleet Air Arm. HMS Emperor 1945